Preparing to Back Up Your Files
- Using Personal Backup Scripts
- Sources and Destinations for Scripts
- Locking, Exporting, and Importing Scripts
- Personal Backup Script Options
- What Happens When You Click "Play"
Using Personal Backup Scripts
Regardless of whether you use Personal Backup for backups, synchronizations or bootable backups, you can tell the program what you want it to do by creating a script that you can then execute whenever you want. A script consists of two parts:
- Indication of the source of files to copy and their destination.
- Options that control such matters as when a backup will run, what happens before and after it runs, what to do with duplicate files, and so forth.
If you haven't created any scripts already in a previous version of Personal Backup, the first time you launch the program it displays a window with three default scripts, a backup, bootable backup, and a synchronization script, none of which have source, destination or options defined.
You can use one of these scripts, or you can delete them and create your own new scripts. To create a script, either choose File > New Script, or press Command-N.

Or, click the + button.

You'll see a window that offers a selection of a Backup, Bootable Backup, or Syncronization. (A description of each of these is in the About Backups section of this manual.)
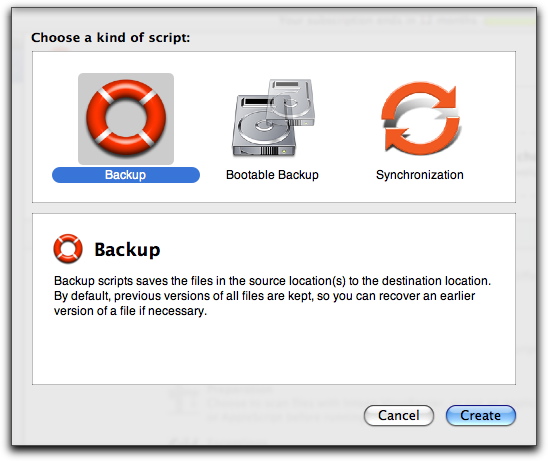
We've chosen Backup, which results in a new script named "untitled backup script."
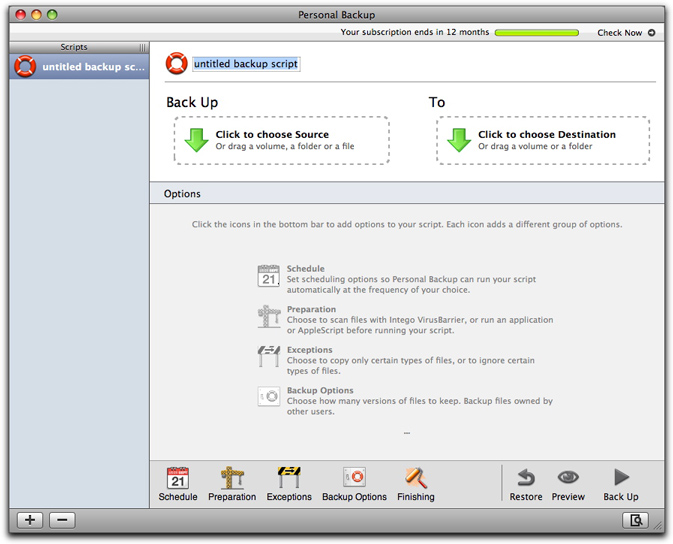
If you do the same thing again, you'll notice a second script underneath the first one, titled "untitled backup script 2".
Depending on your Mac's screen settings, you might not see the script's full name. But you can fix that if necessary. First, hover the cursor over the vertical dividing line between the list of scripts and the rest of the window, or over the tiny vertical lines next to the word Scripts at the top of the script list. You'll know it's in the right place when it turns into a thick vertical line with two small arrows on either side. Then, drag it to the right until you can see all your scripts' full names.

Let's say you want to delete that second script. The first way is to click it once and then click the - button; the second is to press the Control key while clicking the script's name until a menu appears, then choosing Remove. (Such "contextual menus" occur throughout Personal Backup.)
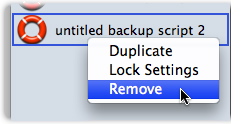
In either case, a dialog box will ask you to confirm your choice.

Now you have just one script called "untitled backup script." To change this name, highlight it where it appears at the top of the window and type in its new name.

Or, double-click its name in the left column, then type in its new name. Once you hit the tab, enter, or return key, the two locations will reflect the new name.

You can also change the icon that represents a script by clicking the current one at the top of the main window and selecting a new icon.

You set up synchronization and bootable backup scripts in exactly the same way as backup scripts, although with different default icons to help you differentiate them at a glance.

Once you've created a script, you might want to make another one almost exactly like it, with just a few small changes. To do this, press the Control key, click the script that you wish to copy, then select Duplicate.

A new script appears with the same name as the one you just duplicated, but with the word "copy" at the end. You can then change its name to whatever you like in the manner described above.
Sources and Destinations for Scripts
So now you have one or more scripts set up and named: the next step is to determine which files will be copied, and where they'll go. The process is similar for backups, bootable backups, and synchronizations; however, there are enough differences among them that we'll look at each separately.
As used here, a "source" is the location of files to be backed up, put into a bootable backup, or synchronized. A "destination" is where copies of the files will go.
Backups are the most flexible in terms of sources and destinations. You can define multiple backup sources, for example to duplicate the contents of several folders, or even several network volumes, to one destination. Backup sources don't have to be on computers running Mac OS X: in fact, they don't have to run any operating system at all. That means you can back up from an external disk, network volume, memory stick, iPod, or any other Mac OS X-readable medium in addition to computer drives. Further, you can back up to any Mac OS X-writable medium.
You can synchronize from any folder or volume to any folder or volume. But unlike with a backup, you can't synchronize individual files, or synchronize from multiple sources.
A bootable backup is the most specific type of action, as its source must be an entire disk or volume that contains a bootable copy of Mac OS X, and its destination must be a medium that can be booted. (Personal Backup does not create bootable backups on DVDs.)
Creating Sources and Destinations
Regardless of whether you're making a backup, bootable backup, or synchronization, you define sources and destinations through the top section of Personal Backup's window.

There are five ways of indicating sources and destinations:
- Dragging and dropping items from the Finder to their locations in Personal Backup.
- Clicking in the source or destination area of the window, finding an item you want to use, and clicking Select.
- Selecting menu options under the Script menu, Choose Source… or Choose Destination….
- Using command keys: press Option-Command-S to select a source, and Option-Command-D to select a destination (as is shown in the above menu).
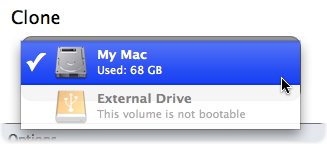
- Using popup menus that appear the source and destination areas of Personal Backup's main window. These only appear when creating bootable backups.

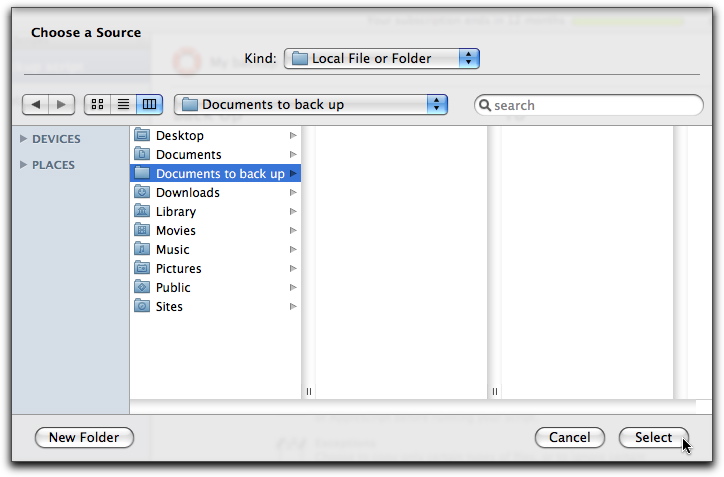

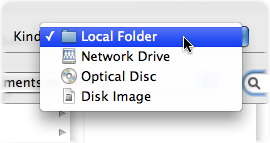
In addition to using folders and volumes as sources and destinations, Personal Backup offers other options. If you click on the Source or Destination areas, you'll see a window where you can choose a source or destination. By default, the Kind menu shows Local File or Folder. Click that menu, and you'll see the other options available. The sources available are the following:

And you can choose from the following destinations:
Network Drives
You can use a network drive as a source or destination; to do so, select it in the Kind menu. A dialog displays where you can enter information for your network drive:

First, enter an address. This can be a local address (such as iMac.local), which you can find in the Sharing pane of System Preferences on the Mac you want to mount; a Windows share (such as smb://servername); an FTP or SFTP server, identified by its address (ftp://example.com, or sftp://example.com); or a network volume on a remote computer, identified by its IP address. In each of these cases, you must enter a full address, including any volume and/or folder name. You can add any type of network volume that you can mount in the Finder: in fact, in most cases, the easiest way is to mount the volume in the Finder, then drag its icon onto the Address field in the above dialog.
If you check Connect automatically as, and enter a name and password, Personal Backup will not prompt you for this information when running its script. And if you check Wake computer if needed, Personal Backup will attempt to wake the computer containing the network volume. (Note: this does not work with all computers.)
You can click Test Settings to check to make sure your settings are correct.
Spotlight Searches
You can use a search from Spotlight, Mac OS X's search technology, as a source for your scripts. To do this, select Spotlight Search from the Kind menu: you'll see a sheet where you can set up a Spotlight search.
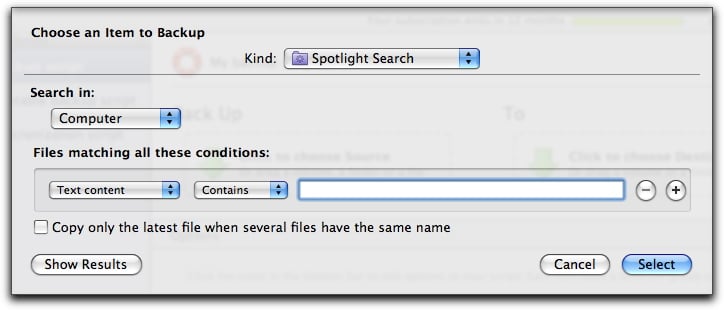
To create a search, first choose a location from the Search in menu. This can be Computer (your Mac), Home Folder (your home folder) or Other…. If you choose Other…, you can select any folder or volume you would like to search.
Next, choose criteria for your search. For example, you could choose Content Modified from the first menu, then After from the second menu, and enter a date in the text field. Or you could choose a specific type of file (Other > Kind > Contains > Word to find all Microsoft Word documents). For more on using Spotlight to create searches, see Mac OS X's help documentation.
Note that you can also drag a smart folder, which is a way of saving a Spotlight Search, from the Finder onto the Source section of the Personal Backup window to add that search as a source. If the smart folder is in the Finder sidebar, click the folder, then drag its "proxy" icon - the icon in the title bar of the window - onto the Source section of the Personal Backup window.
iDisks
If you have an Apple MobileMe account, Personal Backup allows you to choose an iDisk as either a source or destination. Using it as a source allows you to back up its contents on a local Mac; if you choose it as a destination, you can back up some of your files to your iDisk to have off-site backups easily. Note that iDisk storage space is limited, so you might not be able to back up all your files without purchasing additional space from Apple.
If you select iDisk from the Kind menu, Personal Backup mounts your iDisk (if it is not currently available in the Finder), and displays a sheet where you can select a subfolder for your source or destination:

If you wish to back up a folder, or use a folder as destination, click it and click Select. To choose your entire iDisk as a source, hold down the Command key and click on the selected folder to deselect it, then click Select.
Optical Discs
You can use an optical disc - a CD or DVD - as either a source or destination. To use an optical disk as a source, insert it into your Mac's drive, wait a moment for it to mount, then select it in the Choose a Source dialog. Alternately, drag it on the Source area of the Personal Backup window. To use one as a destination, select Optical Disc from the Kind menu of the Choose a Destination dialog. You'll see the following:
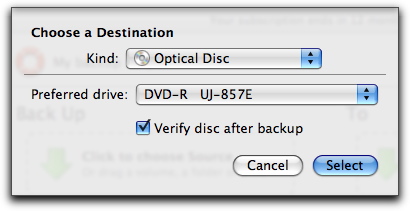
If your Mac has more than one optical drive, select it from the Preferred drive menu. If you want Personal Backup to verify the disc after running your backup script, leave the Verify disc after backup option checked. It's a good idea to do this; it only takes a few minutes, and ensures that your disc is readable. If you uncheck this option, you'll save time, but you may not have a working backup.
When you use an optical disc as a destination, you will have different Backup Options from other destinations. (See the Personal Backup Script Options section to learn more about such options.) The Mode menu of the Backup Options offers two choices:

You can only choose between Copy only changed files or Copy everything each time you run your backup. If you copy everything each time you run the backup, each backup disc (or set of discs) will contain all your files. If you need to restore any files, you can do so from any of your backup discs (or sets of discs).
If you choose to copy only changed files, you can make incremental backups, each new disc (or set of discs) containing only those files that have changed since the previous backup. In this case, Personal Backup will ask you to insert the last disc of your previous backup before copying files to new discs. (For example, if your backup spanned three DVDs, you will need to insert the third of these discs into your Mac.) This is done so Personal Backup can read information regarding the files that have already been backed up, so the program will know which files to copy.
Note: Personal Backup can create multi-session backups on CDs, but not on DVDs; this is because the Mac OS X framework for writing optical discs cannot write multiple sessions on DVDs. This allows you to use empty space on CDs for incremental backups. If you back up to CDs, and have only used half the capacity of a CD, Personal Backup will be able to use the remaining space for your next backup.
Disk Images
You can use a disk image as either a source or destination. To use a disk image as a source, mount it in the Finder and select it in the Choose a Source dialog, or drag the mounted disk image (not the .dmg file) on the Source area of the Personal Backup window. To use one as a destination, select Disk Image from the Kind menu of the Choose a Destination dialog. You'll see the following:
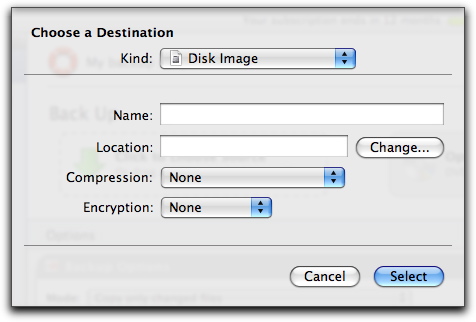
In this sheet, choose a name for your disk image, and select a location by clicking Change… or by dragging a folder or volume into the Location field. If you wish your disk image to be compressed, choose a form of compression, and if you want to encrypt your backup, choose from two levels of encryption.
When you run the script the first time, Personal Backup creates the disk image. Each subsequent time, Personal Backup mounts the existing disk image if it is in the same location. If you move it, though, Personal Backup will create a new disk image with the same name, so you should make sure to leave the .dmg file in the appropriate location.
Personal Backup doesn't ask you to choose a size for the disk image; Personal Backup determines the appropriate size. If you run a subsequent backup, Personal Backup enlarges the size of the disk image if necessary. You therefore don't need to worry about how big it is.
Changing Sources and Destinations
Once you've chosen a source or destination, you can change it by clicking it and selecting an option from the large popup menu that appears. Options vary depending on whether you're working on a backup, bootable backup, or synchronization.
Type of script |
Options |
Backup source
|
Edit the current choice by clicking the pencil icon, then selecting a new choice. Remove the current choice by clicking the - icon. Add an additional source by choosing Add Source… and selecting the desired source. |
Backup destination 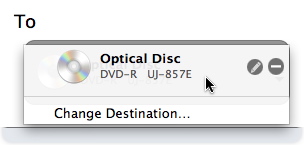
A single location - a folder, volume, or drive - on any Mac OS X-writable medium. |
Same as backup source, except that Change Destination… replaces Add Source…. This is the same as clicking the pencil icon. (You can only select one backup destination.) |
|
Synchronization source 
A single folder, volume, or drive, on any Mac OS X-writable medium. |
Same choices as backup source, above, except that Add Source… has become Change Source…; selecting it is the same as clicking the pencil icon. (You can only select one synchronization source.) |
|
Synchronization destination 
A single folder, volume, or drive, on any sort of Mac OS X-writable medium. |
Same choices as synchronization source, except that Change Source… has become Change Destination…. |
|
Bootable backup source 
|
Shows all volumes that contain a bootable copy of Mac OS X. |
|
Bootable backup destination 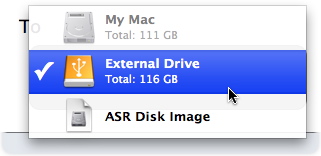
|
Shows all currently mounted volumes that are capable of containing Mac OS X, plus the option ASR Disk Image, which creates a single file that contains the full contents of the bootable backup's source. This file is portable, and can be used to produce multiple copies of the source disk, for example to standardize the contents of all Macs on a network. Obviously, a bootable backup's destination can't be the same as its source. If you attempt to make them the same, Personal Backup intelligently changes the previously chosen one so they're not the same. |
Locking, Exporting, and Importing Scripts
So far, we've considered Personal Backup from the point of view of lone Mac users who don't need to share or protect their backup scripts. But if you share your computer, you might want to protect your scripts from the itchy fingers of others. And if you know others who also have Personal Backup, you might want to share copies of your scripts with them so they can see what you did.
Personal Backup includes a very simple system that prevents accidental changes to your scripts. Since the scripts themselves aren't valuable information, the "lock" is more of a deterrent than a security measure: for example, no password is needed to unlock scripts. But it's an effective tool to prevent scripts' accidental deletion or changing.
To lock a script, either:
- Hold down the Control key while clicking the script in the script list, then select Lock Settings from the contextual menu that appears;
- Choose Script > Lock Settings;
- Or press Command-L.

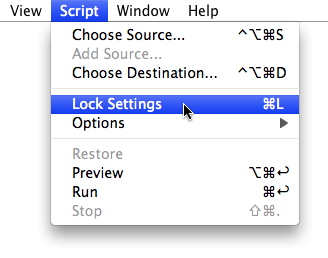
To unlock the script, either select Unlock Settings in the contextual menu, choose Script > Unlock Settings, or press Command-L again.
To export a script, click it in the script list, then either choose File > Export Script… or press Command-Shift-S. To import a script that's been exported, whether from your copy of Personal Backup or someone else's, either choose File > Import Script…, press Command-O, or double-click the script's icon in the Finder.
Exported scripts are plain-text XML files that store all the script's options, including the locations of sources and destinations. If you move the script to a Mac that doesn't have the source or destination in the same location, the script will open but not run.
Personal Backup Script Options
At this point you know how to set up Personal Backup scripts to create backups, bootable backups, and synchronizations; how to show which files should be backed up; how to protect those scripts; and how to transfer them among Macs where Personal Backup is installed. You can run any of these scripts by clicking the one you want in the left column and pressing the Play button in the lower-right corner (that is, the right-pointing triangle).
But Personal Backup gives you much, much more control over operations than you've seen so far, through Script Options.
Virtually all of Personal Backup's custom options - such as when a script runs, what happens before and after it runs, what it does when it encounters duplicate files, and so forth - are set in the script's options, which appear as a row of five buttons at the bottom of Personal Backup's window. They are:

- Schedule. You can make a script run periodically, wake up your Mac (if it's asleep), or run even if you're not logged in. Schedules can have several parts, so for example you could direct Personal Backup to run a backup every Monday and Wednesday at 5pm, then again on the first of every month.
- Preparation. You can set Personal Backup to run another program before starting its script. Most commonly, the program will be Intego VirusBarrier X6, to identify dangerous files before copying them (and possibly infecting other files or computers). However, you can also direct Personal Backup to run any program, including a custom AppleScript that, in turn, runs several other programs.
- Exceptions. Personal Backup has selectors that give you wide-ranging control over which files are copied. You can choose to back up (or not back up) files based on their visibility, name, kind, path, size, date created, date modified, label, or any combination of these criteria.
- Options. Each of the three script types - backup, bootable backup, and synchronization - offers a set of choices specific to that script. These involve the number of backups to keep; whether to copy aliases or the files to which they point; what to do when a file has been changed on both the source and the destination disk; and so forth.
- Finishing. Like the Preparation option, Finishing lets you direct Personal Backup to run a program (or AppleScript) after the script is finished. It also lets you choose whether to unmount the destination disk, quit the program, run another Personal Backup script, put Mac OS X to sleep, or shut down your Mac entirely.
You can view each of these five sets of options in any of three ways: by clicking its button, by choosing its menu item, or by pressing its command-key combination. Each set of options shows up in its own section of the Options part of Personal Backup's main window. But you don't need to specify any of these options: if you don't, the script will simply run using Personal Backup's default options.
There are three ways to remove a set of options from the Options section of the window, and therefore use the default options:
- Click the small X in the upper-right corner of that section of the Options window;
- Press the same command-key combination that causes the option to appear; or
- Select the same menu item that causes the option to appear.

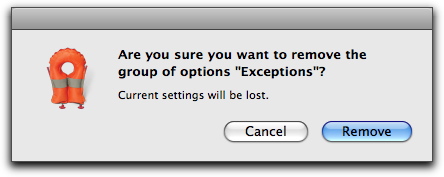
In any case, a dialog box will ask you to confirm your choice.
Schedules
You can run a Personal Backup script at any time by pressing the Play button in the main window's bottom-right corner. But much of the convenience of backup and synchronization operations is in setting them to run periodically, without your intervention or attention. For example, you might want a backup script to run automatically whenever you plug in an external hard drive, or synchronize two computers whenever they're on the same network together. Schedules make this possible.
To access Personal Backup's Schedule options, either:
- Choose Script > Options > Schedule
- Press Command-1
- Click the Schedule button at the bottom of Personal Backup's main window.

The Schedule options display.

The Run script section lets you direct Personal Backup to run the selected script periodically. To do so, click the checkbox labeled Run script. Then, select how often you want the script to run by selecting a period from the popup menu. The choices are:
- Every Day: Select the time of day.
- Every Week: Select the day of the week, and the time on that day.
- Every Month: Select the day of the month, and the time on that day.
- Every ____: Select the number of periods and the length of the period (minutes, hours, days, weeks, months). For example, you could make the script run every 20 minutes, or every three months.
You can set up complex schedules by clicking the + button to add more lines to the Run script section. For example, here we've set a script to run every week on Monday and Friday at 11pm, then on the first day of every month at 1am.

To remove any criterion, click the - button to its right; to disable all schedules in this script (without deleting them), uncheck the Run script checkbox
The other three controls in this section are:
- Wake up computer if necessary allows you to put your Mac in its power-saving "sleep" mode, yet still be confident that Personal Backup will perform its scheduled script. Once the script is completed, the computer will remain on, unless you also turn on an option in the Finishing section to put the computer back to sleep when done. (To learn how to do this, see Finishing: Postprocessing Files, below.) Note that this option will not turn on your computer if it's fully turned off, rather than merely asleep.
- Run this script even if you're not logged in allows the script to execute even if no-one, or another person, is logged on at the time it's set to run.
- Run script when volume ____ is ready automatically starts the script when the specified volume is visible to your Mac - for example, whenever you connect to a network, or turn on or plug in an external hard drive. Except for your Mac's startup drive, all volumes that are given as sources or destinations for this script are available in the popup menu; if both the sources and destination are on your Mac's startup drive, this option will not be available.
Preparation: Preprocessing Files
To access Personal Backup's Preparation options, either:
- Choose Script > Options > Preparation,
- Press Command-2, or,
- Click the Preparation button at the bottom of Personal Backup's main window.

This option lets you run a program before Personal Backup makes its copies. Because a virus checker is what Mac users most often want to run before backing up or synchronizing, the first checkbox is dedicated to Intego VirusBarrier. Personal Backup will work with either VirusBarrier X5 or VirusBarrier X6 to scan your files.
The second checkbox lets you direct the script to run any application first. That program could be a Mac application with a graphical interface, an AppleScript, a shell script, an Automator workflow, or even a sound file that you want to play when the script begins. When you check this box, you'll see a dialogue box asking you to select the program to be run; to change it later, click the Choose… button.

Exceptions
To access Personal Backup's Exceptions options, either:
- Choose Script > Options > Exceptions,
- Press Command-3, or,
- Click the Exceptions button at the bottom of Personal Backup's main window.


The first two popup menus let you specify whether you want to copy - or not copy - items matching any of the conditions you give, or all of them. For example, changing this selection could make the difference between copying only files with "cache" in their names, none of them, or those files together with others.
The next section lets you specify the type of information that you want the filter to find. The choices are: Visibility, Name, Kind, Path, Size, Created (i.e., the date the file was "born"), Last Modified, and Label. After choosing one of these, you'll have the opportunity to specify filter details.
As in the Schedule section, clicking the + button at the right of the window adds an additional condition, while clicking the - button next to a condition removes it from the list. You can also modify filter conditions by simply changing their popup menu options or typing new data into the data fields.
In the example below, files will only be copied if they:
- Are Microsoft Office files (such as Word documents), or
- Are in a certain folder named "Documents to back up", or
- Have the name "Finances".

Options Overview
Regardless of whether you're running a backup, bootable backup, or synchronization, you access the script's options in the same ways. (Available selections change depending on which type of script you've clicked in the script list in the left column.)
|
Script type |
Ways to access the script's options |
|
Backup 
|
Choose Script > Options > Backup Options, Press Command-4, Click the Backup Options button at the bottom of Personal Backup's main window. |
|
Bootable backup 
|
Choose Script > Options > Bootable Backup Options, Press Command-5, Click the Bootable Backup Options button at the bottom of Personal Backup's main window. |
|
Synchronization 
|
Choose Script > Options > Synchronization Options, Press Command-6, Click the Synchronization Options button at the bottom of Personal Backup's main window. |
We'll look at each of these individually.
Backup Options
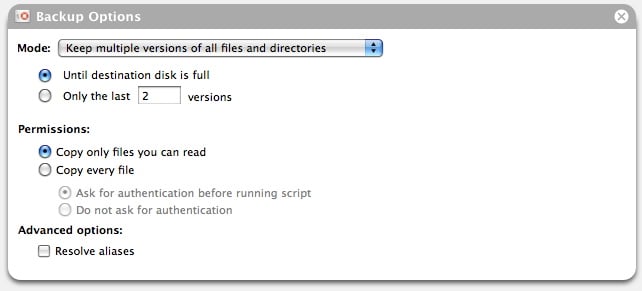
Mode: This section defines how many versions of copied files you wish to keep. (The Backup Decisions section of this manual will help you decide the best strategy for you.) By default, Personal Backup saves all old versions of your files until your backup disk is full, after which it deletes the oldest backups in order to have enough space for new ones. However, you can choose to save only a specific number of old versions.
The other option in the Mode popup menu is Keep the latest version of each file only. Selecting that reveals three different options.

- Remove files deleted from source ensures that your backup doesn't contain copies of any files that you have removed from the source location. In this case, your backup precisely reflects the current contents of your source.
- Overwrite destination files, even if they are more recent than in source makes the backup truly one-way: it assumes the source contains the definitive versions of files that you want to keep, no matter what. This could be useful if (for example) you use files at the backup location for testing purposes while those at the source location are used for "real" business.
- Back up to root level of destination when only one source is defined produces a "mirror" of the source that could be less complicated than other backup schemes.
The Permissions section asks whether you want Personal Backup to copy only those files that you have permission to read, or whether it should use administrator authority to copy all files. If you choose the latter, you're given the choice of either entering an administrator's password just before the script runs (Ask for authentication before running script) or ahead of time (Do not ask for authentication).
To copy all files, you must enter a user name and password belonging to someone with administrator-level permissions. To determine who that is on your Mac, choose System Preferences… from the Apple menu, and open the Accounts preference pane by clicking its icon: users with such power will have "Admin" under their names.
The Advanced options section contains a single checkbox, Resolve aliases. If you leave this unchecked, each alias file will be copied to the destination location without any changes; check it, and the file to which the alias points will be copied instead.
Bootable Backup Options
Bootable backups have four options.

- Do not ask for an administrator password makes Personal Backup ask for the administrator password when you define the script, saving you from having to enter it later. If you leave it unchecked, you'll have to enter the password just before the script runs.
- Never remove anything in destination: if you leave this unchecked, Personal Backup will make a perfect clone of the source volume, erasing everything on the destination in the process. By checking it, you're saying that you want a perfect clone of the source to be created on the destination volume in addition to content that's already there. Note that checking this box could cause trouble with your bootable backup. If you simply want to keep a folder from being deleted, you can add it as an exception.
- Repair permissions on _______ examines the permissions on system files. Personal Backup will attempt to fix any errors it finds.
- Repair _______ examines the destination volume after running the bootable backup to make sure that it's in good shape. Personal Backup will attempt to fix problems it finds, such as directory errors.
Note: when running a bootable backup, you don't need to back up your startup volume to a hard disk the same size as the original. For example, you may have a Mac with a 250 GB hard disk, but only 80 GB of its space is used. In this case, you could create a bootable backup on, say, a 120 GB hard disk, and still have room for that backup to grow. You do need to have several GB of free space on the destination, however, or you may not be able to use the backup to start up your Mac in case of problems. (Your Mac uses invisible virtual memory files that can take up several GB of space.)
Synchronization Options
A synchronization coordinates the files contained in two folders or volumes so they both have the same versions of all files. The question arises when the same file has been changed on both the source and destination volumes: which one should be copied? The first popup in the synchronization options window lets you decide.

The first option, Ask, displays a window whenever it encounters a file that's been changed in both places.

On the left you see details about the document in its source location; on the right, the same document in its destination. In the bottom right of each section is a small magnifying glass icon: clicking it shows the file in Quick Look. You can show the file in the Finder by pressing the Option key when you click the magnifying glass.
You have two options for this file: either make the version on the source location the "official" one that gets copied, or copy the version that was changed most recently, then click the Continue button. Or, you could choose to ignore all such conflicts by checking Resolve other conflicts then choosing one of the elements in the popup menu. If you want to resolve the conflicts later, click the Resolve All Later button. If you make no choice within 60 seconds, Personal Backup will act as though you clicked the Resolve All Later button.
The popup menu labeled When files have changed on both sides since last sync also has selections to make Personal Backup act consistently whenever it runs into such synchronization conflicts. Besides Ask, its other four options are Copy from Source, Copy from Destination, Copy newest, and Copy oldest.
Whatever you choose, Personal Backup will erase previous versions so that only one version will remain on both the source and destination volumes. However, you can override this behavior and save all previous versions by checking the Never delete anything checkbox.
The Permissions section asks whether you want Personal Backup to copy only those files that you have permission to read, or whether it should use administrator authority to copy all files. If you choose the latter, you're given the choice of either entering an administrator's password just before the script runs (Ask for authentication before running script) or ahead of time (Do not ask for authentication).
To copy all files, you must enter a user name and password belonging to someone with administrator-level permissions. To determine who that is on your Mac, choose System Preferences… from the Apple menu, and open the Accounts preference pane by clicking its icon: users with such power will have "Admin" under their names.
Finishing: Postprocessing Files
To access Personal Backup's Finishing options, either:
- Choose Script > Options > Finishing
- Press Command-7
- Click the Finishing button at the bottom of Personal Backup's main window.

The first Finishing option is similar to one you read about in the Preparation section: it lets you run another program once the script has finished. As before, this program can be any application, AppleScript, shell script, Automator workflow, or sound file that you want to play when the script completes. When you check this box, you'll see a dialogue box asking you to select the program to be run; to change it later, click the Choose… button.

The next option, which is checked by default, directs Personal Backup to unmount the destination volume when the script is complete. Here a popup menu gives you two options: either unmount the volume only if it was mounted by Personal Backup (a network volume, for example), or always.
The last option allows you to tell Personal Backup to quit, put your Mac to sleep, shut your Mac down, or run another script. If you select Run script, you'll see another popup menu, listing all available scripts. In this way you could have Personal Backup perform a series of scripts, one after the other, and finally shut down.
What Happens When You Click "Play"
At this point everything's set: you've chosen which files to copy, what Personal Backup will do with those files, how it will handle exceptions, and what it will do before and after the script is complete. Now it's time for action!
To run a script, click it in the left column, then click the right-pointing triangle in the lower-right corner (called the Play button, as it resembles that button on a DVD player.) The label on this button will vary, depending on whether you're performing a backup, bootable backup, or synchronization.
For the most part, Personal Backup will run without your intervention: once a script's scheduled time arrives, or you press the Play button, the program does exactly what you directed, every time. However, there is one notable exception: if you're making a backup to removable media such as DVDs, you may have to watch the process and insert new media as needed.
Personal Backup provides ways to inspect a backup or synchronization before, during, and after it has run. The Preview button shows you exactly which files will be copied; you can see how the process is humming along in three different ways by clicking the Summary, Chart, and Details buttons; and the Log keeps a record of past scripts, both successful and failed.
A backup is useless without a way to recover lost files. Personal Backup's Restore function lets you choose not only which files to return to their original places, but which versions of those files to keep. (See Backing Up and Restoring Files for more on restoring files.) Of course, since it stores files in their native format, you can also just drag them from one folder to another in Mac OS X.
Preview
So now you've set up your backup or synchronization script. But what, exactly, will happen? How many files will be copied? In which direction? What if you want to make a temporary exception? With its Preview function, Personal Backup answers all these questions.
Click your script in the script list, then click the Preview button at the bottom right of Personal Backup's main window.

Alternately, you can enter Preview mode by choosing Script > Preview, or pressing Command-Option-Return.
The bottom part of the window will look something like this:
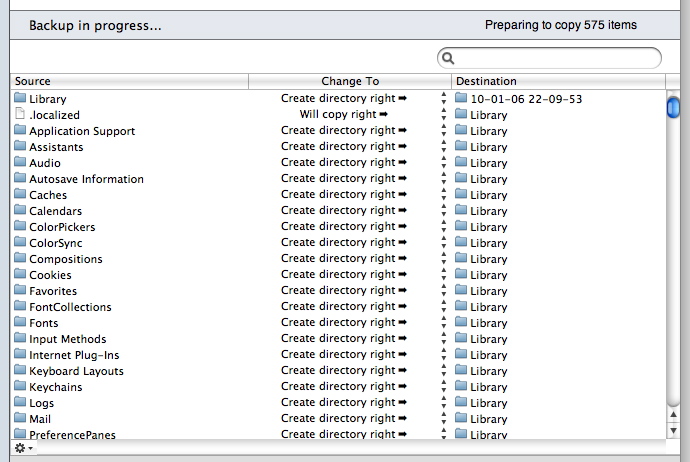
The left column shows the name of the file or folder to be copied; the center column shows what will happen to it; and the third column shows where the item will end up in the destination location. Note that even invisible files appear in this list, so you'll see some (such as .localized in the above example) that don't appear in the Finder.
Want to see more information? Clicking the gear icon in the window's bottom-left corner lets you display two additional columns of information for each item in the list: its modification date, and creation date. Further, selecting Complete Path shows not only the name of the source file, but where it is on the source volume. A checkmark appears next to those that are showing: to hide them, simply select them from the gear menu again.

Here's the same window, with all information visible.

Depending on which options you selected, your Mac's screen might be too small to see everything. You can change the width of columns to better see those that are most important to you. To do so, hover your cursor over the line to the right of the column head you want to expand or contract until it turns into a "double-arrow" cursor. Here, we're about to expand the Source column:

Here it is, fully expanded so you can see each file's complete path.

Double-clicking any portion of the file path reveals the file in the Finder.
What if you see an item that you don't want copied? Of course you could create a rule in the Exceptions (see Exceptions in the Personal Backup Script Options) section), but Personal Backup gives you a much faster way to make individual exceptions: simply click the action for that item in the Change To column: you'll see a popup menu, from which you can choose to disable that item from being copied.

Once you've confirmed that the backup or synchronization script will go as you like, you can run it by pressing the Play button, or go back to the main window by clicking the Edit Mode button in the window's lower-right corner.

