Using Remote Management Console 2
- Server Information
- Working with Workstation Lists
- Working with Policies
- Working with Tasks
- Working with Reports
- Updating Client Computers
- Viewing Logs
Server Information
When you have completed the Remote Management Console 2 setup procedure, the Remote Management Console 2 application will open and your server will be visible in the sidebar. Five tabs display information about that server, or allow you to view logs, run tasks or create reports.

Overview
This displays the name and address of your server, its version number, and its serial number. You can generate a client package if you haven't already done so with the Remote Management Console 2 Assistant, or if you add workstations after initial setup.
Accounts
This is a list of user accounts set up to work with your Remote Management Console 2 server. When you configured Remote Management Console, you created a first administrator's account. You can add, remove or edit accounts by clicking the buttons below the accounts list.
Remote Management Console offers two types of accounts: Administrators and Observers. Administrators can make changes to settings, workstation lists and all other items related to managing Intego software. Observers can only view settings, lists, logs, etc. When you create an account, check Allow user to edit settings if you want them to be an administrator.
Logs
This tab displays logs of server activity. You can choose to display all entries or just errors. You can also choose when you want to remove logs, or do so manually.
Tasks
This shows a list of all tasks you have run using your server. You can run a new task by clicking the + button. For more on tasks see Working with Tasks.
Reports
This tab lets you create and view reports for the Macs managed by your server. For more on reports see Working with Reports.
Working with Workstation Lists
Click the disclosure triangle next to your server to see lists related to that server.
The All Workstations list contains all Macs that you have set up with a Remote Management Console 2 client package for that server. When you first install that package, however, computers will be in the Approval List. Click that list, then select the computers you wish to approve and click Approve. They will be added to the All Workstations list.
Creating Lists and Smartlists
Remote Management Console 2 lets you create two types of lists to organize the Macs that you administer. You can create lists and smartlists. The former are static lists to which you add workstations manually, and the latter populate themselves based on criteria you choose. (These lists work like playlists and smart playlists in iTunes.)
To create a list, click the + button below the sidebar and choose New List…. Enter a name for the list, and add any workstations you want to it by dragging them from the All Workstations list; you can access individual workstations from the Workstations tab.
To create a smartlist, click the + button below the sidebar and choose New Smart List…. Enter a name for the smartlist, then choose among the criteria available.

In the example above, the smartlist will find any Macs whose model names contain "MacBook," therefore finding all of the laptops being managed. Other criteria are available, such as name, system version, client version and more. Criteria can be combined by clicking the + button at the right of the Rules: section. An example smartlist displays in Remote Management Console 2 when you launch the program: it contains all computers that have not been connected in the past 24 hours.
Creating Groups
In addition to the two types of lists above, you can also create groups. A group is presented as a folder, and can contain lists, smartlists and/or other groups. To create a group, click the + button below the sidebar and choose New Group…. Name the group, then add lists and smartlists to it as you desire by dragging them onto the group's folder icon.
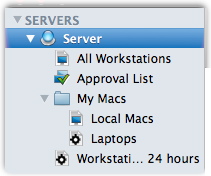
Viewing Lists and Groups
When you select a list or group, you'll see the information about the Macs in that list or group. You see Information about the selected item, such as its name, the policies used on the workstations it contains and the number of workstations. Below this, in the Software Versions section, is a list of the Intego programs and software components installed on the workstations in the selected item. This shows version numbers and the latest filter updates installed. There is also activity information for ContentBarrier and/or VirusBarrier, depending on which of these programs are installed.
The toolbar contains four tabs that provide information and access to those workstations, plus additional tabs for the Intego software you have installed on them.

- Overview
- Workstations
- Tasks
- Reports
- ContentBarrier
- NetUpdate
- VirusBarrier
Overview
This tab gives you an overview of the Macs in your list or group. It shows the name of the list or group, the number of workstations it contains, the policy or policies in effect, and shows some information for ContentBarrier (user statistics) and/or VirusBarrier (recent suspicious activity) if these programs are installed. Even if only one Mac in a list or group has a specific program, the section for that program will display.
Note that while Remote Management Console allows you to manage settings for VirusBarrier X6, ContentBarrier and NetUpdate, other Intego software will display in the Software Versions section of this pane if they are installed on client computers that you manage. This is because NetUpdate can be used to update those programs and/or their filters.
Workstations
This is a list of the Macs in the list or group. It shows the name, model, policy applied, system version, client version, last connection, and IPv4 and IPv6 addresses for each Mac. (Right-click on the column headers to choose to show or hide specific columns.) If you double-click a workstation, you can access information about that workstation. You can also change settings for that workstation's version of ContentBarrier and/or VirusBarrier from those programs' tabs.
Tasks
This tab shows tasks that have been applied to the Macs in the list or group. For more on tasks see Working with Tasks.
Reports
This tab lets you create and view reports for the Macs in the list or group. For more on reports see Working with Reports.
ContentBarrier or VirusBarrier
These tabs let you see logs for ContentBarrier or VirusBarrier. Combined logs display for all the workstations in the list or group.
NetUpdate
If you click the NetUpdate icon, you can access a list of Software Versions installed on the workstations in the selected item, or view a log of Installed Updates. From the Software Versions tab you can apply updates to individual programs. Click on a program, then, if updates are available, click Update… and follow the instructions.
Working with Policies
Remote Management Console 2 lets you create and apply policies to the Intego software (ContentBarrier, VirusBarrier and/or NetUpdate) on the Macs you manage. You can create as many policies as you want, and apply them to lists of Macs, groups, or even to individual computers.
Creating Policies
To create a new policy, click the + button below the sidebar and choose New Policy…. The new policy will display as an entry in the sidebar in the POLICIES section. Enter a name for the policy, then make changes to the settings of ContentBarrier, VirusBarrier and/or NetUpdate and click Save. When you click either the ContentBarrier, VirusBarrier or NetUpdate icon in the Remote Management Console 2 toolbar you'll have access to all of the settings of the selected program. While the actual display of the settings is slightly different from that of the individual programs, you can access all such settings. For more information on these individual settings, see the user manuals for the versions of the programs you are using on this web page.
Applying Policies
When you create policies, there are two ways to apply them. If you click on the name of a policy in the sidebar, then click on Apply to… at the bottom of the window, the following dialog displays:
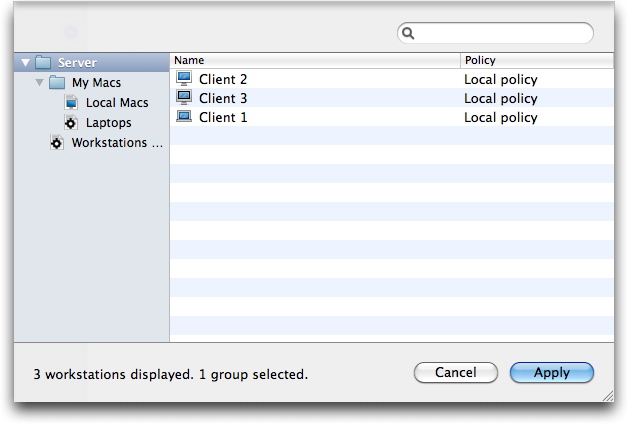
Select your server to see all the Macs it manages, or select a list or group to narrow down the list. You can also type part of a computer's name in the search field to narrow down the list. Click Apply to apply the policy to the selected computer.
You can also apply policies by selecting your server, a list or a group, then clicking the Overview button in the Remote Management Console 2 toolbar. In the Information section at the top of the window you'll see which policy is currently applied.

Click Change… to change the policy. The following dialog displays:
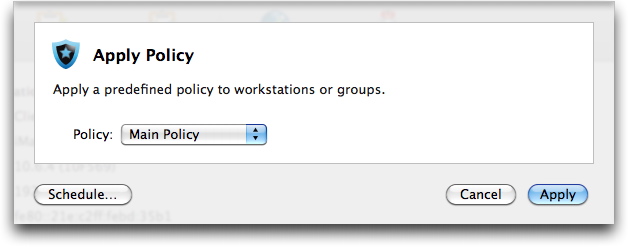
Choose a policy from the Policy pop-up menu, then click Apply.
If you wish to schedule policy changes, you can do so by clicking the Schedule… button. When you schedule a policy, it will be applied at the time you select, and you can choose to repeat it at regular intervals of minutes, hours, days, weeks or months.
If you apply policies to computers that are not currently accessible, the change in policy will be made the next time they are on line.
Working with Tasks
Remote Management Console 2 lets you run several types of tasks on managed computers. You can apply policies, generate reports or run malware scans with VirusBarrier. You can run tasks by selecting a server, list or group, then clicking the Tasks tab in the toolbar.
When you view the Tasks pane, you will first see a list of tasks. You can delete any of these by selecting them and clicking the - button below the Tasks list. You can select multiple items and delete them as well.

To perform a new task, select an item - your server, a list or a group - then click the + button below the Tasks list. The following dialog displays:
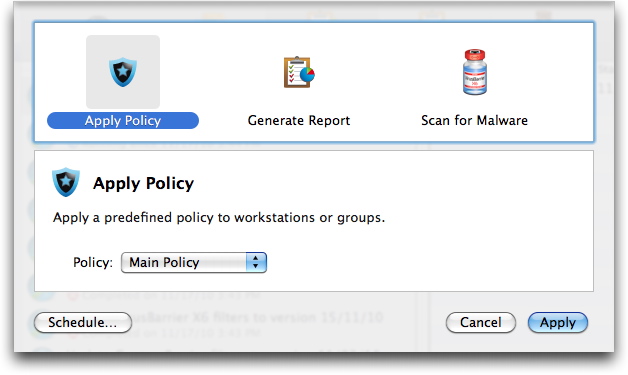
Click on the type of task you wish to run. The options for each task are different.
Applying Policies via Tasks
To apply a policy via Tasks, select the policy from the Policy pop-up menu, then click Apply.
If you wish to schedule policy changes, you can do so by clicking the Schedule… button. When you schedule a policy, it will be applied at the time you select, and you can choose to repeat it at regular intervals of minutes, hours, days, weeks or months.
If you apply policies to computers that are not currently accessible, the change in policy will be made the next time they are on line.
Generating Reports via Tasks
To generate a report via Tasks, click the Reports icon in the Tasks window. The following dialog displays:
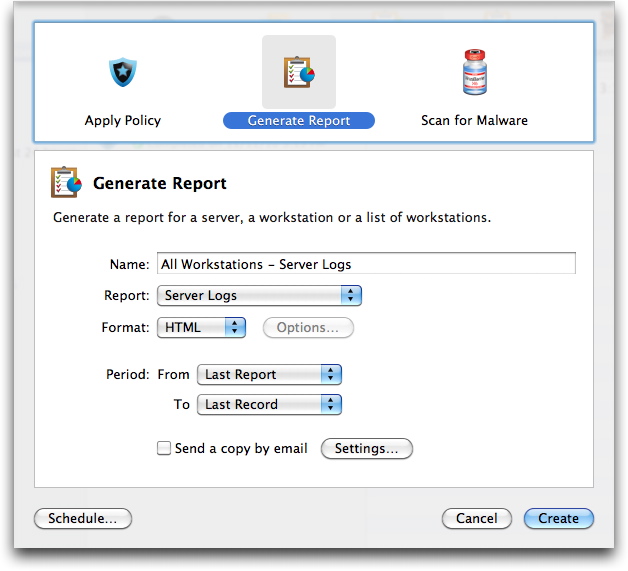
The report will be created for the item you have selected. You can choose from a number of options. See Working with Reports for more on reports and their options.
If you wish to schedule report generation, you can do so by clicking the Schedule… button. When you schedule a report, it will be generated at the time you select, and you can choose to repeat it at regular intervals of minutes, hours, days, weeks or months.
Running Malware Scans via Tasks
To run a malware scan with VirusBarrier via Tasks, click the Scan for Malware icon in the Tasks window. The following dialog displays:

Chose the locations you wish to scan: a number of standard locations are available in the list, but you can add others by clicking the + button and entering a path in the Additional Paths list that displays. You can optionally choose to repair infected files during this scan.
If you wish to schedule malware scans, you can do so by clicking the Schedule… button. When you schedule a malware scan, it will be run at the time you select, and you can choose to repeat it at regular intervals of minutes, hours, days, weeks or months.
Working with Reports
Remote Management Console 2 lets you generate reports for individual computers, lists or groups of computers. You can view these reports in Remote Management Console, or you can export them to save them and view them in other programs.
To create a report, select a list, group or individual computer, then click the Reports icon in the Remote Management Console 2 toolbar. Click the + button and the following dialog displays:

Here are your options:
- Name: the name field is populated with the name of your selection - the list, group or computer. You can change this name if you wish.
- Report: choose the type of report you wish to create. You can choose from Server Logs, ContentBarrier, VirusBarrier X6 Malware, and VirusBarrier X6 Network.
- Format: choose HTML or PDF. If you choose the latter, you can click the Options… button to adjust the page setup for the resulting PDF file.
- Period: choose from several options available from the pop-up menus.
- Send a copy by e-mail: If you check this, the report will be e-mailed to one or more addresses. Click the Settings… button to choose e-mail settings.
When you have chosen how you wish the report to be generated, click Create to have Remote Management Console 2 create the report. If you wish to schedule report generation, you can do so by clicking the Schedule… button. When you schedule a report, it will be generated at the time you select, and you can choose to repeat it at regular intervals of minutes, hours, days, weeks or months.
Updating Client Computers
Intego software provides subscription-based updates to filters to ensure up-to-date protection from malware, for VirusBarrier, and updated content filter keywords and URLs, for ContentBarrier. Intego NetUpdate is used to provide these filter updates, as well as updates to the programs themselves. NetUpdate is installed on all client computers to ensure updates, and Remote Management Console 2 lets you use a NetUpdate Proxy, which offers centralized updating for all the Macs you manage. Rather than have each client Mac connect to the Internet to download updates, you download a single update and store it on your server, and client computers obtain the update from that location.
To use a NetUpdate Proxy, you have to add one to Remote Management Console. Click the + button below the Remote Management Console 2 sidebar and choose Add NetUpdate Proxy… The NetUpdate Proxy Setup Assistant displays.
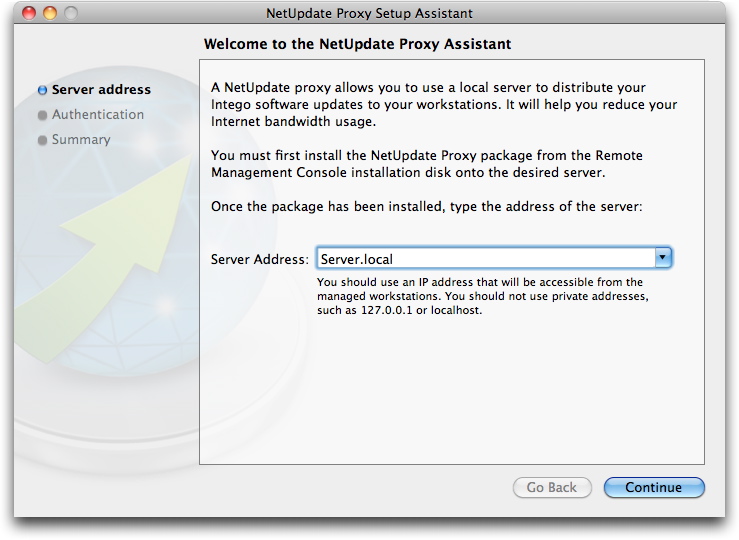
In the first screen, shown above, enter the server name. You can click the triangle at the right of the field to see a list of available NetUpdate proxies. Click Continue to go to the next screen.
Set up your NetUpdate Proxy account by entering a user name and password, then click Continue. Complete the setup by clicking Close on the summary screen.
When this has finished, you'll see your NetUpdate proxy in the NETUPDATE PROXIES section of the Remote Management Console sidebar. If you select it, you'll see information about that NetUpdate proxy.
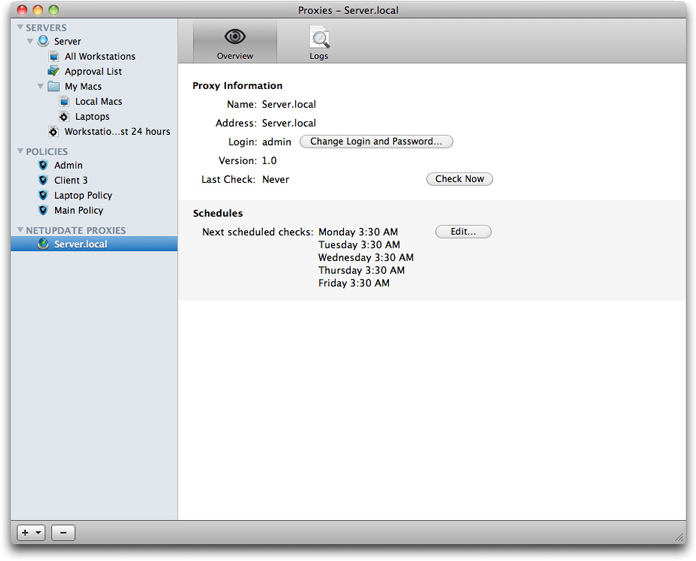
This pane shows you the name and address of your server, and the account that is being used. You can change the login and password for that account if you wish. It also shows the last time the server checked with Intego's NetUpdate server for updates. You can check manually by clicking Check Now.
In the Schedules section you'll see when the NetUpdate proxy is scheduled to check for updates. By default, updates are set to run once a day at a certain time. You can click the Edit… button and make changes in the dialog that displays: you can change the time, by double-clicking a time, or choose which days you want to check for updates, by checking or unchecking them.
To set your workstations to use the NetUpdate proxy to check for updates, click on one of your policies in the Remote Management Console sidebar, then click on the NetUpdate icon in the toolbar. In the Sources section of this screen, choose Check for updates on: NetUpdate Proxy Server, then check the server you want to use. (You can set up more than one NetUpdate proxy server.)

For a NetUpdate proxy to function, the computer in which it is installed must be able to accept connections through port 8089 TCP.
Viewing Logs
Remote Management Console 2 offers logs for both servers and NetUpdate proxies. Click one of these items, then click the Logs icon in the toolbar to see these logs.
Server logs show activity related to the server: connections and disconnections of workstations, connections by administrators, any refused connections, and any errors that occur. You can choose when to remove log entries, or you can remove all entries manually.
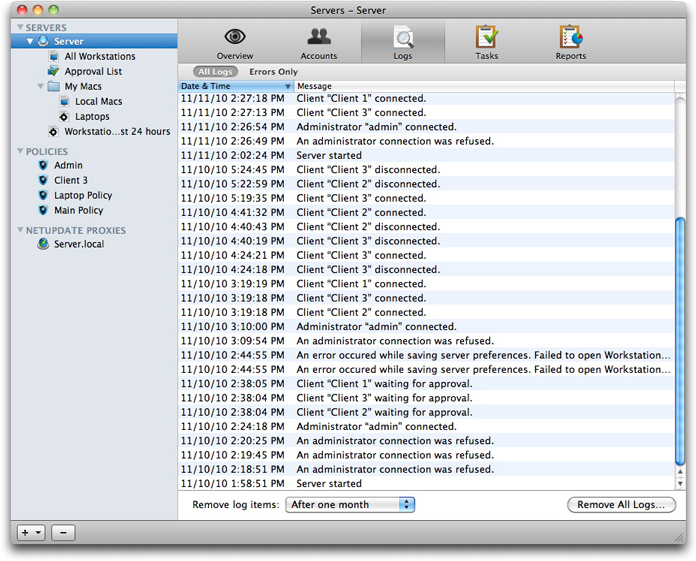
NetUpdate proxy logs show server activity, connections by workstations, and any errors that occur.