Backup Express Preferences
Backup Express Preferences
Log Preferences
Backup Express offers several options for customizing how you view logs and schedule scripts. To access the program's preferences, either choose Backup Express > Preferences…, or press Command-comma. A window will appear, showing the preferences.

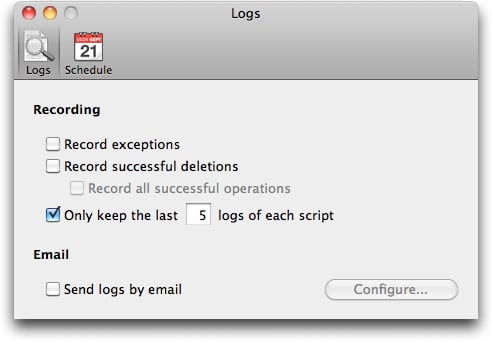
In the Logs preferences, the Recording section lets you show more - or less - information in the log window. The first option, Record exceptions, keeps track of the selection criteria you made in the Exception options when you set up the script. (See the Exceptions section under Backup Express Script Options.) The second option, Record successful deletions, keeps track of files that a script deleted from either the source or destination. The third option, Record all successful operations, augments the second option by tracking not only deletions, but everything a script does, such as copying a file or creating a folder.
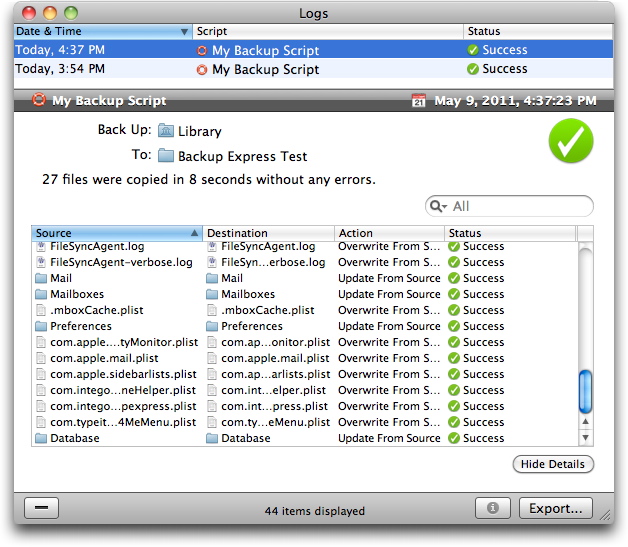
If any of these first three checkboxes is selected, a new Show Details button appears in the log window. Clicking it displays as many details as you specified in the preferences; clicking it again hides these details.

The last option, Only keep the last ___ logs of each script, allows you to keep the log window more manageable by not saving irrelevantly old information. (By default, Backup Express retains only the last five logs of each script.)
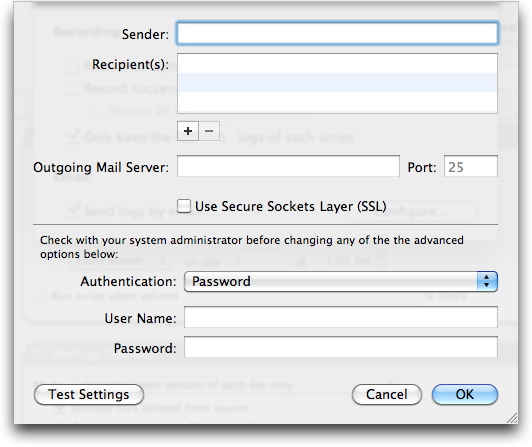
You can also have Backup Express send copies of the log to recipients of your choosing after a script completes. To do so, check the Send logs by e-mail box, then click the Configure… button. In the window that appears, fill in details of the message's origination and destinations, plus details needed by your mail server to send the message. (For specifics, contact your e-mail administrator.) You can test your e-mail setting to ensure that mail will actually be sent using the configuration you gave by clicking the Test Settings button. You may have to wait as much as a minute for the results, which will appear in a dialog box.

To add recipients, click the + button below the Recipients box. You can add as many recipients as you like. To remove a recipient, click it, then click the - button.
Schedule Preferences

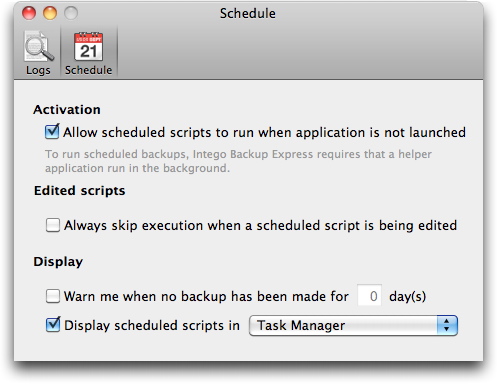
Clicking the Schedule button at the top of the preferences window brings up options in three categories.
- Activation: if you check Allow scheduled scripts to run when application is not launched, Backup Express will be able to run your scheduled scripts even when the application is not running. Scheduled scripts can run if this is unchecked, only if you have launched the application. If this button is not checked, each time you launch Backup Express the program will execute any scheduled scripts it has not already run.
- Edited scripts: the Always skip execution when a scheduled script is being edited checkbox ensures that a script doesn't suddenly spring into action while it's selected in Edit mode. If you check this checkbox, it's wise to quit Backup Express whenever you're not editing a script. Otherwise, you might accidentally leave a schedule-enabled script selected, and the script will not run as expected.
- Display: the first option, Warn me when no backup has been made for ___ day(s), displays a warning dialog if the specified number of days has passed without a backup. The second option, Display scheduled scripts in ____ has two options: Backup Express, and Task Manager. If you check the first option, Backup Express opens when scheduled scripts run; you can follow their progress in the Backup Express window. If you check the second option, only the small Task Manager window displays.