How to ensure your Mac and iOS devices are secure
Posted on
by
Kirk McElhearn
 Everyone knows that New Year’s resolutions don’t always stick. You may decide to join a gym or start a diet, and by February, you’ve slipped from your goal. But there are some New Year’s resolutions that you can use to check the security and your Mac and iOS devices.
Here’s a selection of simple things you can do to make sure your devices are as secure as possible. (Listen to episode 64 of the Intego Mac Podcast where I discuss these and other tips with my co-host Josh Long.)
Mac tips
Enable a password
Some people are really not worried about their Macs, and don’t bother to set a password for their user accounts. You may think that a Mac at home doesn’t need to be protected, but what if someone were to steal it? They’d get access to your accounts, to your email, and could change the passwords on any of your accounts, taking control of your identity.
macOS no longer lets you create a user account with a blank password, but if you’re using an older version of the operating system, you may have an account set up without a password. Change this now. Go to System Preferences > Users & Groups, select your user account then click Change Password.
Use a strong password
 While you’re at it, think about whether your password is strong enough. The most common password is 123456; it’s easy to remember and easy to type, but if you can type it easily, then so can anyone else.
There are many ways to create strong passwords that are memorable. This article gives you some tips and in episode 6 of the Intego Mac Podcast, we discussed creating strong passwords as well as using a password manager to create passwords that are virtually impossible to crack.
Set a delay for a password request
When you step away from your Mac, anyone can access it unless you lock it, or unless you have it set to lock after a certain time. In the Security & Privacy pane of System Preferences, you can set a delay for when your Mac will lock and require your password after it goes to sleep or when the screen saver activates.

I have mine set to Immediately, because it’s safest, but you can choose 5 seconds, 1, 5, or 15 minutes or a number of hours. Shorter is safer; you don’t want to leave your Mac unlocked for too long.
And think about using hot corners to lock your Mac quickly. (You can also lock your Mac by pressing Command-Control-Q.)
Use an Apple Watch to unlock your Mac
If you have an Apple Watch, and you have turned on two-factor authentication or your iCloud account – which you should do in any case – you can unlock your Mac automatically by pressing any key on its keyboard or clicking your mouse or trackpad. In the same Security & Privacy settings as above, you can see I have Allow your Apple Watch to unlock your Mac checked. As long as you are near your Mac this works.
If you do this, you can make an even more secure password for your user account because you won’t have to type it often.
Protect your data with FileVault
 FileVault is the Mac’s full-disk encryption feature. When you use FileVault – you’ll find the FileVault tab in the Security & Privacy preference pane – the data on your Mac is encrypted. If someone steals your Mac or its drive, they can’t get at your data. But this encryption depends on the strength of your user account’s password so, as recommended above, use a strong password.
FileVault doesn’t slow down your Mac and ensures that even if someone gets a hold of your hard drive, they cannot access your data.
Secure AirDrop
Available on both the Mac and iOS, AirDrop is a feature used to send files from one device to another. Make sure that you have AirDrop set to only allow discovery by your contacts. That way, random people can’t send you files which could be dangerous.
iOS Tips
Secure AirDrop
As above for the Mac, make sure to secure your AirDrop settings. This is more important on an iOS device since, when you’re out in the open, you’re likely to have more devices around you (compared to when you are at home or at your office).
Create a secure passcode
Older iOS devices prompted you to create a four-digit passcode; Apple now suggests that you use six digits. But you can create an even more secure passcode, containing both numbers and letters. If you have a four-digit passcode, you should at least upgrade it to six digits; but you may want to be even more secure. This article explains how to make this change.
Make Face ID more secure
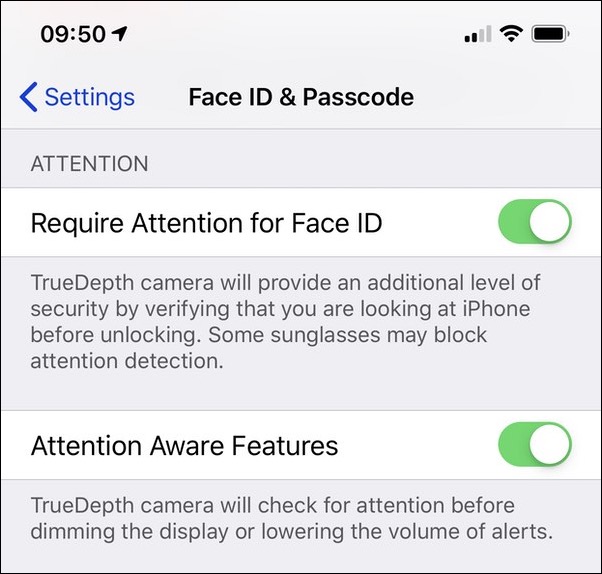
Face ID on iOS devices is very secure, but you can activate a setting to make it even more secure. If you go to Settings > Face ID & Passcode, there are two options worth turning on.

The first ensures that you are actually looking at your device, preventing someone from unlocking the device by holding it in front of you while you’re asleep. The second tells your device to not dim it if you are looking at it, and it will also lower the volume of alerts since the device knows you are close to it.
Hide notification previews
It’s great to get notifications, and it’s useful to see them at a glance. But this also means that anyone who looks at your iPhone or iPad can see some of the information in your notifications.
You can turn off the previews that display on the lock screen by going to Settings > Notifications > Show Previews. You might want to set it to When Unlocked, so you’ll see previews in banners when your device is unlocked, or never to be even more secure.
Protect Siri
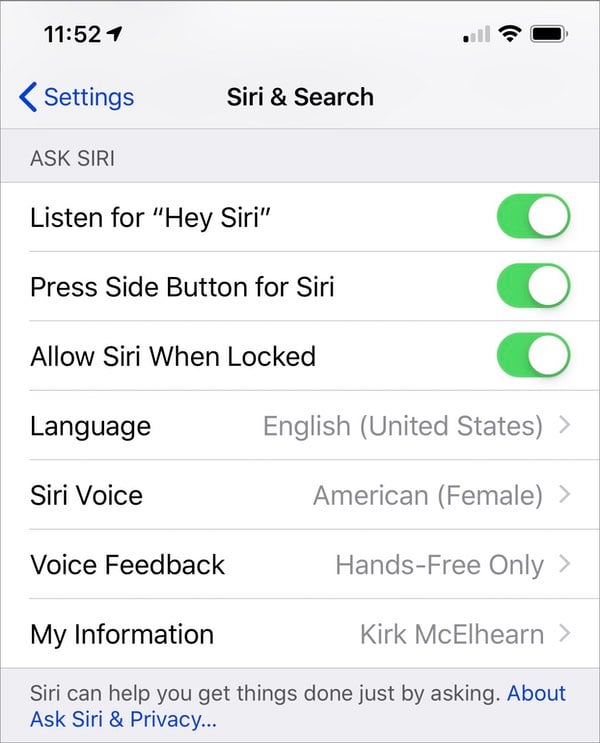
There’s one more thing to consider about the lock screen and that’s Siri. By default, if you’ve turned on Hey Siri, it is available when your iOS device is locked. This means that anyone can tell your device to perform certain actions. You can turn this off in Settings > Siri; toggle the Allow Siri when locked setting. This means that you’ll need to press the home button or side button (depending on your device) to invoke Siri, but it’s a lot more secure. It’s worth noting that you need to allow this setting to be on to use Apple’s CarPlay because it is meant for hands-free access.

Checking these settings will get you started on a safe and secure new year. It only takes a few minutes to make your Mac and your iOS devices more secure.
Want more great tips like these? Subscribe to The Mac Security Blog and the Intego Mac Podcast to make sure you don’t miss out!