How to Securely Set Up a New Mac in 12 Easy Steps
Posted on
by
Jay Vrijenhoek
You have a brand new Mac, new used Mac or have reinstalled your current Mac. Either way, you’re about to start fresh! Since you’re starting from scratch, you might as well get it done right and secure. This article is a list of things to consider.
1. Migrate your data
If this is your first computer, this step does not apply, but if you’re migrating from another Mac or PC, you probably want to take all the files, folders, photos and videos with you. This can easily be done thanks to macOS’ built-in Migration assistant.
First, make sure your computers can see each other. This can be done by having both computers on the same network through Wi-Fi or Ethernet or by connecting the computers to each other directly using a FireWire, Thunderbolt or Ethernet cable.
While using FireWire at this point is unlikely, you will probably end up using a network connection. (Use Ethernet if you can as Wi-Fi will make for a very slow data transfer.) With both computers connected, or if a local Time Machine backup is available on an external hard drive or Time Capsule, fire up the Migration assistant, which can be found in your Applications > Utilities folder.
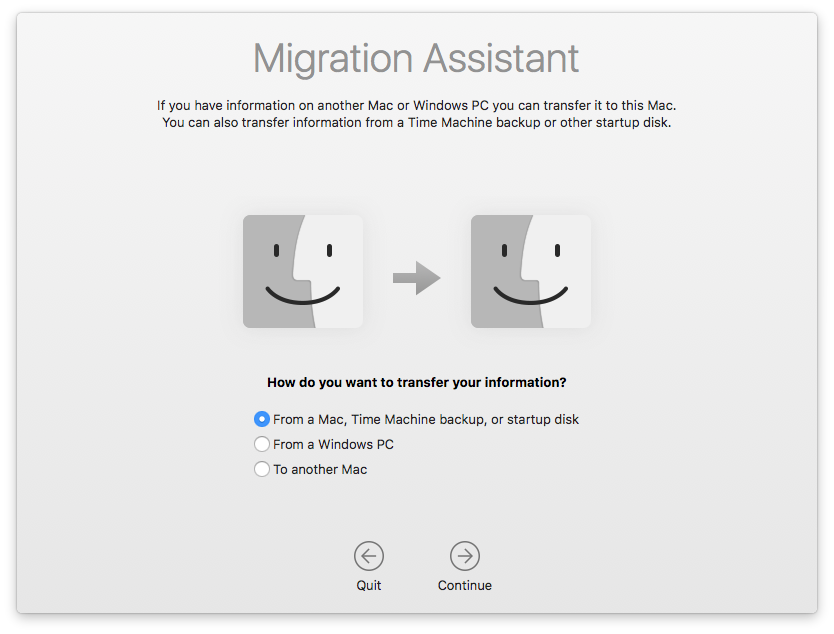
Do the same on your old Mac or PC. For Windows, you’ll have to download Migration Assistant, which can be found here. You can now start transferring all your data. For detailed instructions, have a look at Apple’s support page here.
2. Install updates
Your new Mac may not have the latest operating system installed, and the applications that migrated from your old Mac may need some updates as well. Start by launching the App Store and clicking the Updates tab.
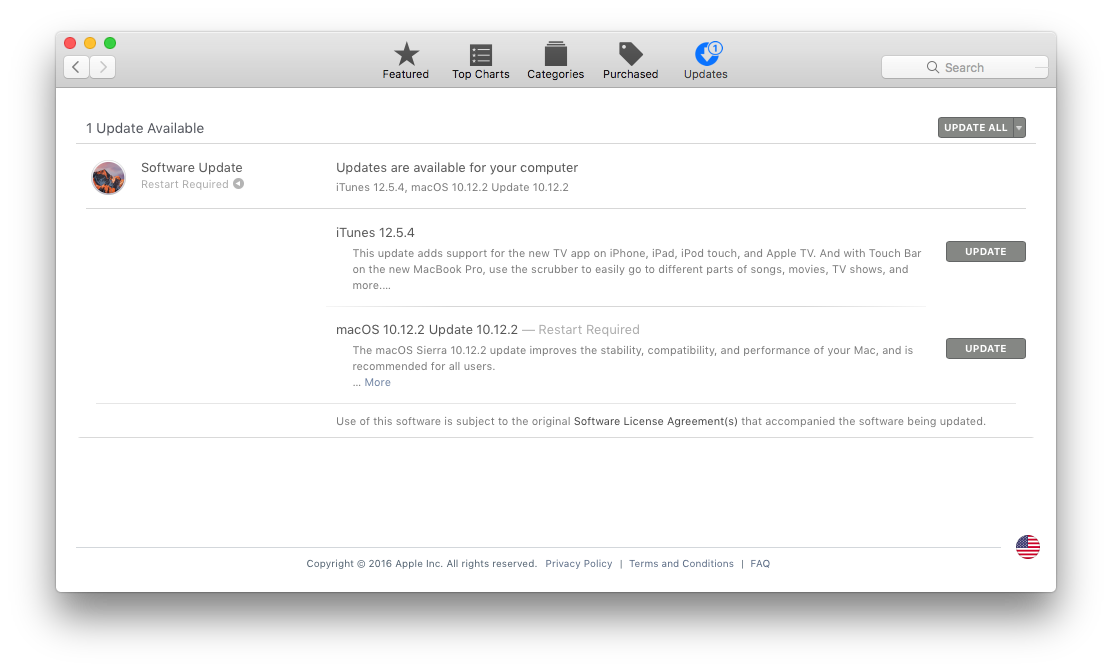
Have a look at the notes of whatever is in the available updates list and install the updates. One of the best security practices we routinely recommend is keeping software up to date, so this is a good first step. Now check your software such as Office, Adobe Suite and other third party applications. Just scroll through the contents of your Applications folder and see what you have. Open the applications one by one and see if there is an update available.
RELATED: How to Tell if Software and Updates Are the Real Deal
3. Enable automatic updates
After checking for software updates through the App Store for the first time, you may get asked by the system if you wish to enable automatic updates.

I recommend that you enable this feature to ensure always having the latest system and software updates. Keep in mind this does not include third party software, just the content that came from the App Store. If you want more control over the auto update settings or if you didn’t see this pop-up, open System Preferences > App Store, and you can select which content you want automatically updated.
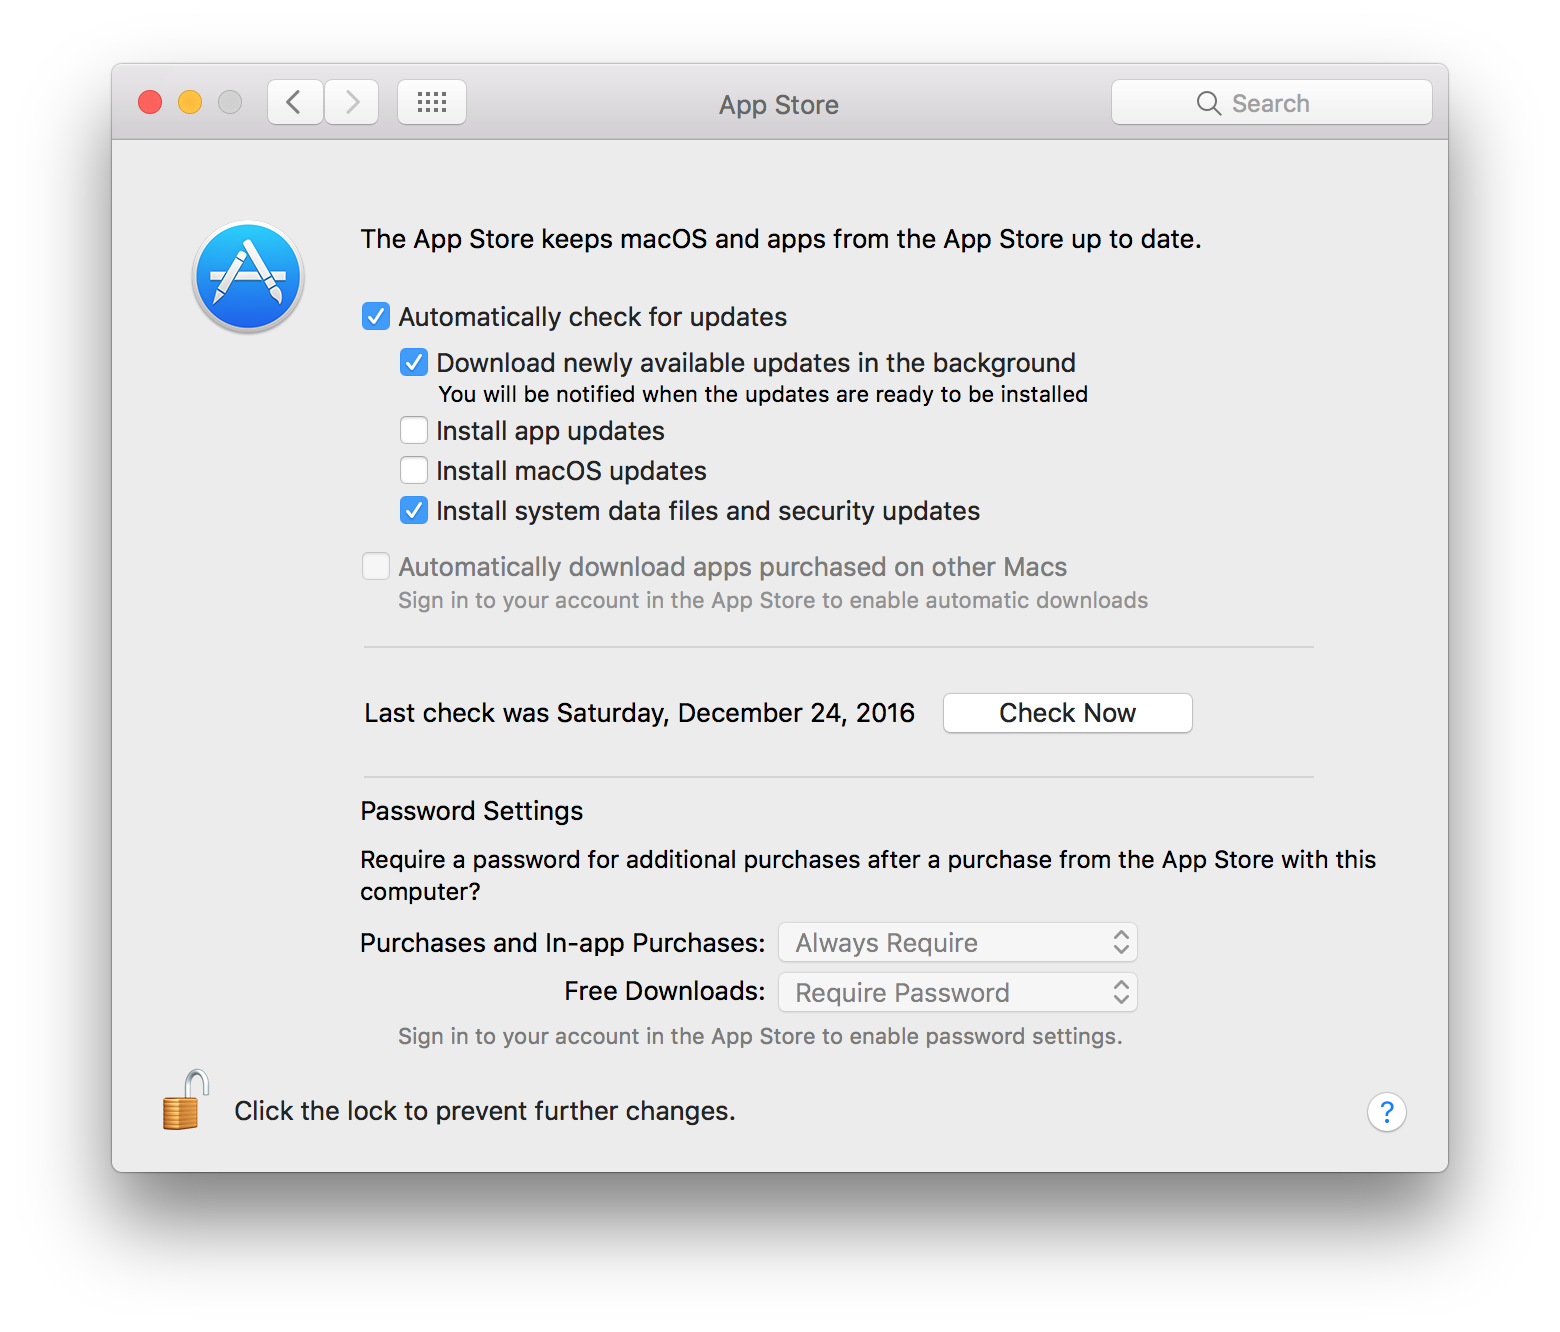
You can leave all checkboxes ticked and the App Store will take care of it for you. I prefer to read the update release notes on macOS and app updates to see if there are any new features, security patches, etc., so I check for and install those manually. You can do the same as long as you don’t forget to actually install the updates!
4. Install security software
To keep an eye on your data and network traffic a security suite is recommended. Malware is real and it’s out there, even for Mac; in fact, you may have already transferred some over from your old computer. An anti-virus solution will ensure you can clean up whatever malware infection may already be present and going forward. A firewall will handle the network traffic for you, making sure no one gains unauthorized access to your Mac.
I’ll let you take a wild guess as to what security suite I recommend. 😉 Whatever your choice, make sure you activate and properly configure the security suite. Out of the box settings should be good enough, but taking a look at the preferences and options is a good idea. This way you familiarize yourself with the product and you can tweak these settings however you want. (MORE: How to Download and Install Intego Products)
5. Back up your files
Security is not just about protecting your Mac from outside threats. Hardware can fail, laptops get stolen, and files accidentally get deleted. A backup of your files can help you recover from calamity, and there are very few scenarios in which backing up your files is not a good idea. Built-in to macOS is a convenient backup utility called Time Machine. It can backup your files to an external drive, macOS server or Time Capsule.
To begin, make sure you have a backup destination ready, then go to System Preferences > Time Machine. Select your backup drive (and set encryption for added security) and… that’s it! Backups will begin shortly and run every hour as long as the backup destination is available.
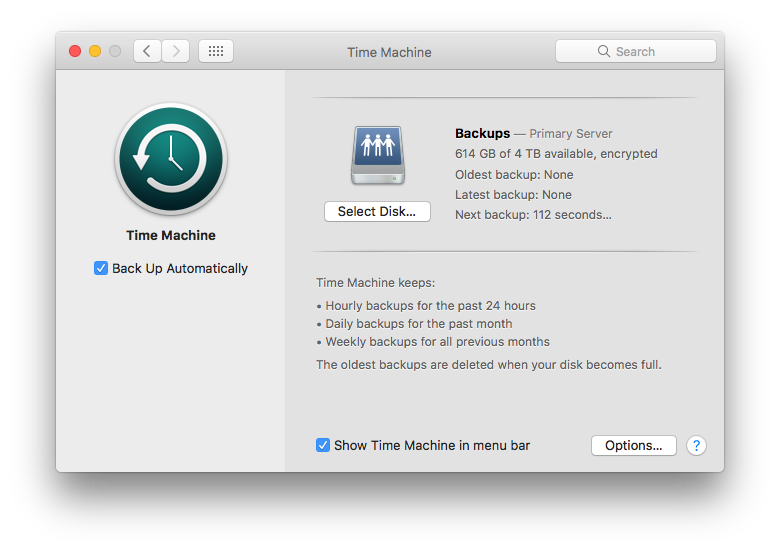 If you feel certain content can be excluded from your backups, for example your downloads folder, click the Options button and add the folders with that content to the excluded file list.
With a local backup in place, you may want to consider adding additional backup solutions. The best backup is an off-site backup, multiple local backups or both. There are many scenarios in which your data may be lost and this goes for your backup as well. A local backup will protect your data if your Mac’s hard drive fails, but what if there’s a power surge? Or a theft where both your Mac and your backup drive are stolen (this is why encrypting your backup is important)? Or a fire? Having another backup in a different location increases your chances of recovering files dramatically.
RELATED: 4 Types of Backup Hard Drives for Mac
If you have an off-site server available, enough storage and enough bandwidth, products such as Intego’s Personal Backup are very useful. Think of Intego Personal backup as Apple’s Time Machine on steroids as it offers the same functionality plus a ton more. Set your own backup frequency intervals, make bootable clones, backup only select drives/folders and backup to almost any kind of destination. An off-site FTP or file server for example. You can replace Time Machine with this or run them alongside each other.
RELATED: Intego Personal Backup Compared with Apple’s Time Machine
Having an off-site server with enough storage and bandwidth available is usually not something most consumers have. In this case, you’ll need not only off-site backup software but also a server — and this can get pricey fast. Luckily, there are services out there offering exactly that and for great prices. Backblaze is such a service and offers unlimited secure online backup storage for an unbeatable price.
With your files safely backed up on multiple drives/locations, you are covered from data loss in almost every scenario. And these days it’s very affordable to get it done. Use the above mentioned services or find one that fits your needs, sooner or later you’ll be glad you did.
6. Encrypt your data
You may work for the NSA, you may run a webdesign company from home, you may be a student or a journalist. Some of the data on your computer will be valuable to someone other than you. This may be your emails, the stored passwords in your keychain, private photos or indeed that top secret research you are working on. If a piece of data you have can be used by someone else to make money, it’s worth going after. This can be in the form of malware or spyware (though you’re covered against that with the security software you installed) or plain old theft; in either case, someone steals your Mac or your backup drive and has all your data.
Encryption is meant to make your data only available to you. macOS has an excellent encryption tool built-in called FileVault, and it will protect everything on your hard drive by encrypting it. It’s very easy to use as all you have to do is enable it. Once you are logged in, your Mac will encrypt/decrypt everything in real-time. To enable FileVault, go to System Preferences > Security & Privacy > FileVault. Once there, click Turn On FileVault and follow the steps.
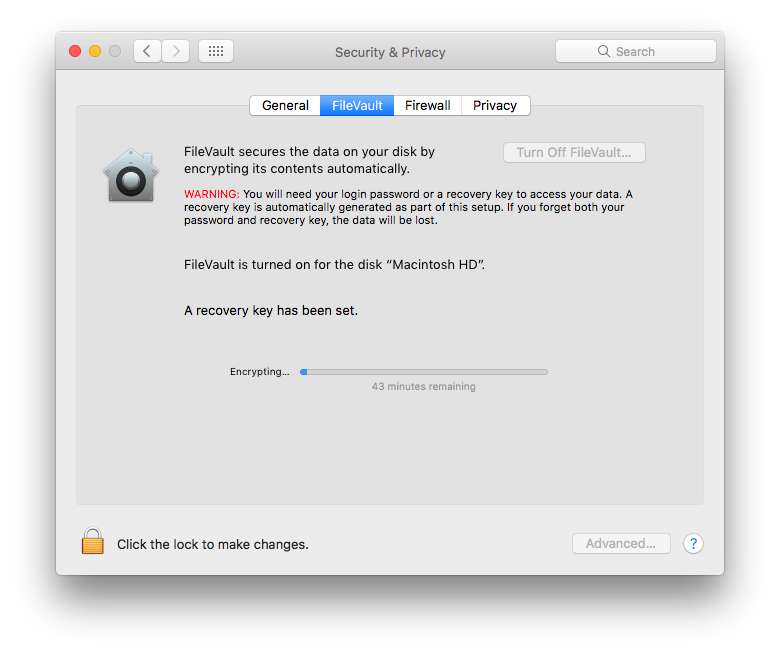 For help with setting up FileVault and other handy encryption tips, have a look at this page.
7. Set up iCloud
iCloud is free and offers some neat features that are particularly useful if you have multiple devices. Syncing your contacts, calendars and notes for example. If you’re not familiar with iCloud and it’s features have a look here. I mention iCloud here because of one specific feature called Find My Mac. Located in System Preferences > iCloud, once you’re signed in it can be found at the bottom of the list.
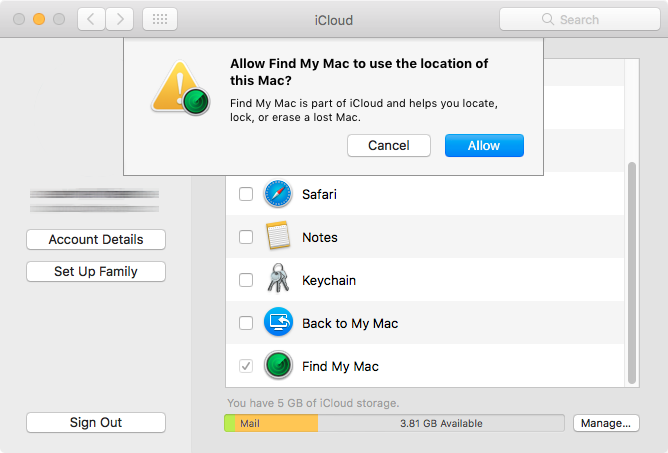
As the pop-up states, you can locate your Mac on a map, lock it with a passcode or even erase it completely (all remotely through iCloud.com). If your Mac is lost or stolen, these options can come in very handy. For this to work, your Mac needs to be online, but your Mac is locked with FileVault, so how would a thief ever go online long enough to trigger Find My Mac? Glad you asked…
8. Enable the guest account
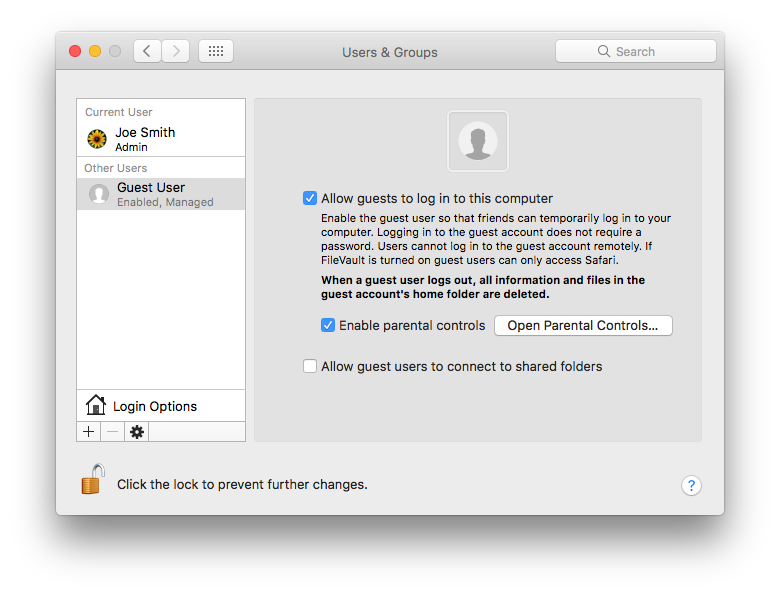
The guest account enables someone to use your Mac for basic functionality. (For instance, the use of Safari, using Microsoft Word, etc.) When the guest logs out, all the work they’ve done will be deleted, giving the next guest a clean slate. Even if you never intend to let anyone else touch your Mac, the guest account will likely be used by a thief or anyone else unauthorized. If used on a Wi-Fi or wired network, Find My Mac will know where your Mac is. If you already had an instruction lined up to lock or wipe before the Mac came online, it immediately executes it.
If you Mac does get stolen, it may come online a day or a week later; but once it does, Find My Mac will ping you and lock or wipe your Mac. The guest account does not decrypt the contents of your FileVault protected drive, it runs in its own space, just like the recovery partition, so your data on the Mac will be perfectly safe. To enable the guest account, go to System Preferences > Users & Groups > Guest User. Turn it on and your guest/decoy account is ready to go!
 You are well on your way to having a very secure setup. Why don’t you take a minute to enjoy Siri? Located at the top right of your screen in the menu bar (or in System Preferences > Siri, if it needs to be enabled), it can help you do all kinds of nifty things.
Here are a few sample commands you can give her:
- Send a message to (name) saying (message)
- Remind me to call (name) in 20 minutes
- Turn Bluetooth off / on
- Activate the screen saver
- Show me privacy settings
- Open Safari
If you’re not used to giving your Mac voice commands, you’re not alone. Some can get stuck not knowing what to say. The best way to figure out what Siri can or cannot do is to just ask. Ask her about the latest scores of your favorite sports team, the weather, to start your car or to brew you some coffee. You’ll find out how helpful Siri can be in no time.
All right, back to the list.
9. Set a screensaver password
Leaving your Mac open and unlocked when you step away is typically not a good idea, especially in an office or otherwise shared environment. If you have an Apple Watch and the latest version of macOS, look into using Auto Unlock. A screensaver password is a quick way to secure your Mac when you step away, all without having to close the lid of your laptop or put your Mac to sleep, which takes time to wake up when you return to your Mac.
To enable the screen saver password go to System Preferences > Security & Privacy > General tab. Check the box to enable the feature and set the timer.
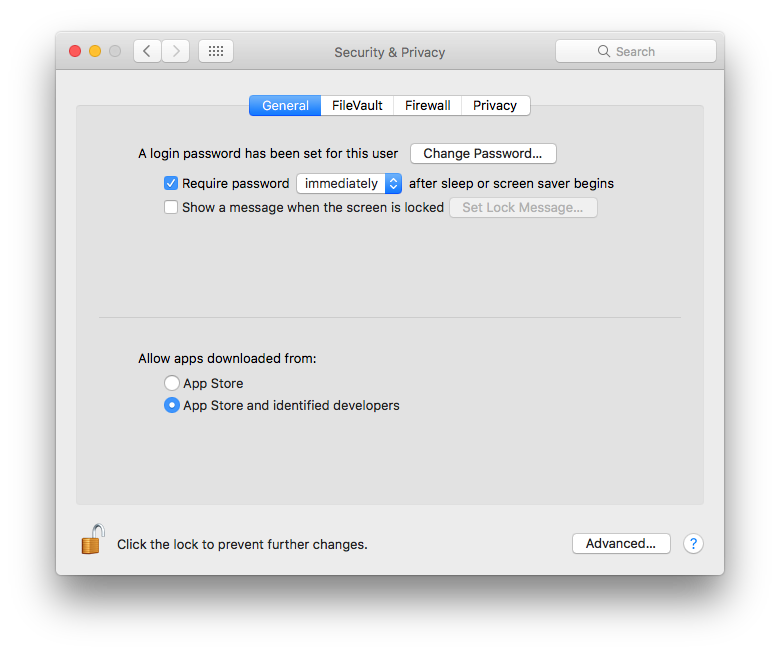 If you often find yourself leaving your desk in a hurry, set the timer to “immediately” or “5 seconds.” This way it’s not left unsecured long enough for someone else to tap any key and see your desktop. You’ll also want a quick way to start the screensaver if you have to step away.
As mentioned earlier, Siri can help you with this just by saying “Activate the screen saver,” but setting up a hot corner is even easier and faster. The idea is that you simply move your mouse pointer into a corner of your screen and it triggers the screensaver. To set this up, go to System Preferences > Desktop & Screen Saver > Screen Saver tab. At the bottom of those preferences you’ll see a “Hot Corners” button, tap that.
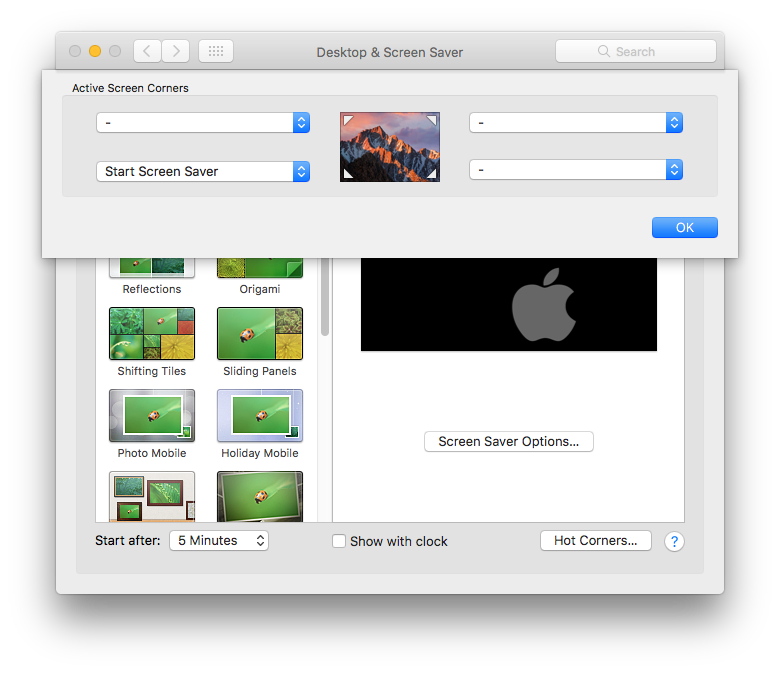 Select any corner to start your screen saver and click OK. From now on when you have to step away, just fling your cursor into the designated corner and walk away; the screensaver will start right away and lock it with a password immediately or after a set amount of time.
10. Don’t install plug-ins you don’t need
You may get prompted by certain websites to install Adobe Flash Player, Adobe Reader, Microsoft Silverlight, Java or other plug-ins. Or you may want to install them because that’s what you’ve always done on previous computers. Try to resist! Those plug-ins are major security threats as they have historically been full of vulnerabilities that end up being exploited by the bad guys. If Flash Player is required, look for site that offers it’s content in HTML5. If Adobe Reader is required, just download the PDF and use Preview to view/edit. Even though most browsers disable plug-ins by default now, just having them installed can risk your privacy and security. You’re better off without them.
11. Disable Bluetooth when not in use
Bluetooth is a very convenient technology and it’s on by default when you purchase a new Mac or re-install a system. Unless you use a wireless mouse/keyboard or Apple Watch to unlock your Mac, you probably don’t need Bluetooth on all the time. It’s a radio that is constantly broadcasting and searching for other devices to pair with, which not only costs you precious battery life if you’re using a laptop (specially the 2016 MacBook pro’s) but may also pose a security risk.
12. Set a firmware password
The data on your Mac is secure, your backups are secure, you don’t use plug-ins you don’t need, updates are installed when they become available, and your security software is keeping a close eye on potential network intrusions and malware infections. You’re about as secure as it gets! There is, however, one more thing you can do to wrap this all up: set a firmware password.
Locking down the firmware will prevent any unauthorized persons from booting your Mac off of another startup drive. Your hard drive is encrypted, so rather than attempting to hack their way in, it’s easier to just erase your drive and start over. The security of your data is the first priority, you can always get another Mac. Howeverm if you want to make sure nobody can use your Mac, even if your data is no longer on it, a firmware password will do the job.
Any time someone wants to start your Mac from the recovery partition, Internet recovery, an external drive or NetBoot server, the firmware password will be required. Without that password, your Mac is just a fancy paperweight to anyone other than you. For detailed instructions on how to set up a firmware password, have a look at this article under “Setting a Firmware Password.”
Your Mac is Secure!
Now that you’ve gone through these 12 important steps, your Mac is secure! With all of these settings made right out of the box, you don’t have to worry about it later and you can simply enjoy using your Mac. Of course, you can implement these security tips at any time, even if you’ve been using your computer for a while; however, it will require you to restart your backups, as encrypting a drive or network share may mean erasing it first.
Have something to say about this story? Share your comments below!