How to securely dispose of your old iPhone or iPad
Posted on
by
Kirk McElhearn

You’ve been using your iPhone or iPad for a while—maybe a year or two, maybe longer. Perhaps it’s so old that your iPhone or iPad is unsafe to use anymore. You might even have an old iPod touch that you’ll replace with an iPhone or iPad; all iPod touch models are unsafe to use, as they no longer get iOS security updates.
In any case, you’ve decided that now is the time to move on and replace your outdated Apple technology.
You may want to dispose of your old iPhone or iPad—perhaps you’ll sell it, give it away, or recycle it (but probably not blend it). But before you get rid of your old device, beware; it contains a lot of personal information, and it’s connected with your Apple account. Before you do, there are several things you should do to prepare the device first. These steps will ensure your data remains secure, and disassociate your device from your Apple account.
Let’s review the nine steps you should take before getting rid of an iPhone, iPad, or iPod touch. (If you have an old Mac, see our related article about how to prepare an old Mac for disposal.)
1. If you have an Apple Watch, unpair it from your iPhone
If you have an Apple Watch, it is paired with your iPhone. You’ll need to unpair the watch to be able to pair it with another iPhone later.
You can do this in the Watch app on your iPhone. Go to the My Watch tab and tap All Watches at the top of the screen, then tap the ⓘ button.
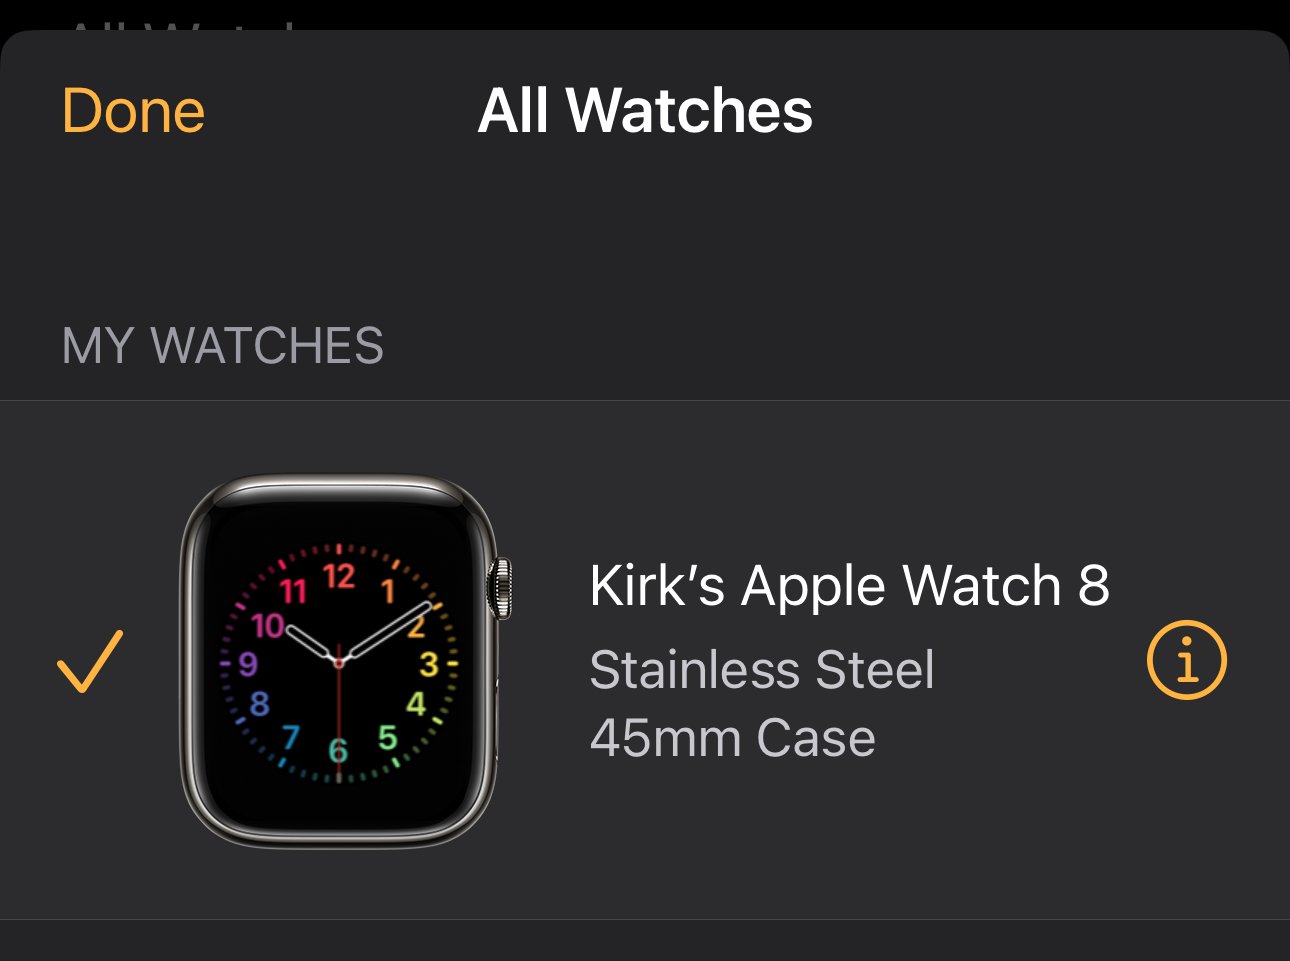
Scroll down and tap Unpair Apple Watch, then Unpair [your watch’s name]. If you have a cellular Apple Watch and have a plan active, you’ll be asked what to do about your plan. You should remove the plan since the iPhone will no longer be paired with any watch. You may need to contact your carrier to activate the Apple Watch’s cellular plan on your new iPhone.
You’ll be asked to enter your Apple ID password; this disables Activation Lock. Tap Unpair a last time.
When you unpair an Apple Watch, the iPhone backs up the watch’s settings and data. When you set up your new iPhone, you’ll restore from an iPhone backup (see below), and this will allow you to pair the Apple Watch to the new iPhone.
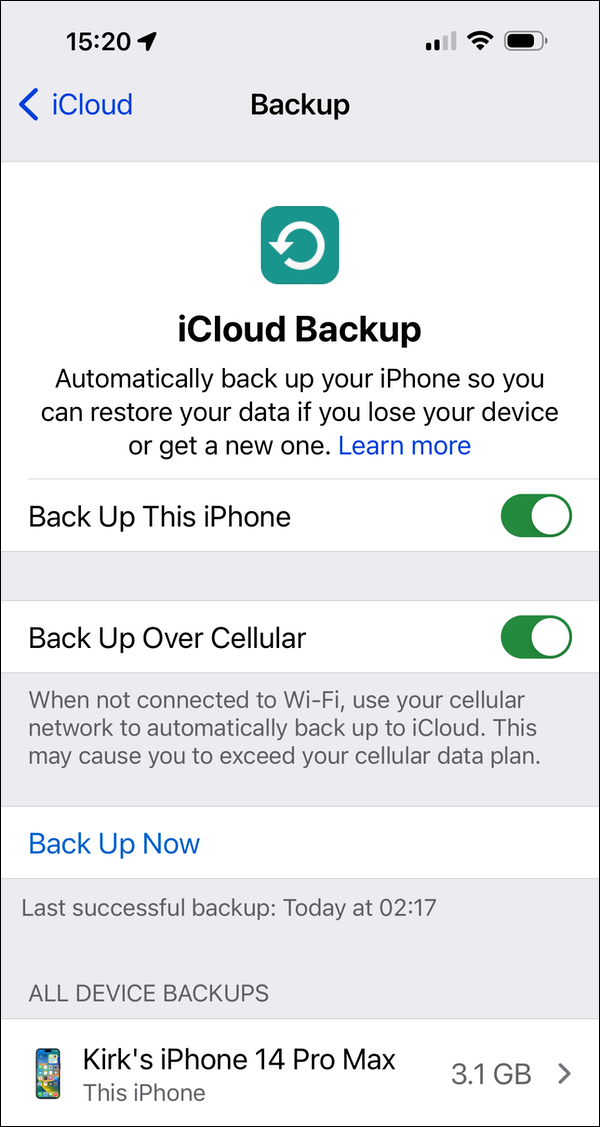
2. Back up your device
There are two ways you can back up your iPhone or iPad. You can either use iCloud, or you can back the device up to a Mac or PC.
Backing a device up to iCloud is the easiest. You can find out how to back up an iPhone or iPad to iCloud in this article. The same article also tells you how to back up an iPhone or iPad to a Mac using the Finder. If you’re using a Windows PC, you can back up your device using either the Apple Devices app or iTunes.
3. Choose what to do about your AppleCare plan
If you have an AppleCare protection plan for your iPhone or iPad, you have two options. AppleCare is linked to a device, not to a person or phone number. Therefore, if you plan to sell your device or hand it down to a friend or family member, you can leave the AppleCare plan as is, if you’ve paid for the full duration upfront. This can be a plus if you’re selling a device on eBay; it means that your device has a guarantee (remains under warranty) for however many months remain.
If you don’t need to keep the AppleCare plan, you can cancel it, and get a refund for the unused time. If you pay a monthly subscription fee for AppleCare, then you should cancel it so you don’t continue paying for it.
4. Sign out of iCloud, iTunes, and the App Store
Once you’ve made your backups, you should sign out of your iCloud account. To do this, go to Settings, tap your name at the top of the screen, scroll down to the bottom of the pane, and click Sign Out. If you have Find My active, you’ll have to turn this off first; you’ll find this near the top of the iCloud Settings screen. Signing out of iCloud removes your device from Apple’s servers, and signs you out of the App Store and the iTunes Store.
5. Deregister iMessage and FaceTime
If you’re switching from an iPhone to an Android phone, you need to “deregister” (i.e. deactivate, disable, or disassociate) iMessage on your iPhone. If you don’t do this, iMessages intended for you may still go to your old phone. This is because iMessage doesn’t depend on phone numbers, but on other device identifiers. If you have removed the SIM card from your iPhone, you need to replace it to be able to deregister iMessage.
You can do this in Settings > Messages; toggle iMessage to turn this off. Then tap Settings > FaceTime, and turn off FaceTime.

If you no longer have your iPhone, you can deregister iMessage on this page on the Apple website.
6. Erase your device, if applicable
Now it’s time to erase your device. Unless you’re planning to trade in your iPhone or iPad at an Apple Store. If you do this, the person who handles your trade-in at the Apple Store will help you transfer your data and erase your device (explained in step 7 below).
If you’re not trading in your device, tap Settings > General > Transfer or Reset [device] > Erase All Content and Settings. If you haven’t disabled Find My, you’ll need to enter your Apple ID and password. If your device uses an eSIM, choose the option to erase your device and the eSIM profile when asked. You may be asked to enter your passcode; do this, then tap Erase [device].
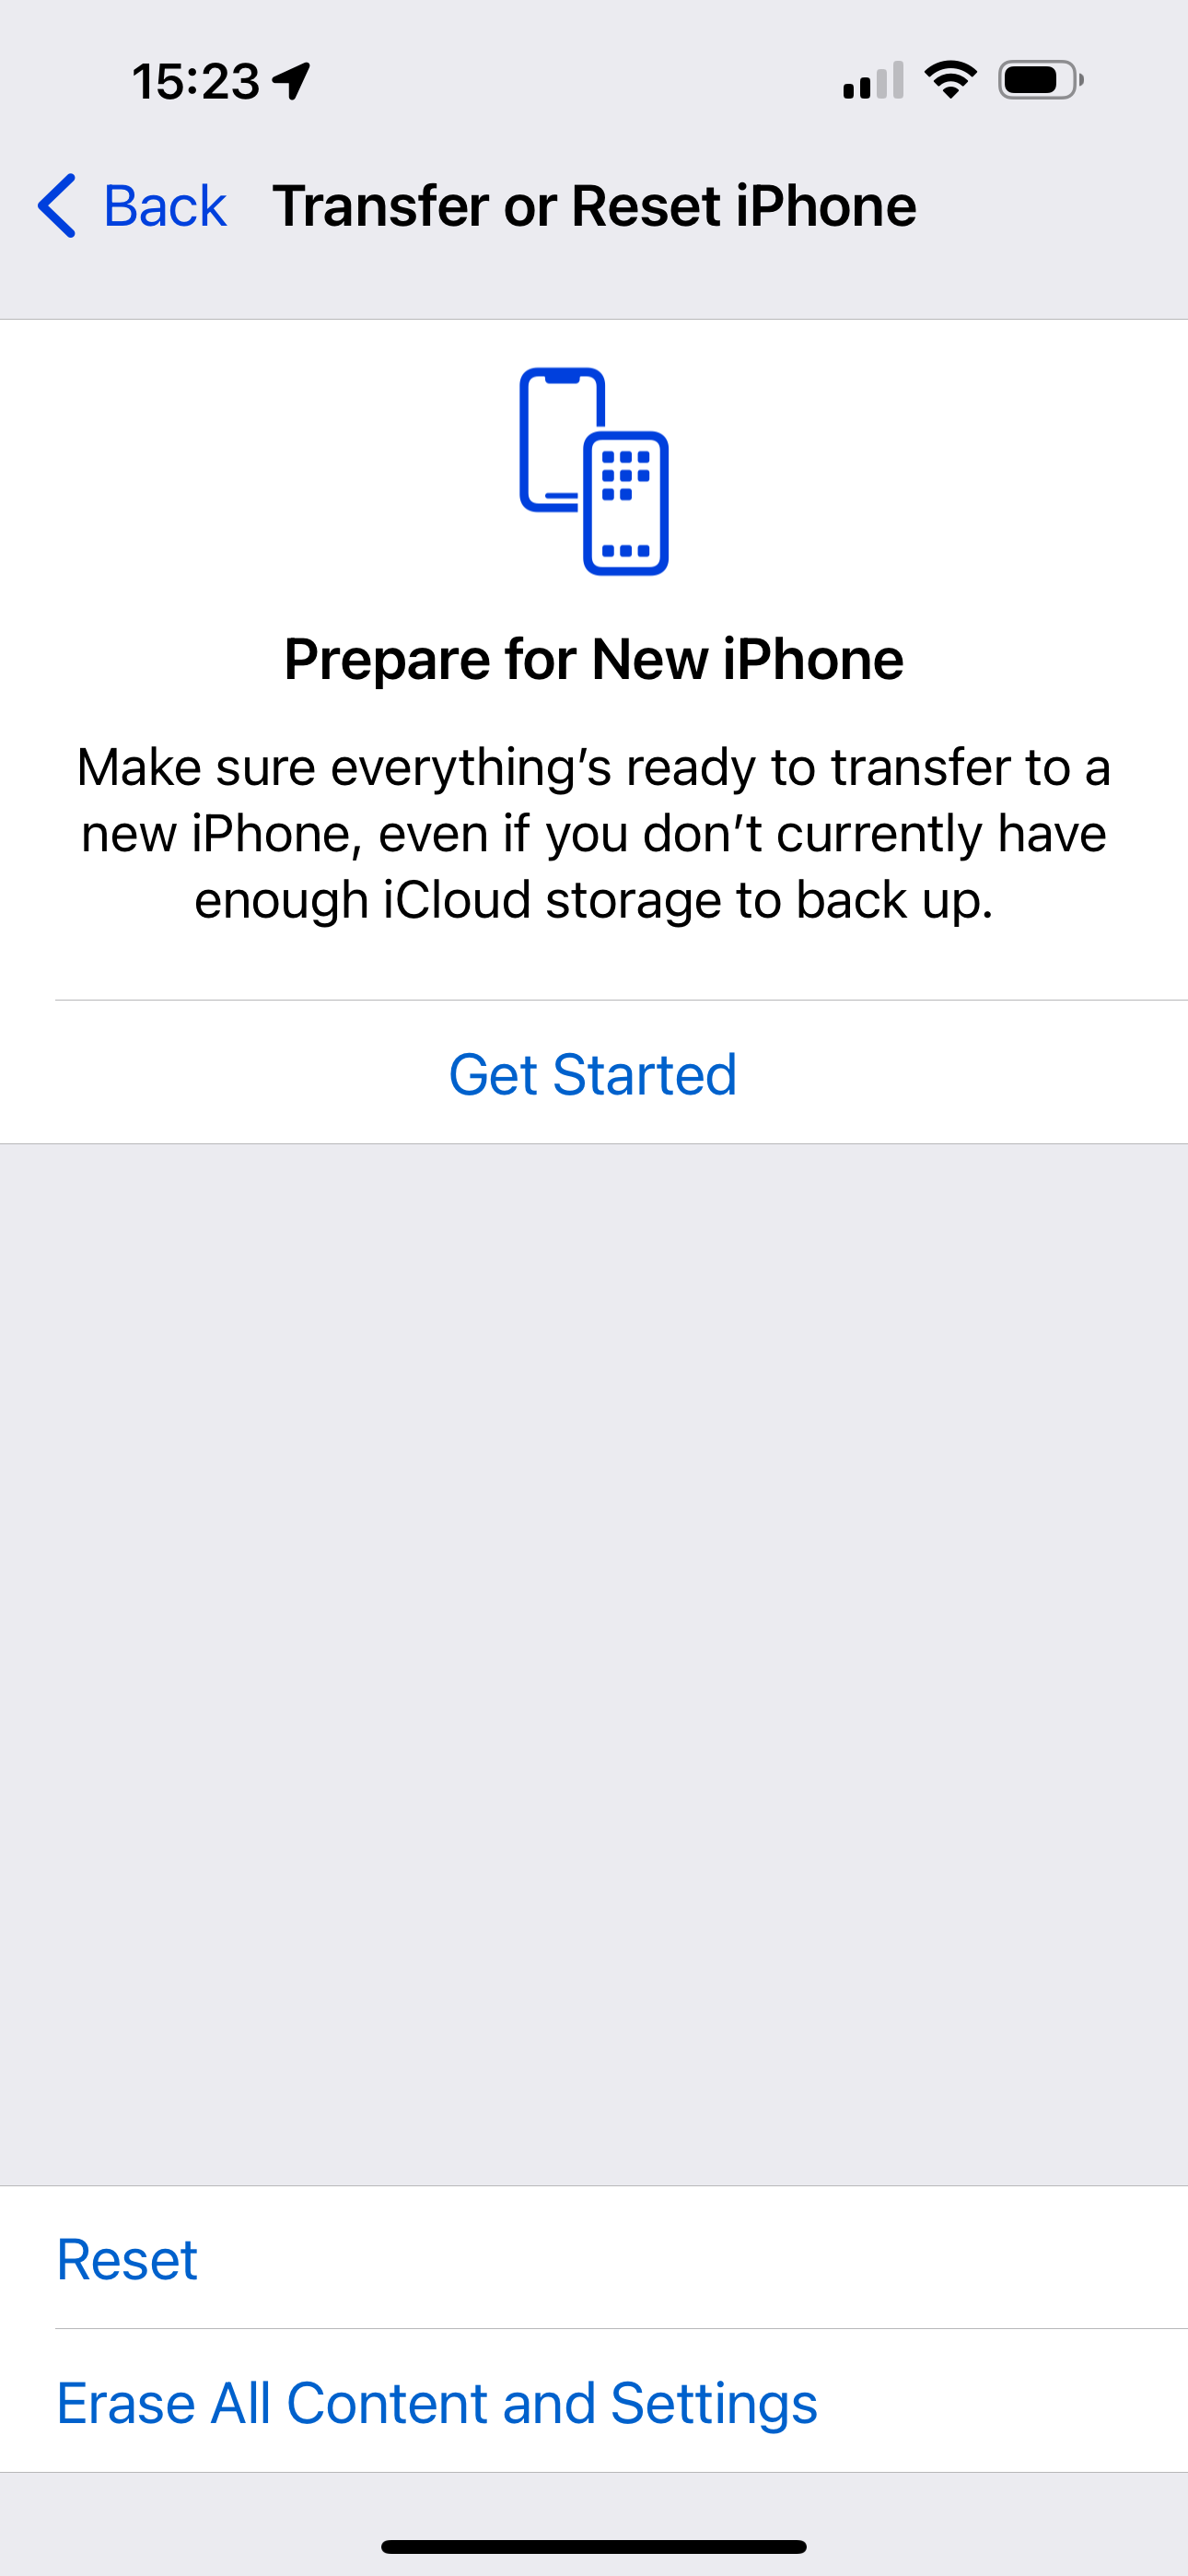
7. Transfer your data to a new device, if applicable
If you already have your new iPhone, you can now use the Prepare for New iPhone feature in Settings > General > Transfer or Reset [device], as seen in the screenshot above. Tap Get Started and follow the instructions.
8. Remove the SIM card from your iPhone or iPad
If your device has a physical SIM card, make sure to remove it so you can put it in your new device. If you’re upgrading to a brand-new model of iPhone or iPad that no longer uses physical SIM cards, you’ll need to contact your carrier to set up your cellular plan for your device.
9. Remove your device from the list of trusted devices
Trusted devices are those devices that can receive two-factor authentication codes when you sign into an Apple device or service from a new device. You should go to appleid.apple.com and remove your device from the list of trusted devices in the Account Security section of the page.
That’s it! Now you’re ready to move to a new device, and can safely get rid of the old one.
If you have an old Mac that you want to dispose of, be sure to check out our companion article, How to securely dispose of your old Mac.
How can I learn more?

Each week on the Intego Mac Podcast, Intego’s Mac security experts discuss the latest Apple news, security, and privacy stories, and offer practical advice on getting the most out of your Apple devices. Be sure to follow the podcast to make sure you don’t miss any episodes.
You can also subscribe to our e-mail newsletter and keep an eye here on The Mac Security Blog for the latest Apple security and privacy news. And don’t forget to follow Intego on your favorite social media channels: ![]()
![]()
![]()
![]()
![]()
![]()
![]()