How to run Windows 11 for FREE on a Mac with an M-Series Chip (M1, M2, M3 or M4)
Posted on
by
Kirk McElhearn and Joshua Long
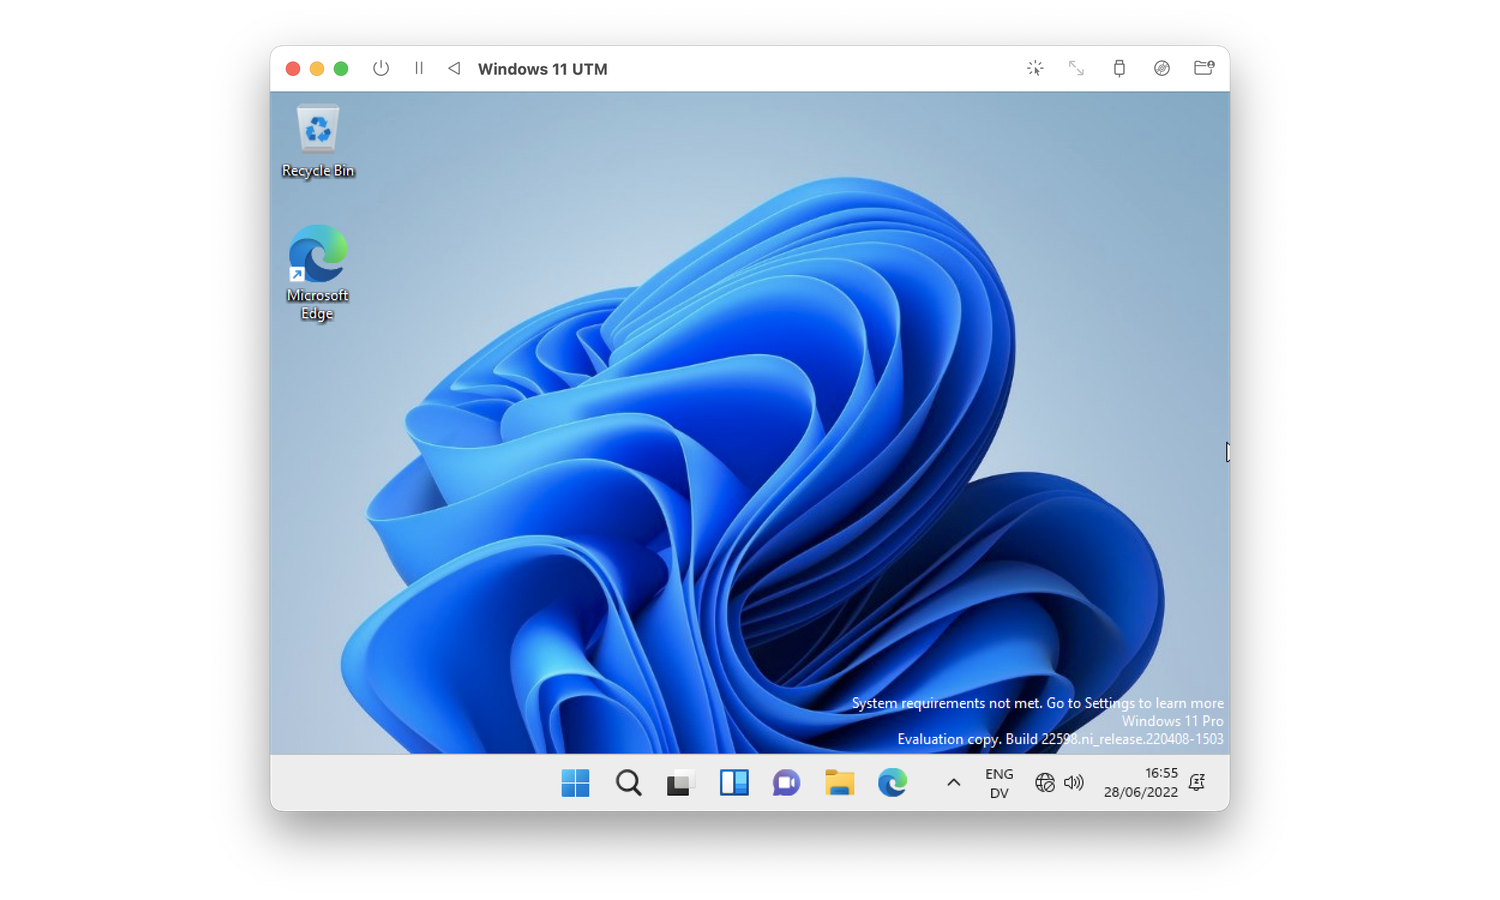
For many years, Apple made it easy to run Windows on your Mac. Apple’s Boot Camp allowed you to start up your Intel-based Mac in either macOS or Windows, and this dual-boot capability was great for people who needed to use both operating systems.
Unfortunately, Apple no longer supports Boot Camp on Macs using Apple Silicon M-series processors: M1, M2, M3, or M4. While you can still use Boot Camp on a Mac with an Intel processor, Apple no longer sells Macs with these processors, though you can buy Intel-based Macs used on eBay or other sites.
For those who want to move forward with Apple silicon, there’s another option: virtualization. Two popular apps that have been used for years to run Windows and other operating systems on a Mac: VMware Fusion and Parallels Desktop. Parallels Desktop’s pricing can range anywhere from about $50 (for upgrades from a previous version) to $100 for the Pro Edition, unless you happen to buy it when it’s on sale, and VMware Fusion is now available for free for macOS, for both its pro and workstation versions for non-commercial use.
There’s another solution, which is QEMU: a free, open-source emulator that (at least in its standard package) is somewhat difficult to install and set up. You can bypass much of the initial setup complexity by using the UTM app, which allows you to run QEMU on your Mac with very little setup. UTM is not as feature-rich as Parallels Desktop, but UTM is free (more accurately, payment is optional).
In this article, I’ll explain how you can run Windows for free on an Apple silicon-based Mac (i.e. any Mac with an M1, M1 Pro, M1 Max, M1 Ultra, M2, M2 Pro, M2 Max, M2 Ultra, M3, M3 Pro, or M3 Max, M4, M4 Pro, or M4 Max chip). To do so, we’ll use an app called UTM, along with a free, official version of Windows 11 Pro that works with Apple’s processors.
What is UTM?
UTM is an app that contains all the software of QEMU, but in a user-friendly GUI. There is no command-line configuration, and UTM looks a bit like Parallels Desktop or VMware Fusion. It’s quite simple to install and set up Windows with UTM.
You can download UTM for free on its website, or you can purchase it for $10 from the Mac App Store. There is no difference between the two versions, other than the fact that UTM gets updates via the Mac App Store app, and that purchasing the app helps fund the project’s development. The free version on the developer’s site doesn’t include a built-in update mechanism, so you’ll need to manually check for and download updates to UTM if you want to keep it up to date.
Getting started with UTM
Before you get started, make sure you have at least 100 GB of free space on your drive, if possible. This will allow enough room to download and install UTM and Windows, with a little wiggle room so you should still be able to download and install macOS updates. If you don’t have at least 100 GB of free space, you may be able to free up enough room by using Washing Machine, part of Intego’s Mac Premium Bundle X9 security and utility suite.
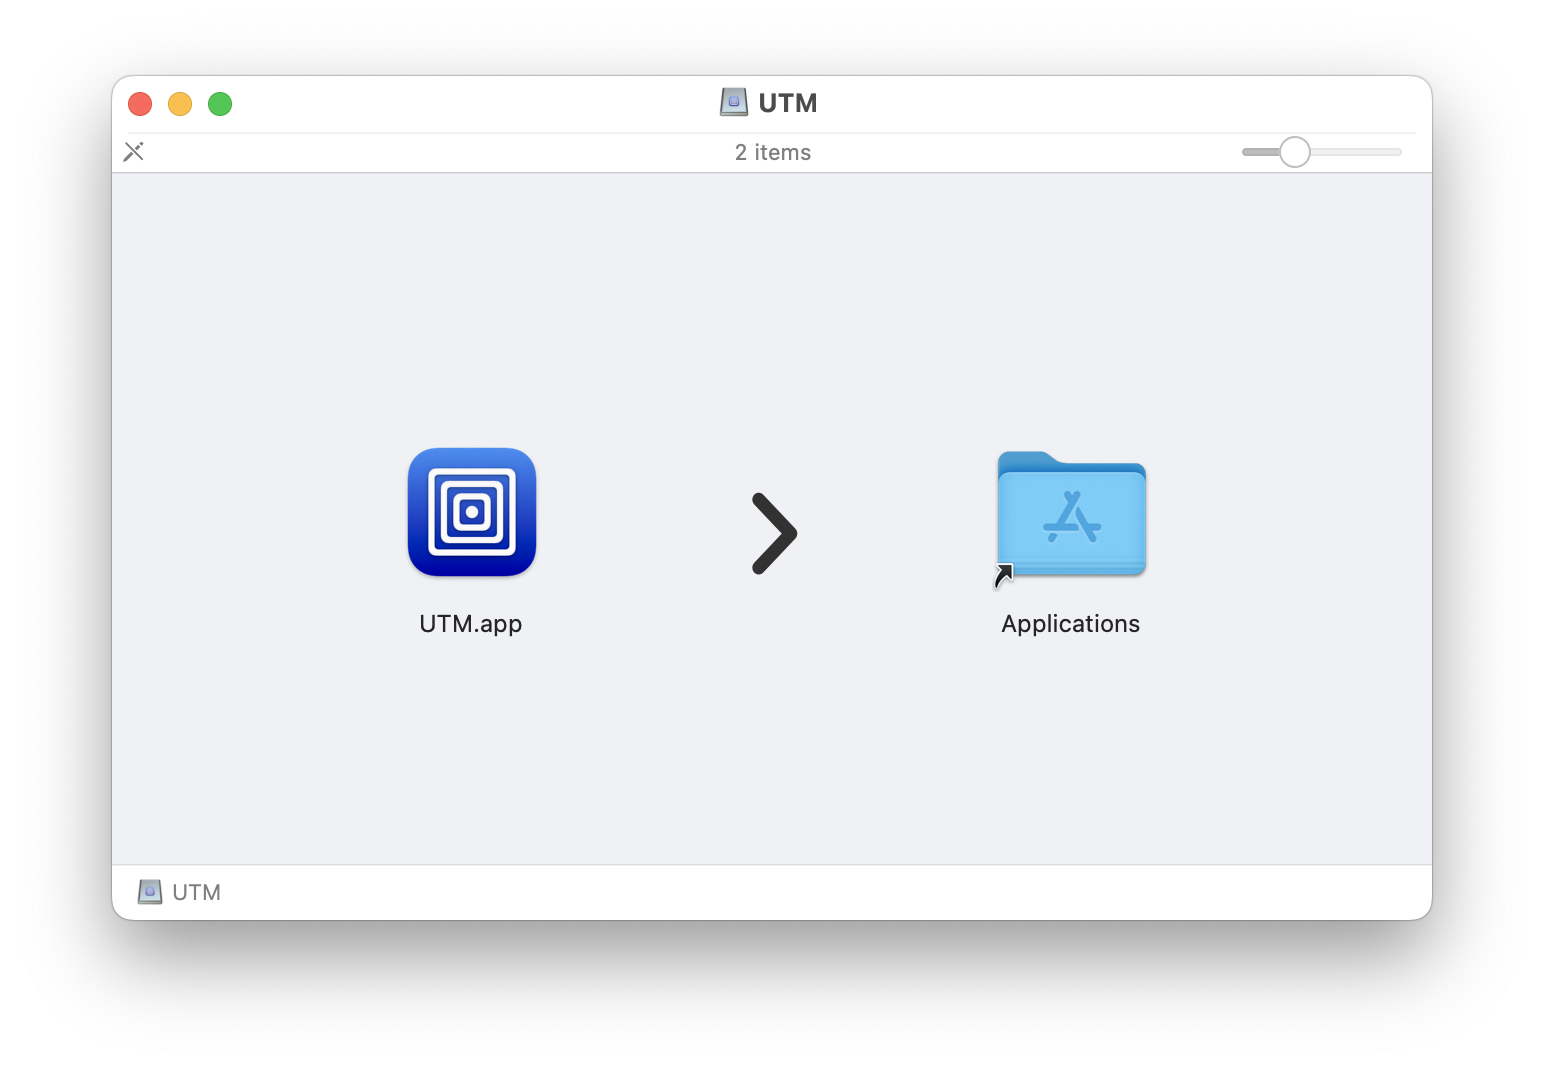
If you download UTM for free from the developer’s site (as opposed to buying it from the Mac App Store), you get a 275 MB disk image. Open the disk image, then drag the UTM app to your Applications folder. The UTM disk image is compressed, so when you copy the app into your Applications folder, expect it to take up about 1.1 GB.
Launch UTM and you’ll see this screen:
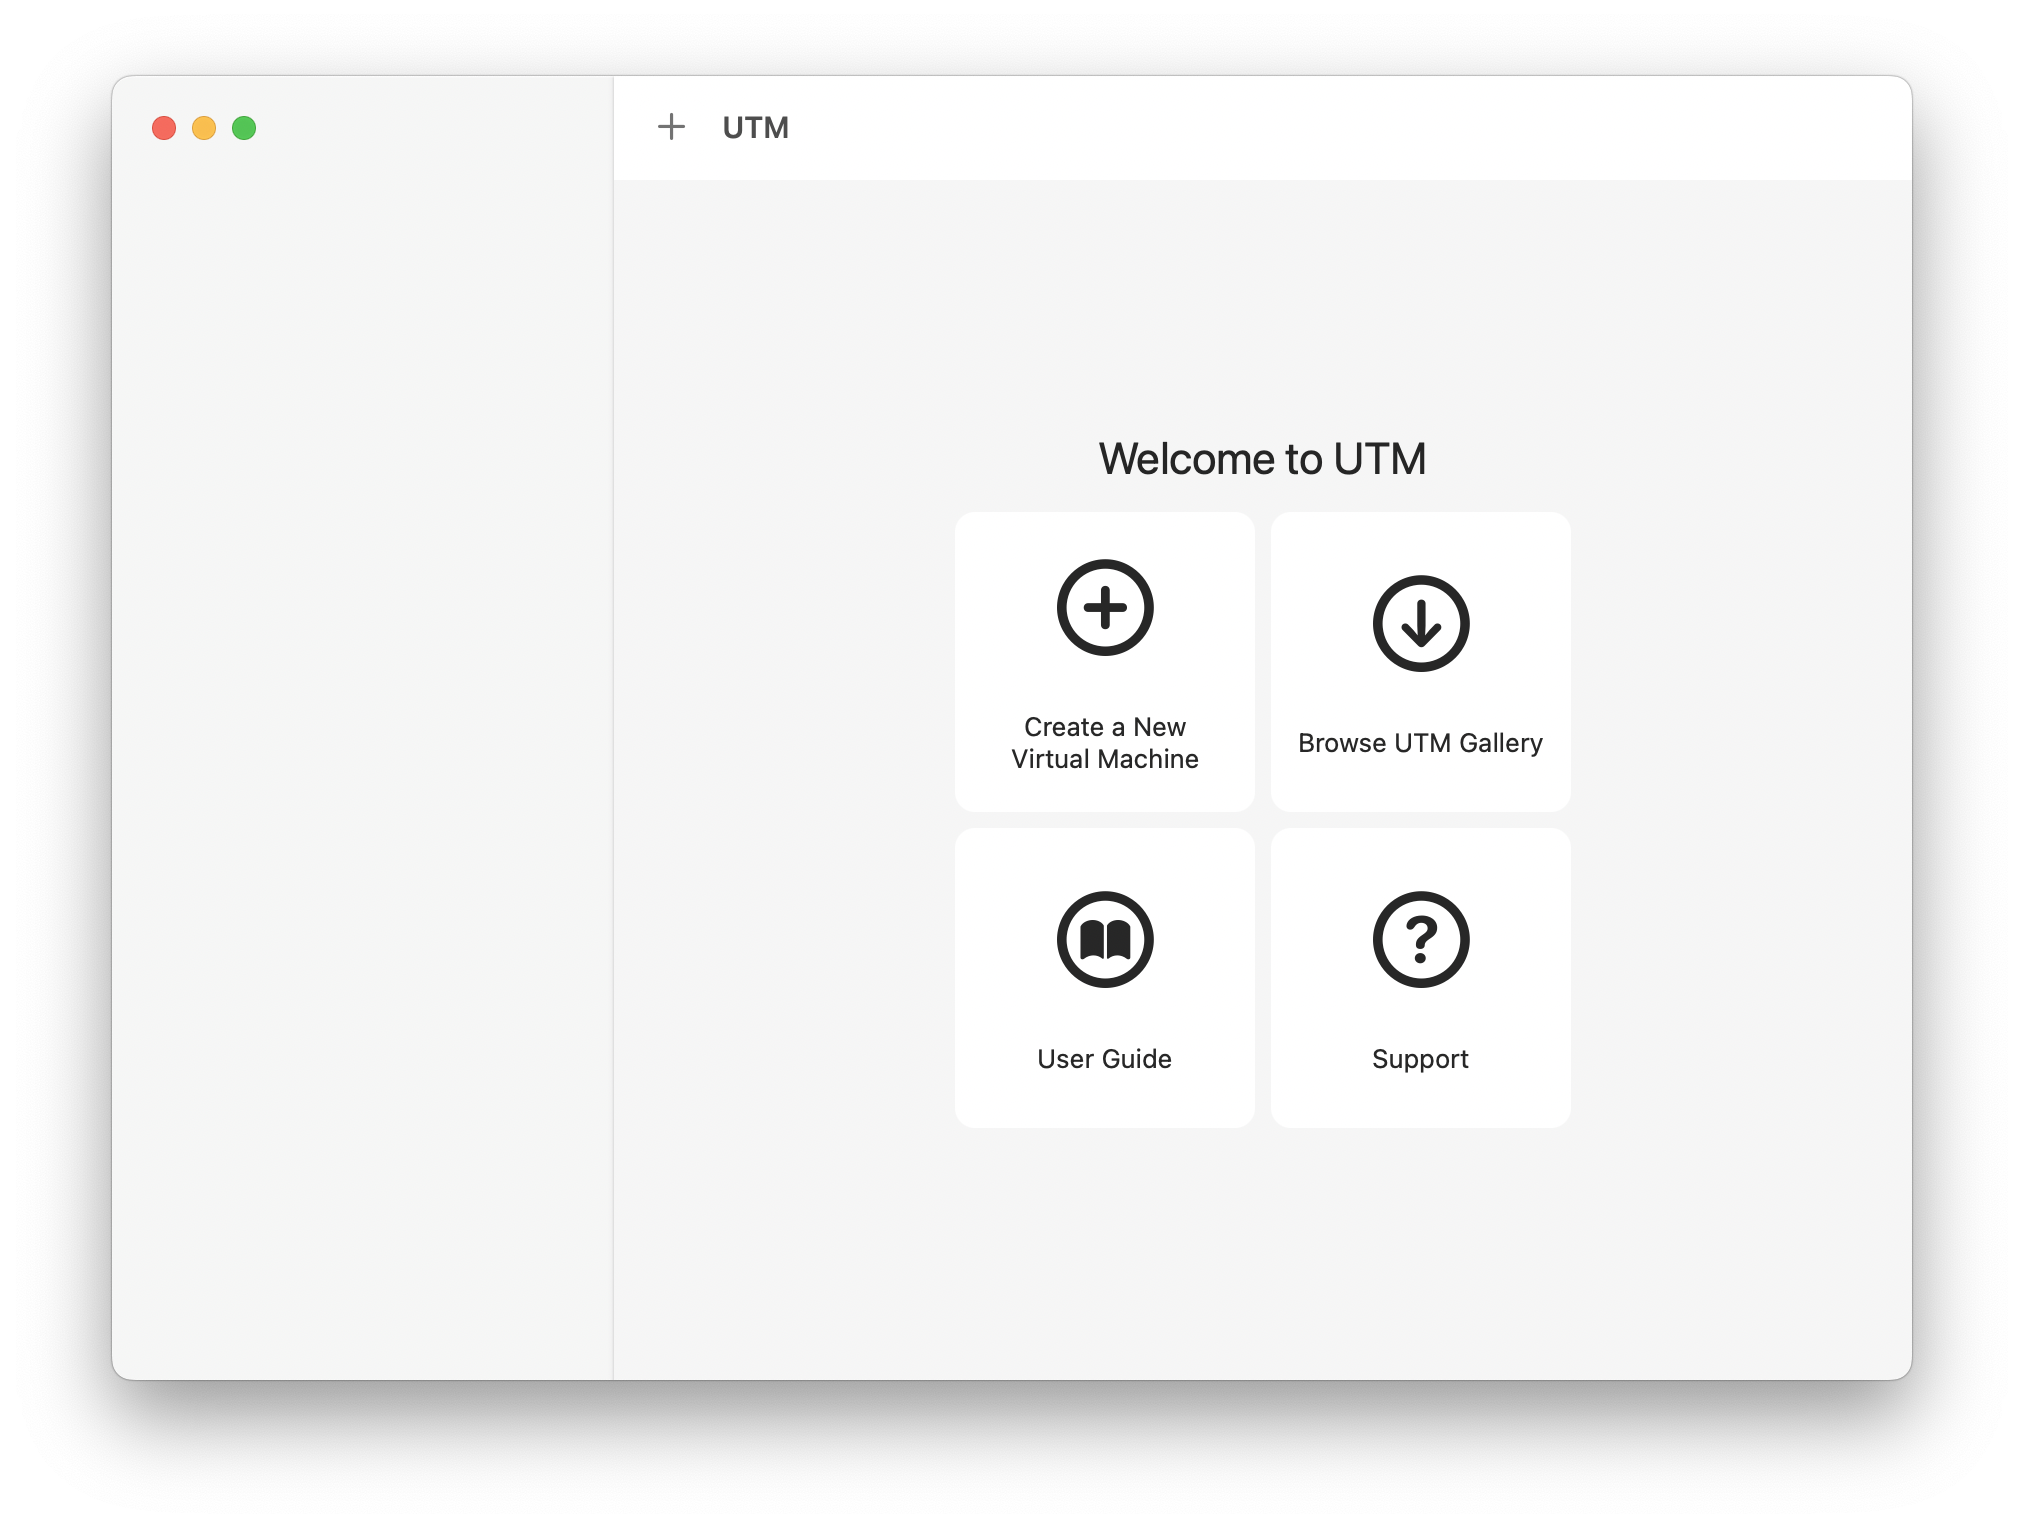
We’ll get to specific steps later. But for now, it’s good to know that later you’re going to create a new virtual machine or VM. The virtual machine will contain all of your Windows installation and apps, accessible via the UTM app. Since Microsoft only sells a version of Windows designed for Intel processors, you need to get a special “ARM” version. (ARM is the processor family upon which Apple’s M1, M2, and M3 chips are based.)
One notable caveat: Some third-party Windows software (including, for now, Intego’s Windows software) may not be fully compatible with the ARM version of Windows. Windows 11 for ARM includes a built-in x86/x64 emulation engine that lets many basic Intel-native apps run as though they’re designed for ARM. (This is similar in concept to how Rosetta 2 lets you run Intel-native macOS apps on an Apple silicon Mac.) However, more complex software (such as antivirus software and video games) may not work until the developer ports the apps to make them ARM native. Given that Microsoft is not yet selling or advertising Windows for ARM, few developers are writing ARM-native Windows apps for now. Again, many third-party apps should work pretty seamlessly thanks to Microsoft’s built-in emulator, so you might not experience any difficulties.
If you want to stay up to date with the latest Windows releases, you can join the Windows Insider Program and download a free preview version of Windows 11 for ARM. This file is more than 10 GB, so if you don’t have the bandwidth to download it quickly, you might have to wait for it to download overnight.
(If you have a specific need to install the Intel version of Windows instead of the free ARM version, specifically so you can use certain Intel-only Windows software, you can also do this via UTM. After you see the screen depicted above, click on Create a New Virtual Machine, then click Emulate. As the UTM software notes, you can expect the Intel version of Windows to be slower. You’ll have to supply your own ISO or VHDX image for the Intel version of Windows; obtaining that is outside the scope of this article. The rest of this article, other than this paragraph, assumes that you want the free ARM version of Windows—because that’s the better option for most people who have a Mac with M-series processor.)
While you’re waiting for Windows 11 to download, you might want to click Browse UTM Gallery. This takes you to the UTM website where you can view a number of virtual machines that you can download. These include various Linux distributions, all ready to run, and even Mac OS 9.2.1, if you want some nostalgia. (For some tips on using Classic Mac OS, be sure to check out our article Mac OS 9: Some Love for the Classics! You’ll even find links to download Mac OS 9 versions of Intego utilities—which are no longer supported, of course.)
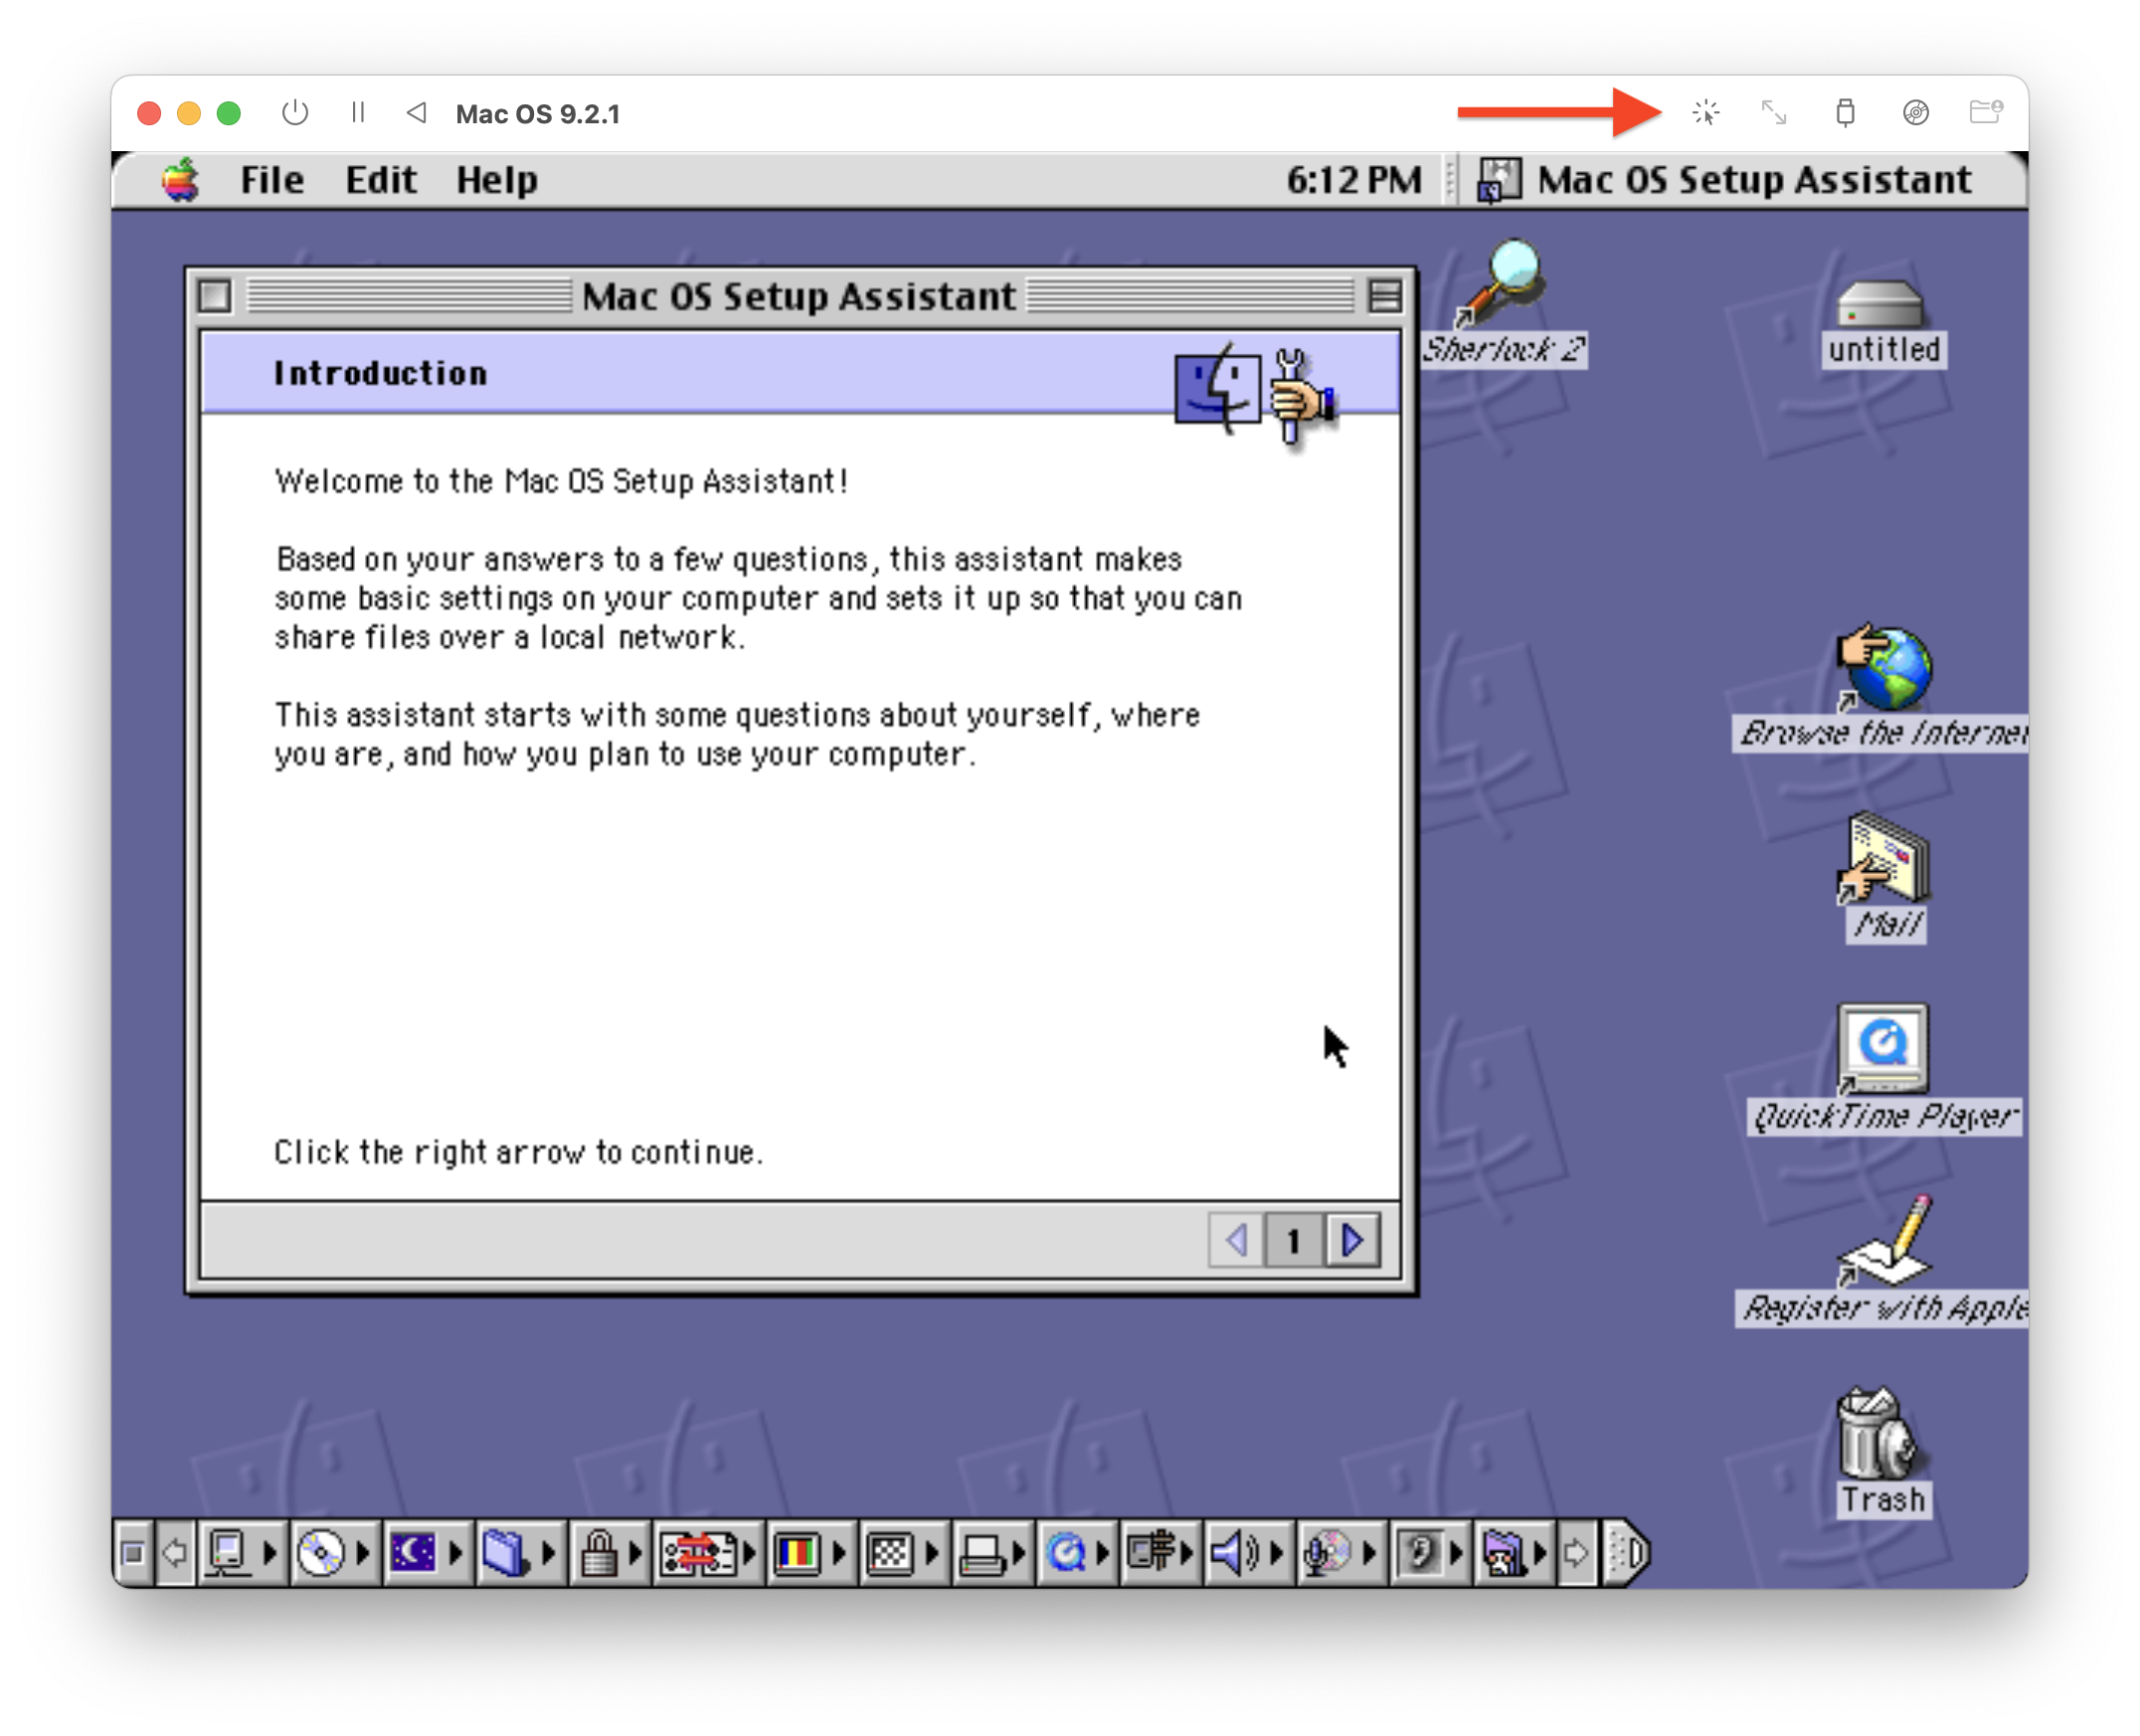
When you first launch a virtual machine in UTM, your mouse cursor won’t work; click the Capture Mouse Cursor button in the UTM toolbar (to the right of the arrow in the screenshot above). After the cursor has been “captured,” you can later hold down Control+Option when you want to make the VM release your cursor.
You’ll notice, in the gallery, entries for various older versions of Windows. You can download virtual machines to run Windows 7 or Windows XP. (Note that, like Mac OS 9, neither of these Windows versions is still getting security updates.) The Windows 11 section gives you instructions on how to install it, as I’m explaining here. Since it doesn’t give you a ready-to-use VM, the rest of this guide will walk you through the steps.
Setting up a Windows virtual machine
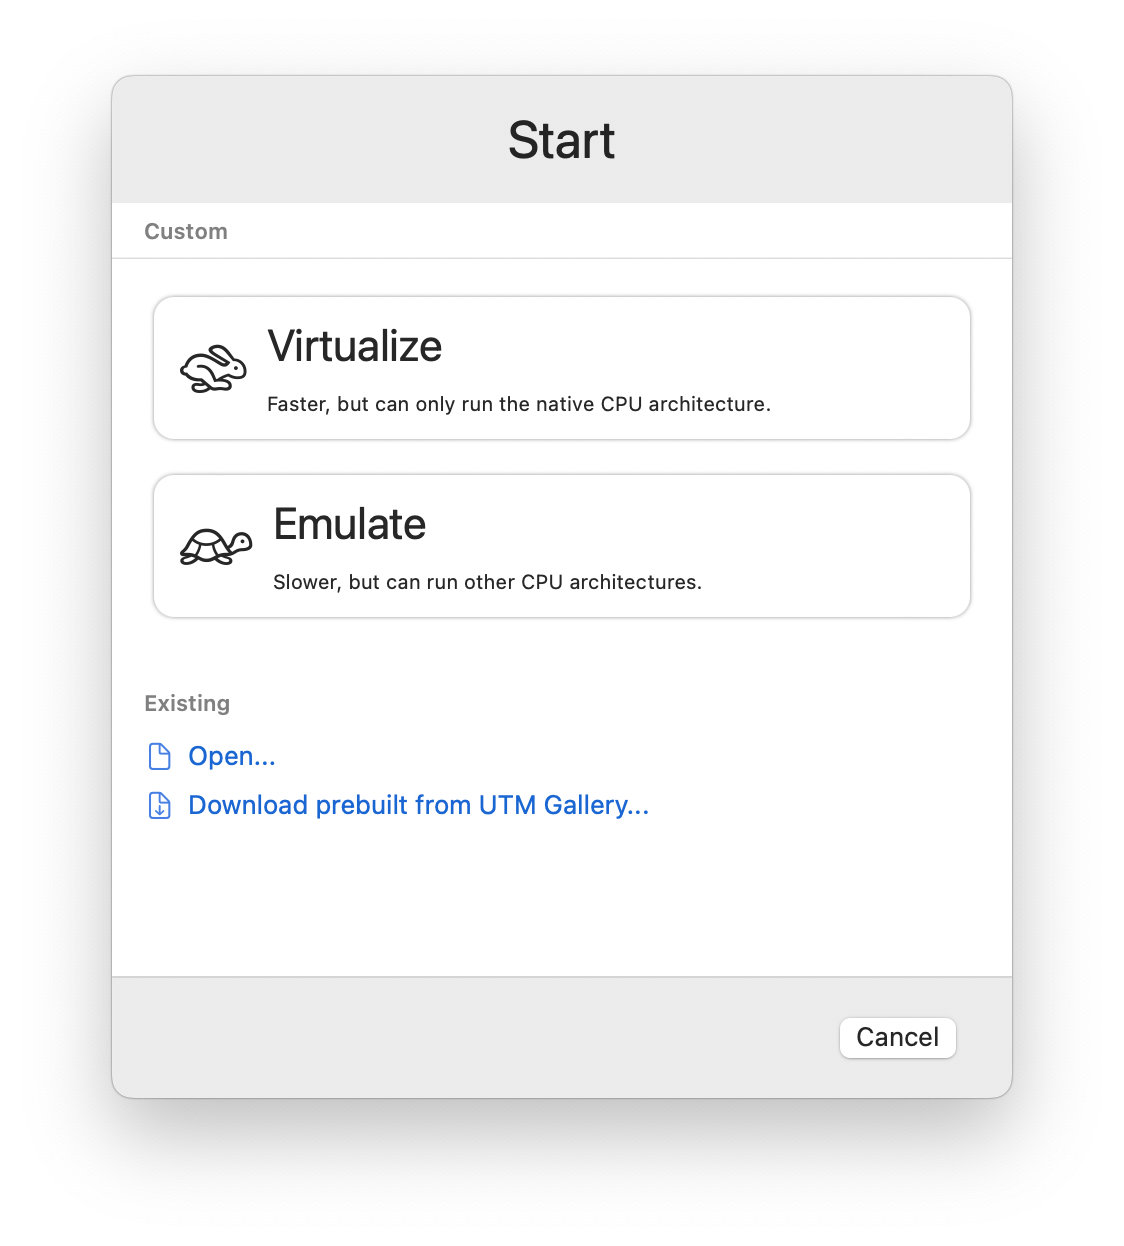
To set up a Windows virtual machine, click “Create a New Virtual Machine” on the UTM home screen, or click the + icon in the toolbar. Since you’ve downloaded an ARM version of Windows 11, you can click Virtualize in the next screen; this means that the software runs natively on your M1, M2, or M3 processor. (If you were to run an Intel version of Windows 11 on an Apple silicon-based Mac, you’d choose Emulate instead, which you can expect to run significantly slower; for most purposes, you’ll probably want to avoid this.)
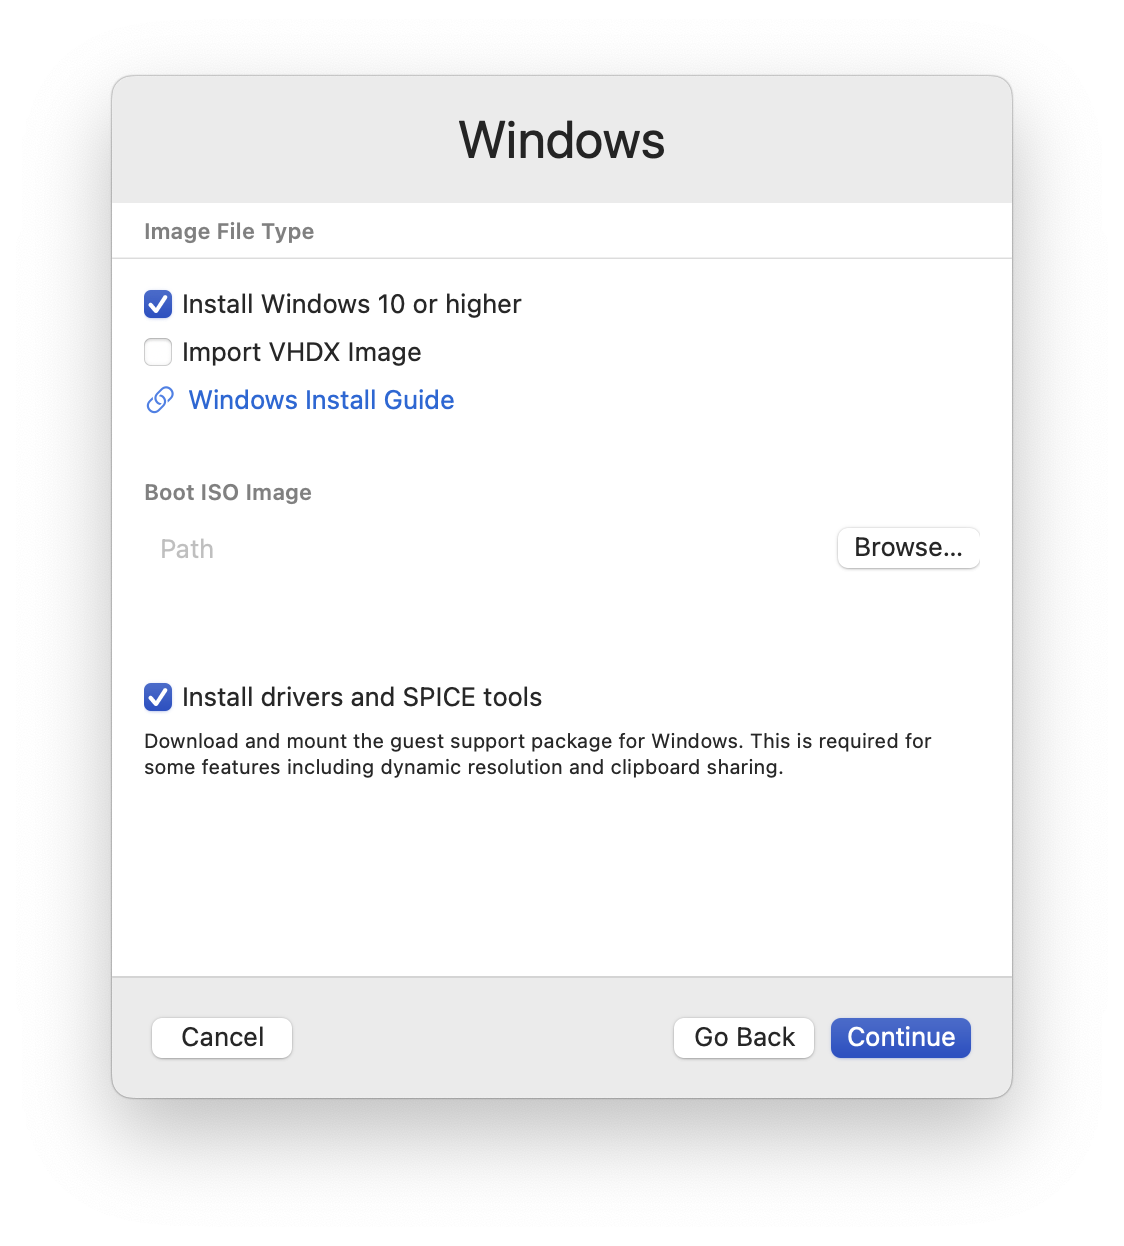
The next screen lets you choose which operating system you run. Click Windows.
By default, UTM is set up to install Windows 10 or higher, and install drivers and SPICE tools, which are necessary for smooth use of your Windows VM. Check Import VHDX Image, then click Browse in the Boot ISO Image section, and select the disk image for Windows that you downloaded. Click Continue.
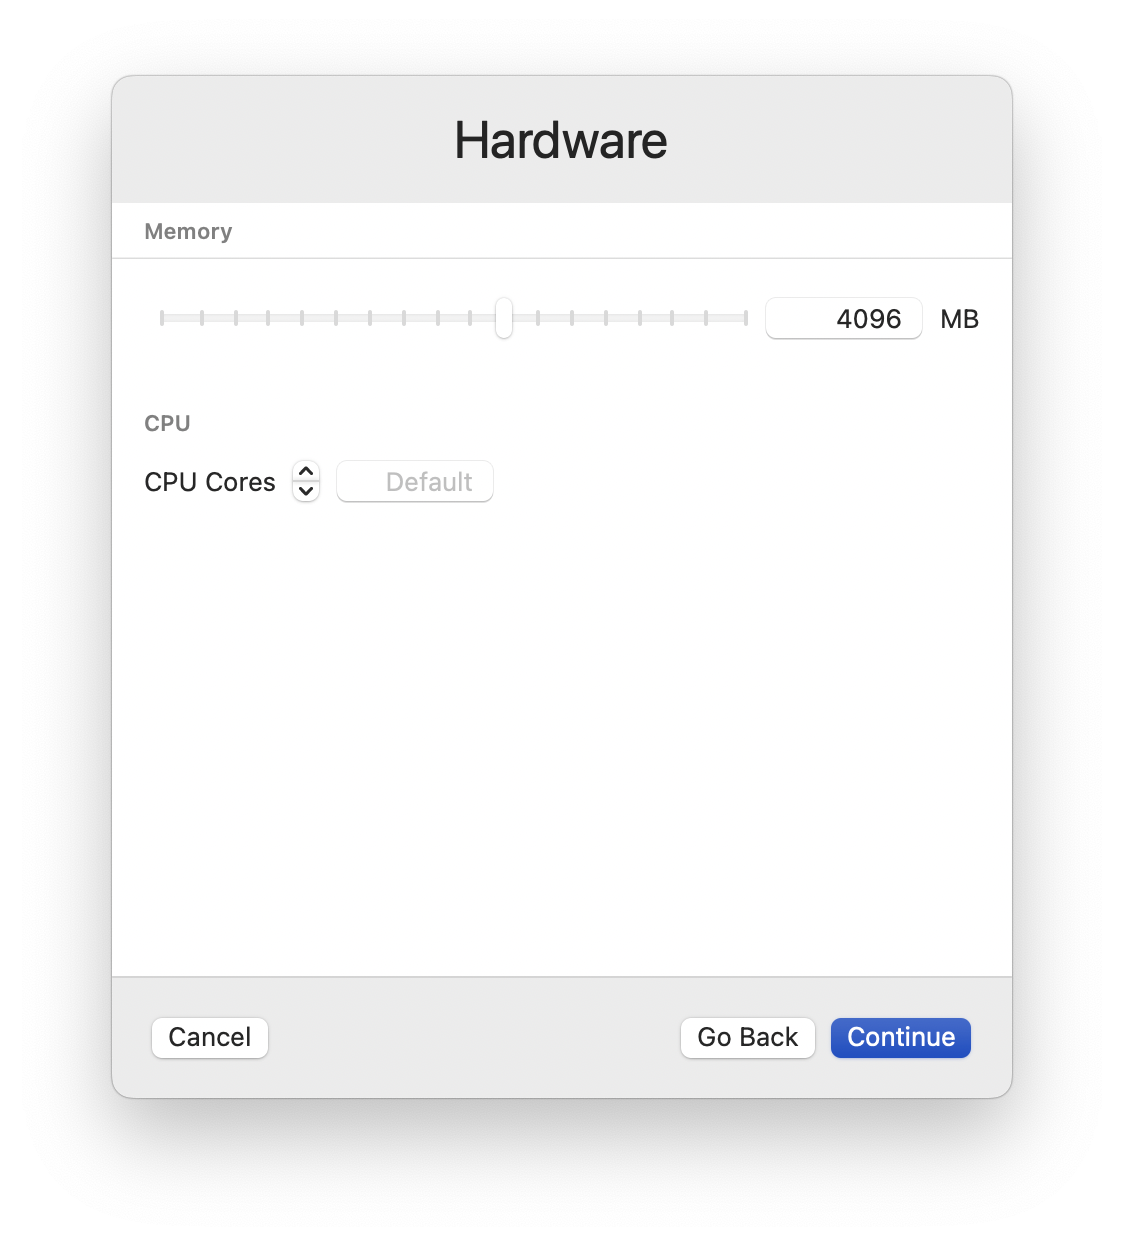
Next, choose the amount of memory and the number of CPU cores you want the virtual machine to use. You can start with the default and change this later. Click Continue.
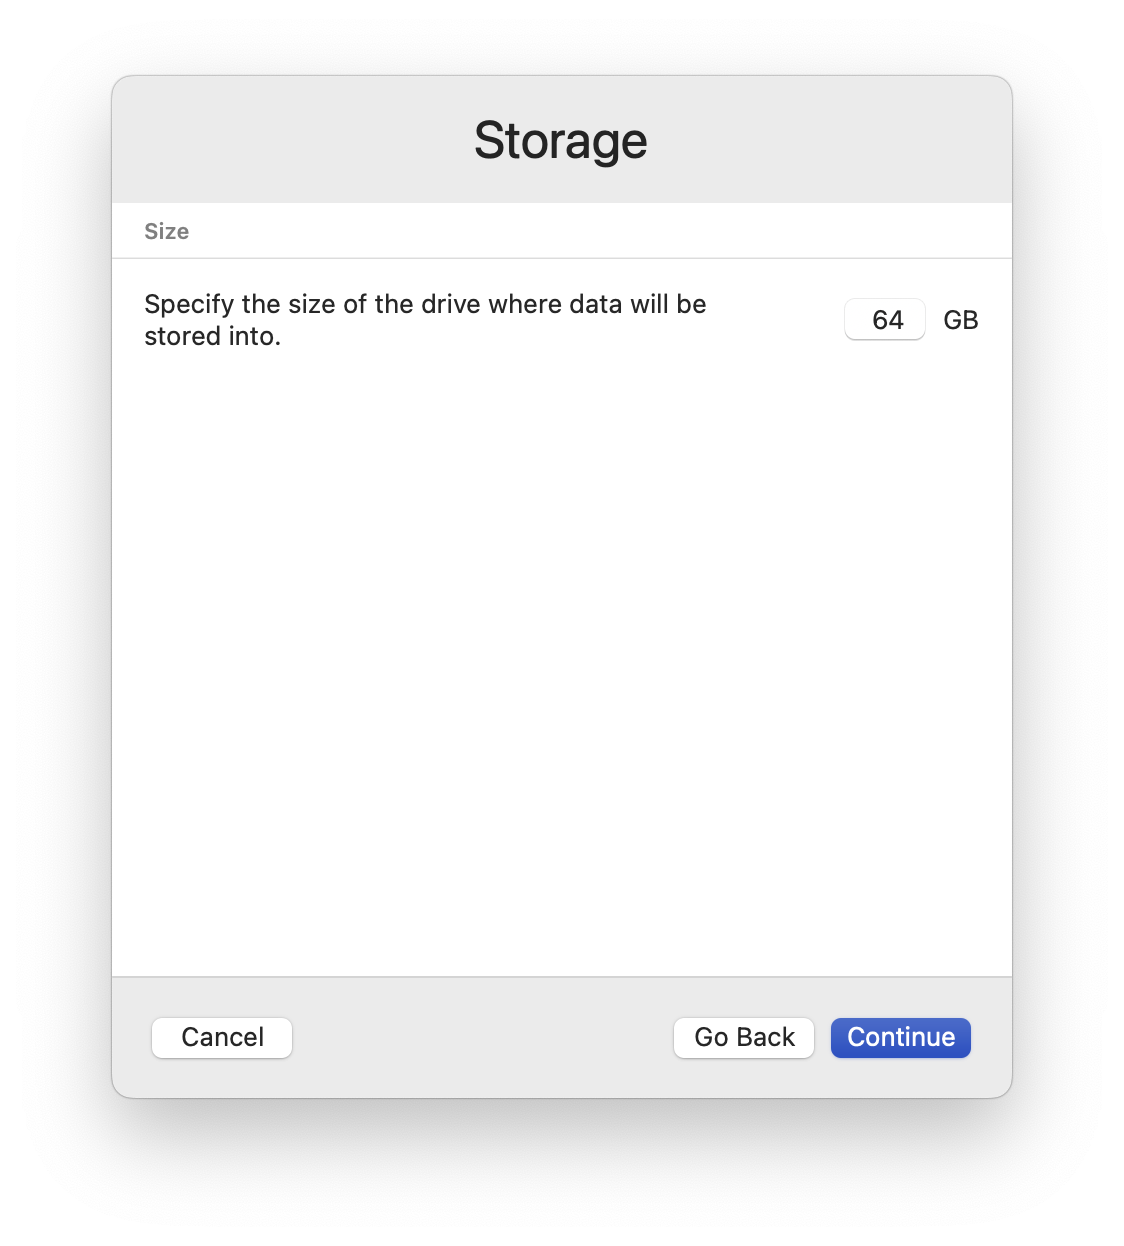
The next screen lets you choose the amount of space the virtual machine will take up on your Mac. By default, this is set to 64 GB, which is sufficient for most uses, but may be too large for some users with limited disk space. You can lower the size, but don’t go much below 20 GB.
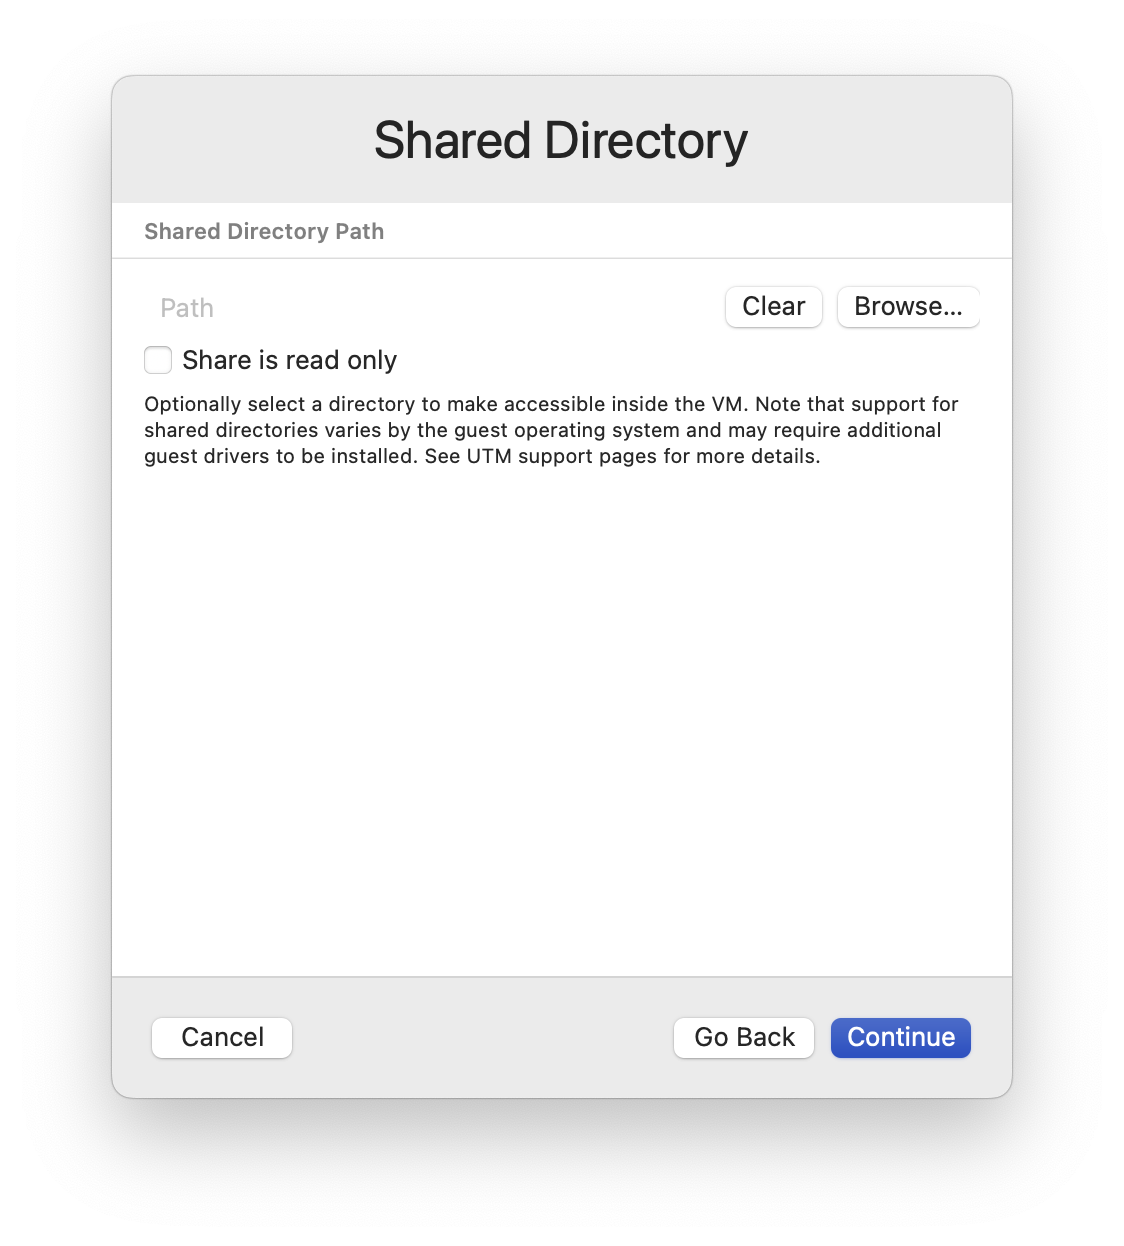
The next screen lets you choose a shared directory, or folder. This is essential if you want to be able to transfer files from your Mac to the virtual machine, and vice versa. Click Browse… to find a folder you want to use, or to create a new folder.
The final setup screen is the Summary screen. This reminds you of your settings, and allows you to name the virtual machine.
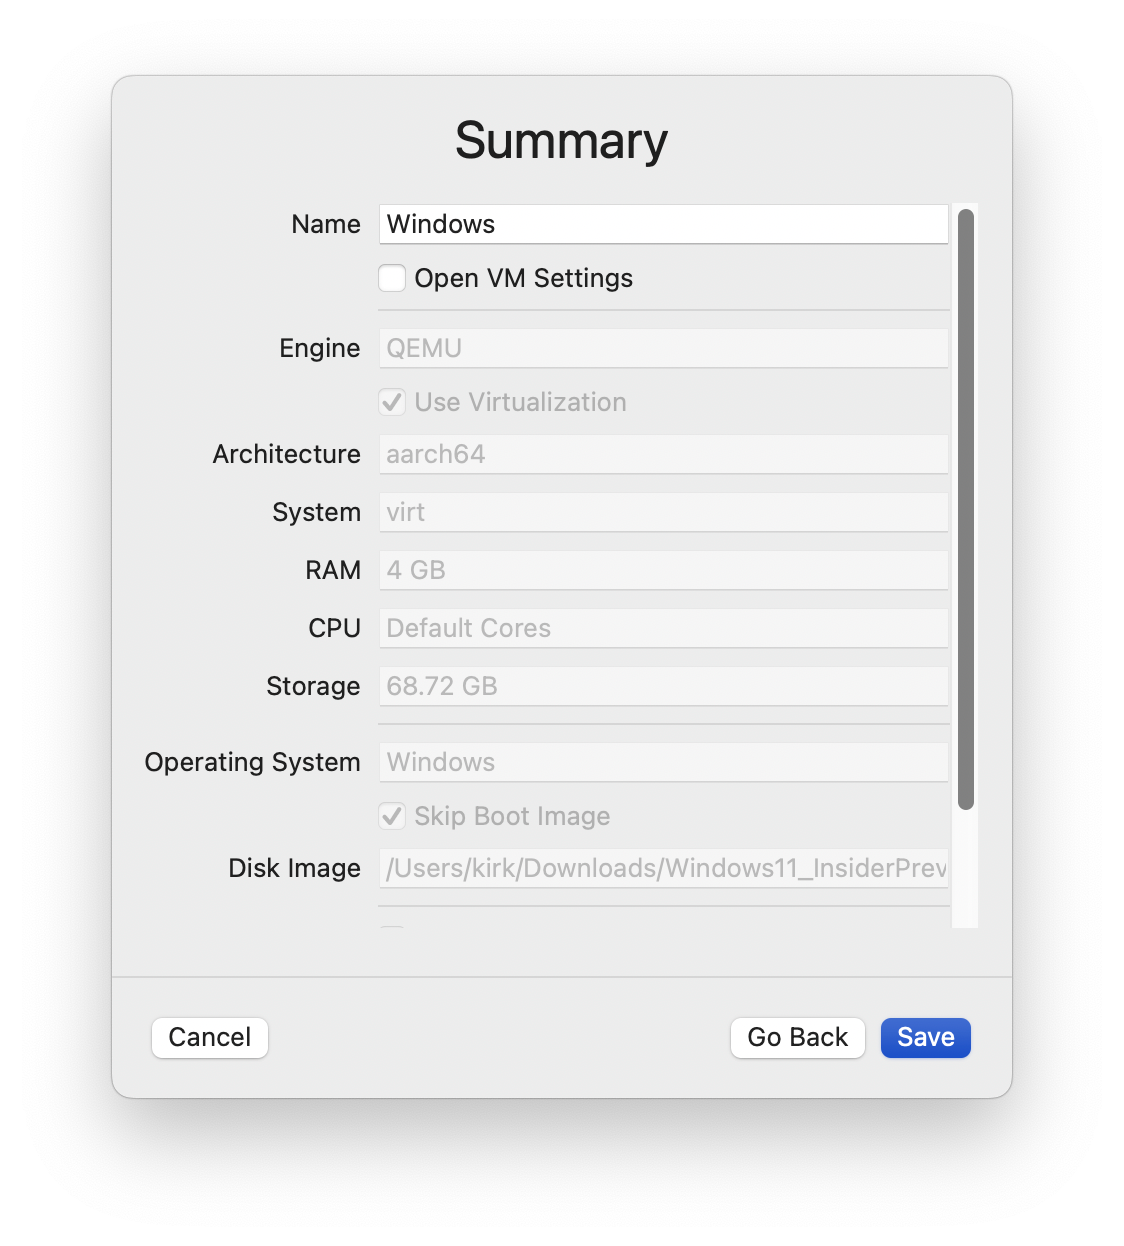
Click Save, and UTM prepares the virtual machine. You see a screen like this:
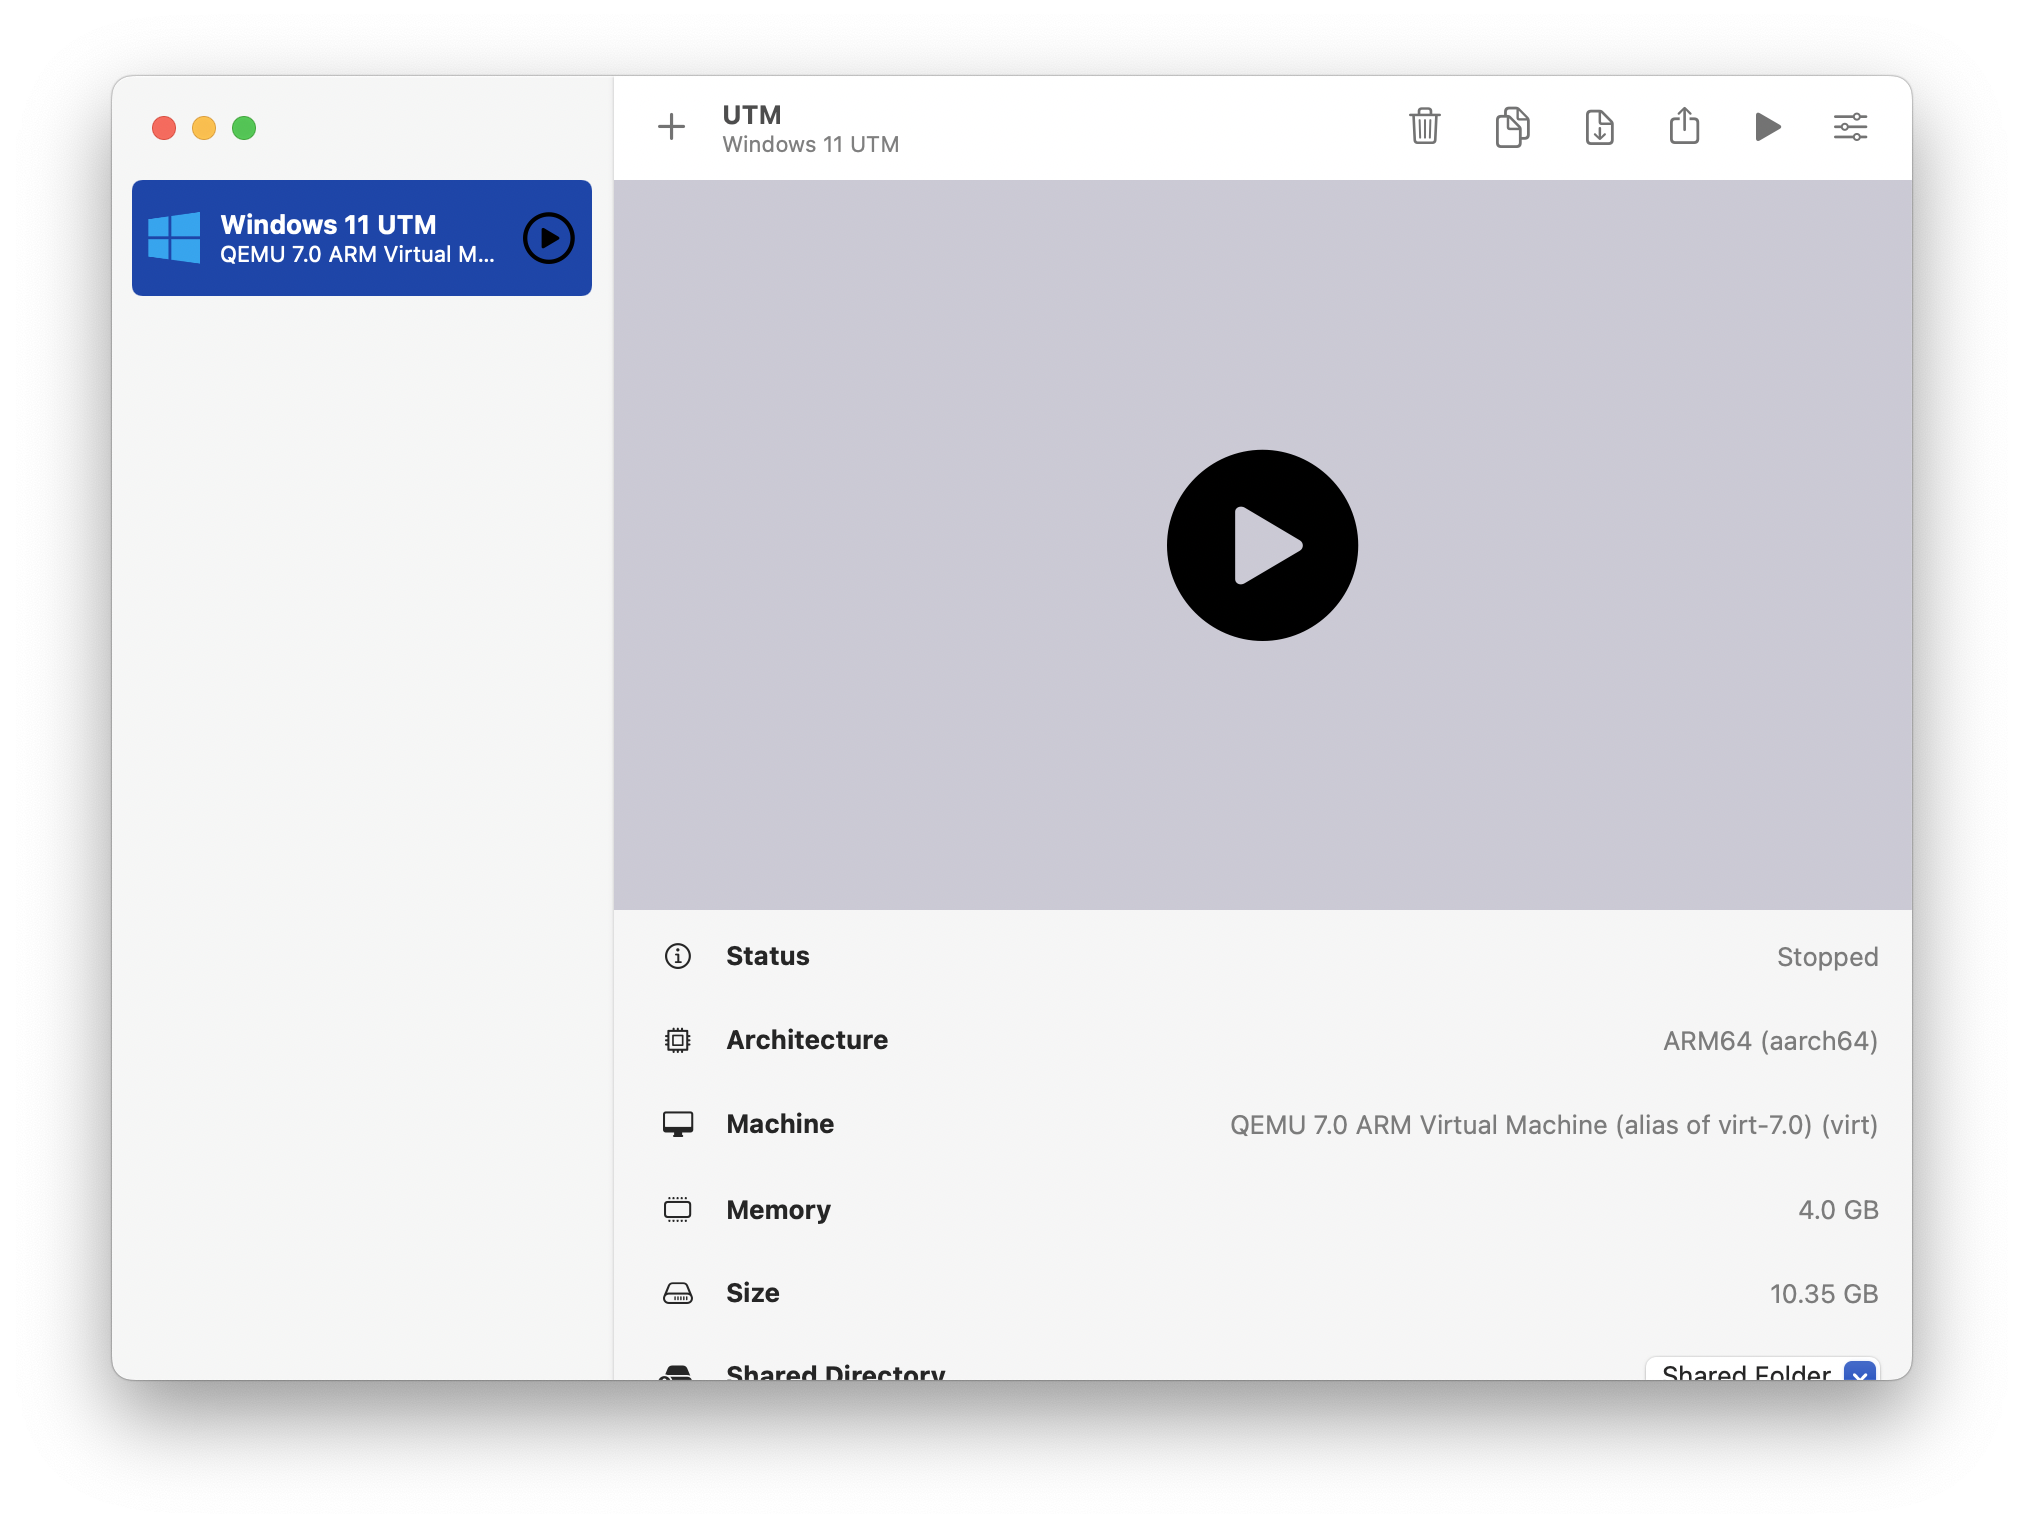
Click the big arrow to launch the virtual machine. In a couple of minutes, you’ll see the Windows setup screens. As I mentioned above, you need to click the cursor button in the toolbar for your cursor to work in the UTM window. Keep in mind that you’ll need to hold down Control+Option later when you want to make UTM release your cursor.
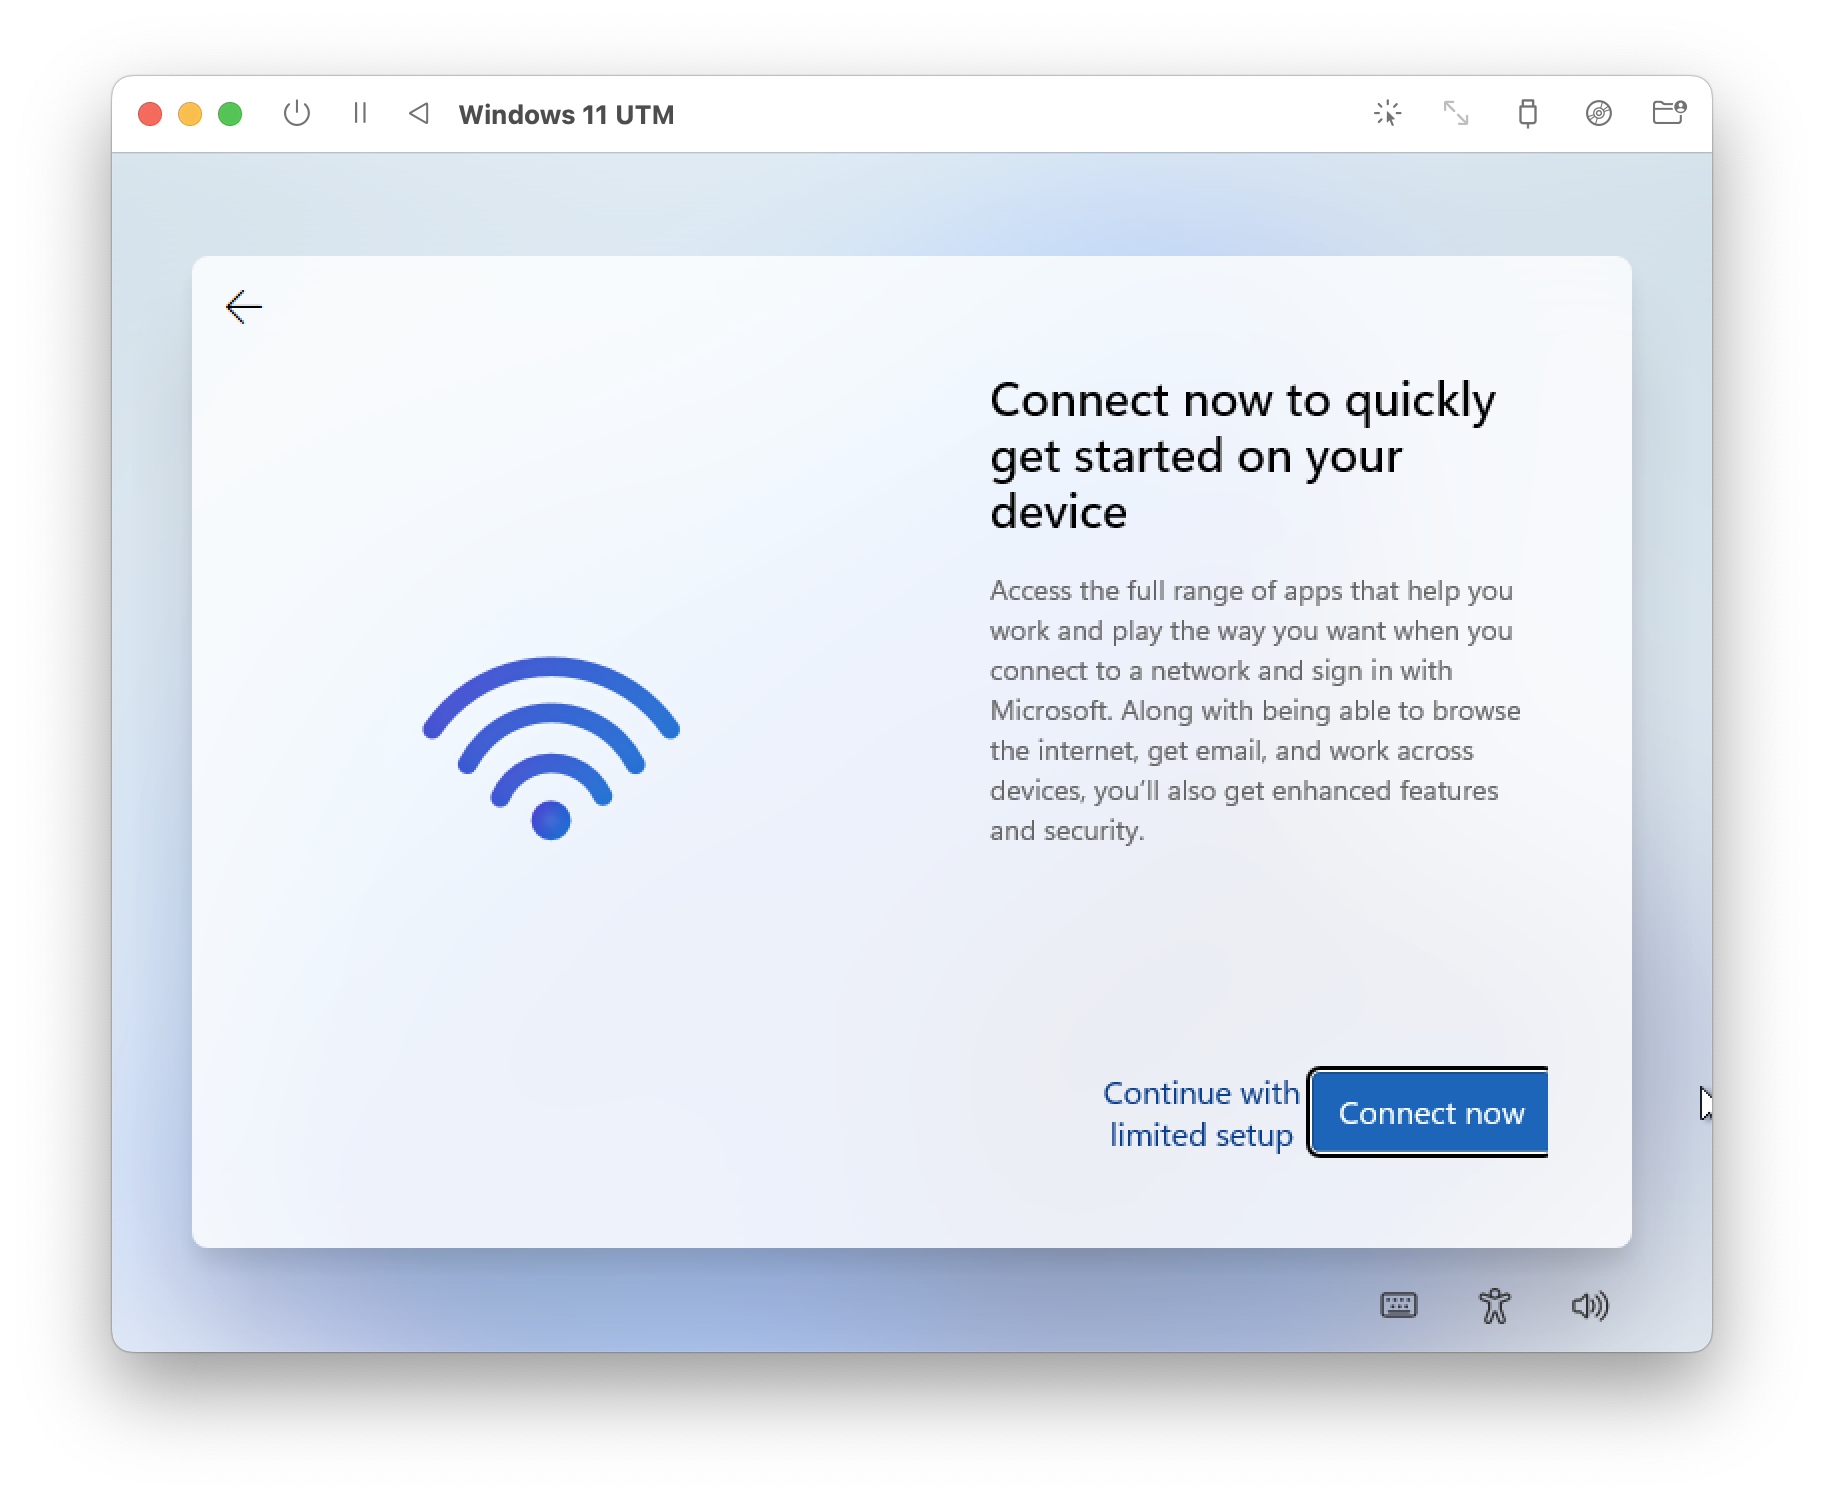
If you hit a snag in the setep when Windows asks for network access, restart the VM, then, when you get to the language selection screen, press Shift-F10 to launch the Windows command prompt, type OOBE\BYPASSNRO, then press Enter. This tells Windows to skip the network setup for now. The VM will restart, and the setup procedure will offer an option for “I don’t have internet” when you get to the network screen. Click that, then click Continue with limited setup. You’ll install something later that will give you network access.
You next set up a user account. You’ll enter your desired username and password, then set up three security questions. These are all really simple questions, which could be defeated by anyone who knows a little bit about you, or who checks your Facebook feed. It’s a good idea to put random answers to these questions, but to make a note of them. (You can put these security questions and answers in your password manager.)
After going through a few more screens, and after a couple of minutes of setup, you’ll reach the Windows desktop.
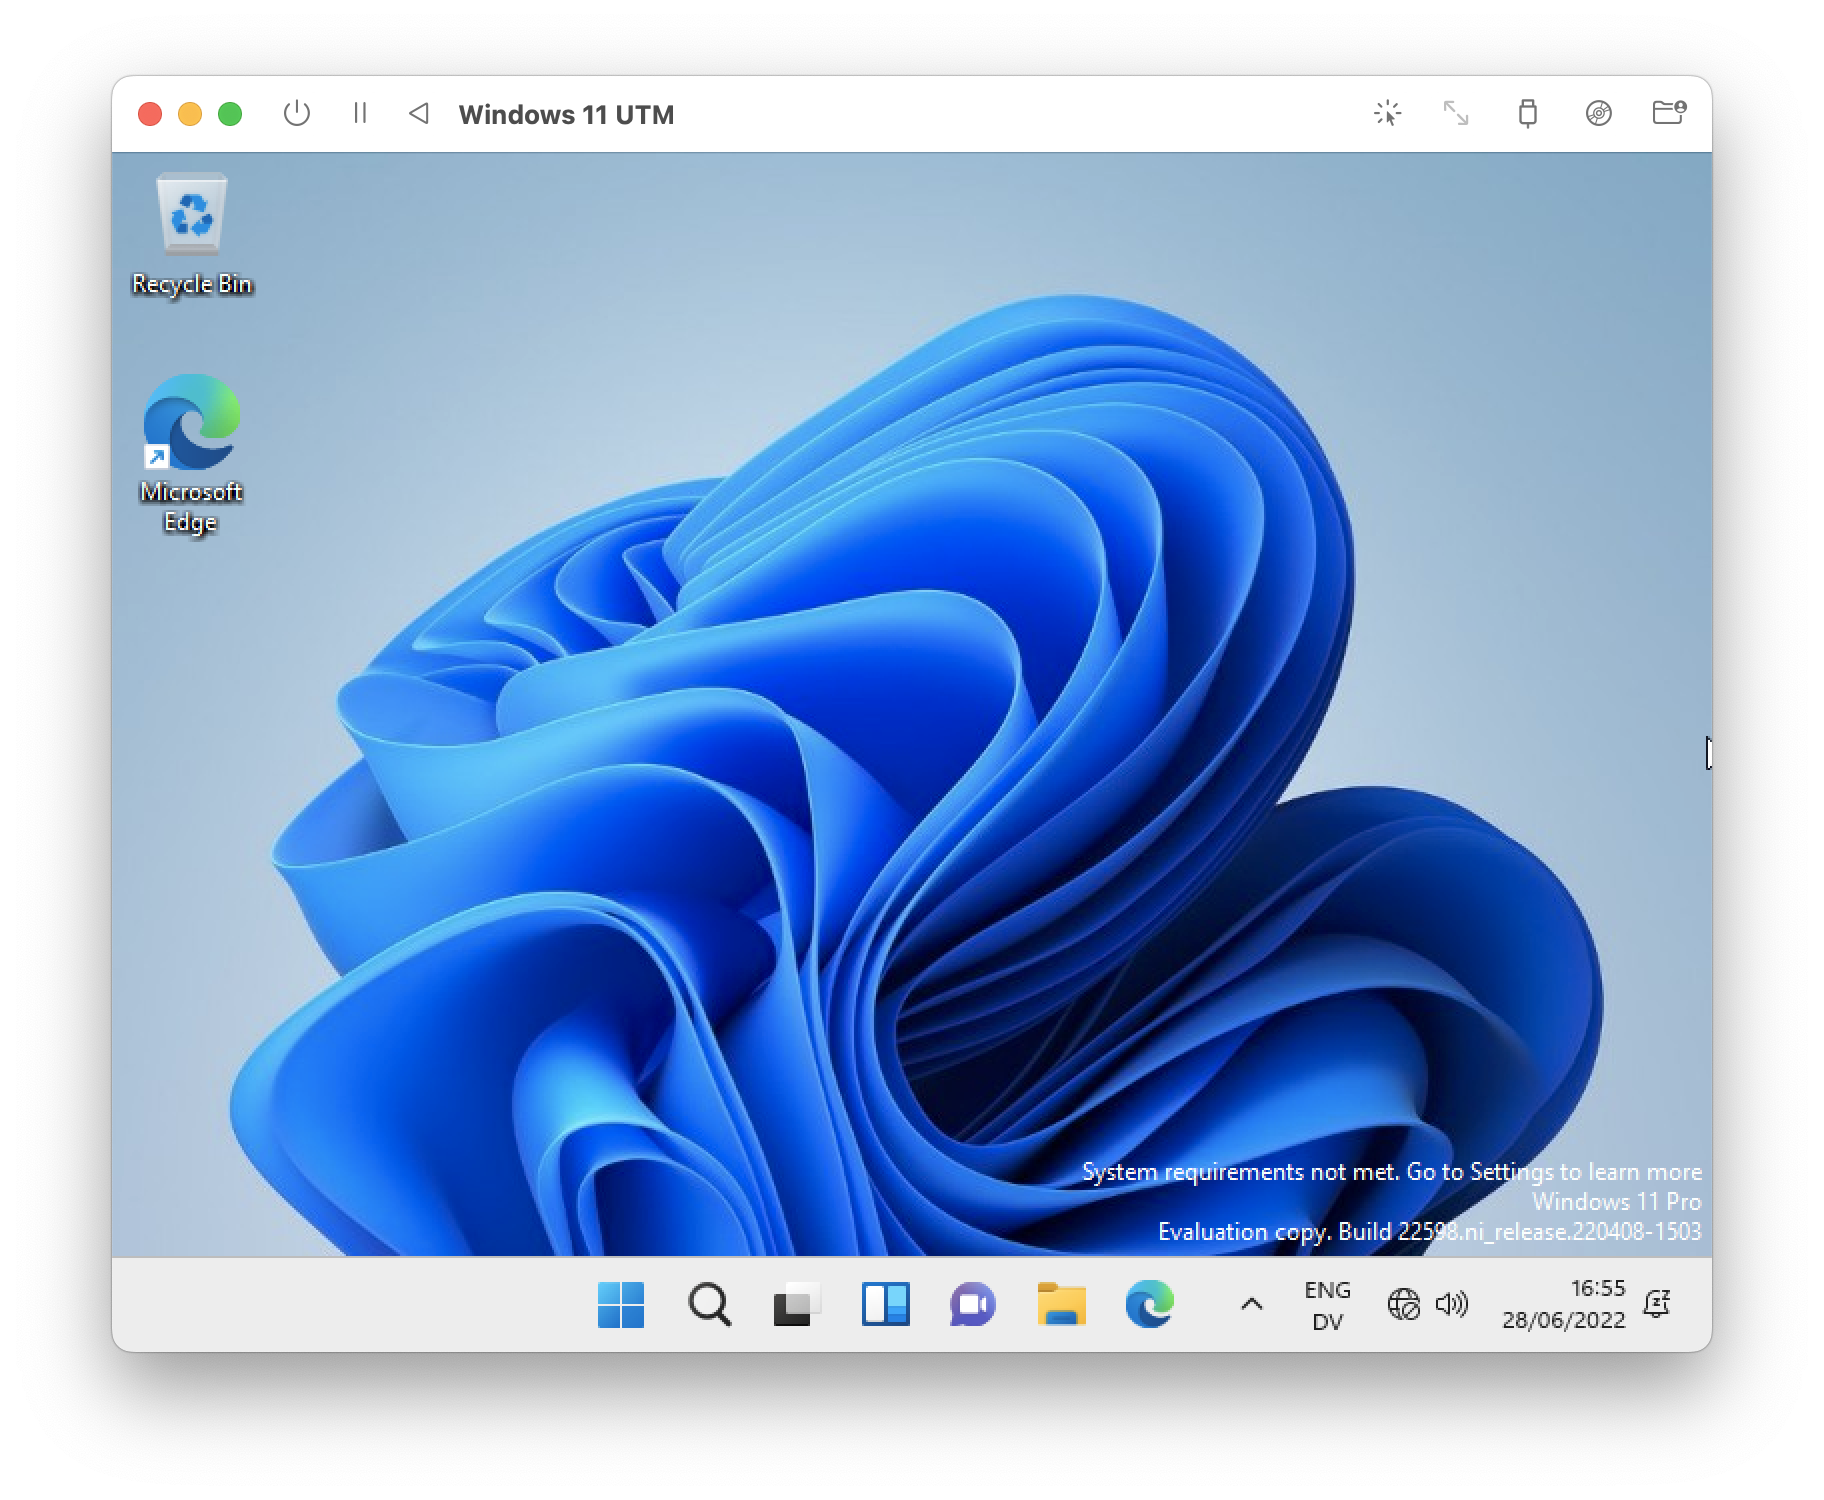
You’re not finished yet, however. You should install some software that allows you you to have network access, and other features. UTM has already prepared this for you. Go to My Computer, find the CD drive – the image for these SPICE tools is already mounted – then launch spice-guest-tools-xxx.exe where xxx is the version number. Follow the instructions to install these tools using the standard Windows installer.
After this installation is complete, reboot your virtual machine. You can now use Windows.
As free software, UTM is more limited in functionality than Parallels Desktop. It may run a bit slower, and you can’t drag files from one OS to the other. However, you can at least copy and paste text between the two operating systems thanks to SPICE Guest Tools.
UTM preferences and settings
There are two locations where you access UTM preferences and settings. If you click the UTM menu (next to the Apple menu) and select Preferences…, you get a preferences screen for the app itself. I recommend you leave all these at the default settings, unless you have a reason to change them.
To access settings affecting QEMU and your virtual machine, select a virtual machine then click the Edit button in the toolbar. (Note that Windows will need to be shut down, so your VM status will show as Stopped on this screen, before you can change the VM’s settings.)
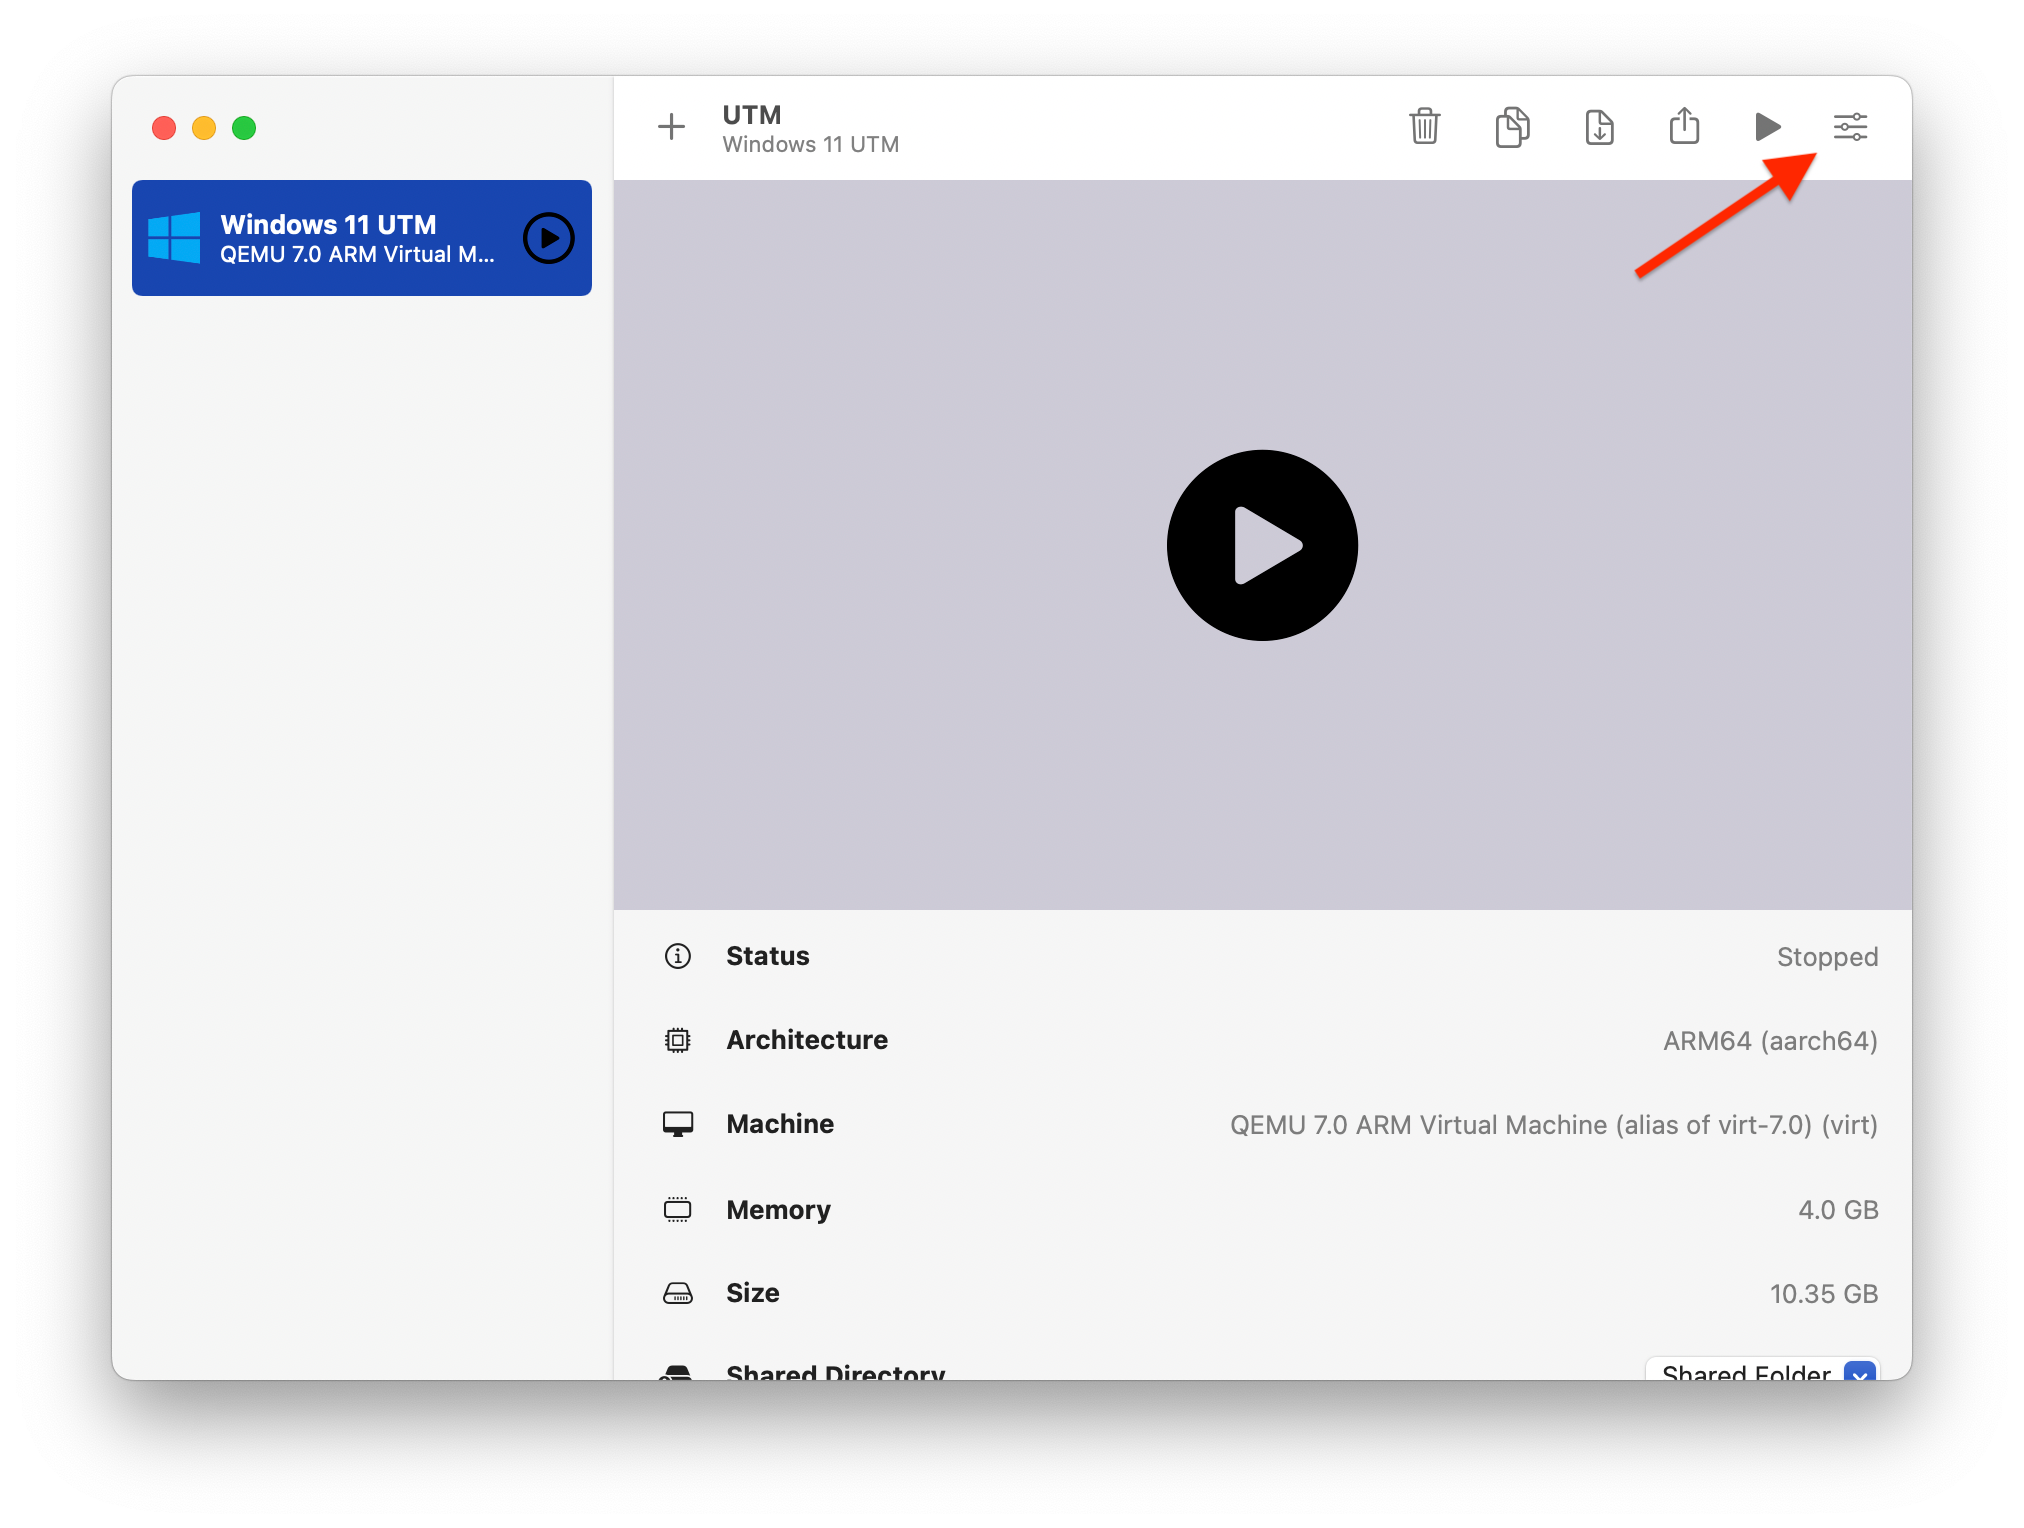
There are lots of settings here you can tweak, notably those for CPU cores and memory. (I suggested earlier to leave these at the default values when you first set up UTM.) If you find that your VM is too slow, you can try assigning more memory and/or CPU cores. You should only need to do this if you’re doing processor- or RAM-intensive work.
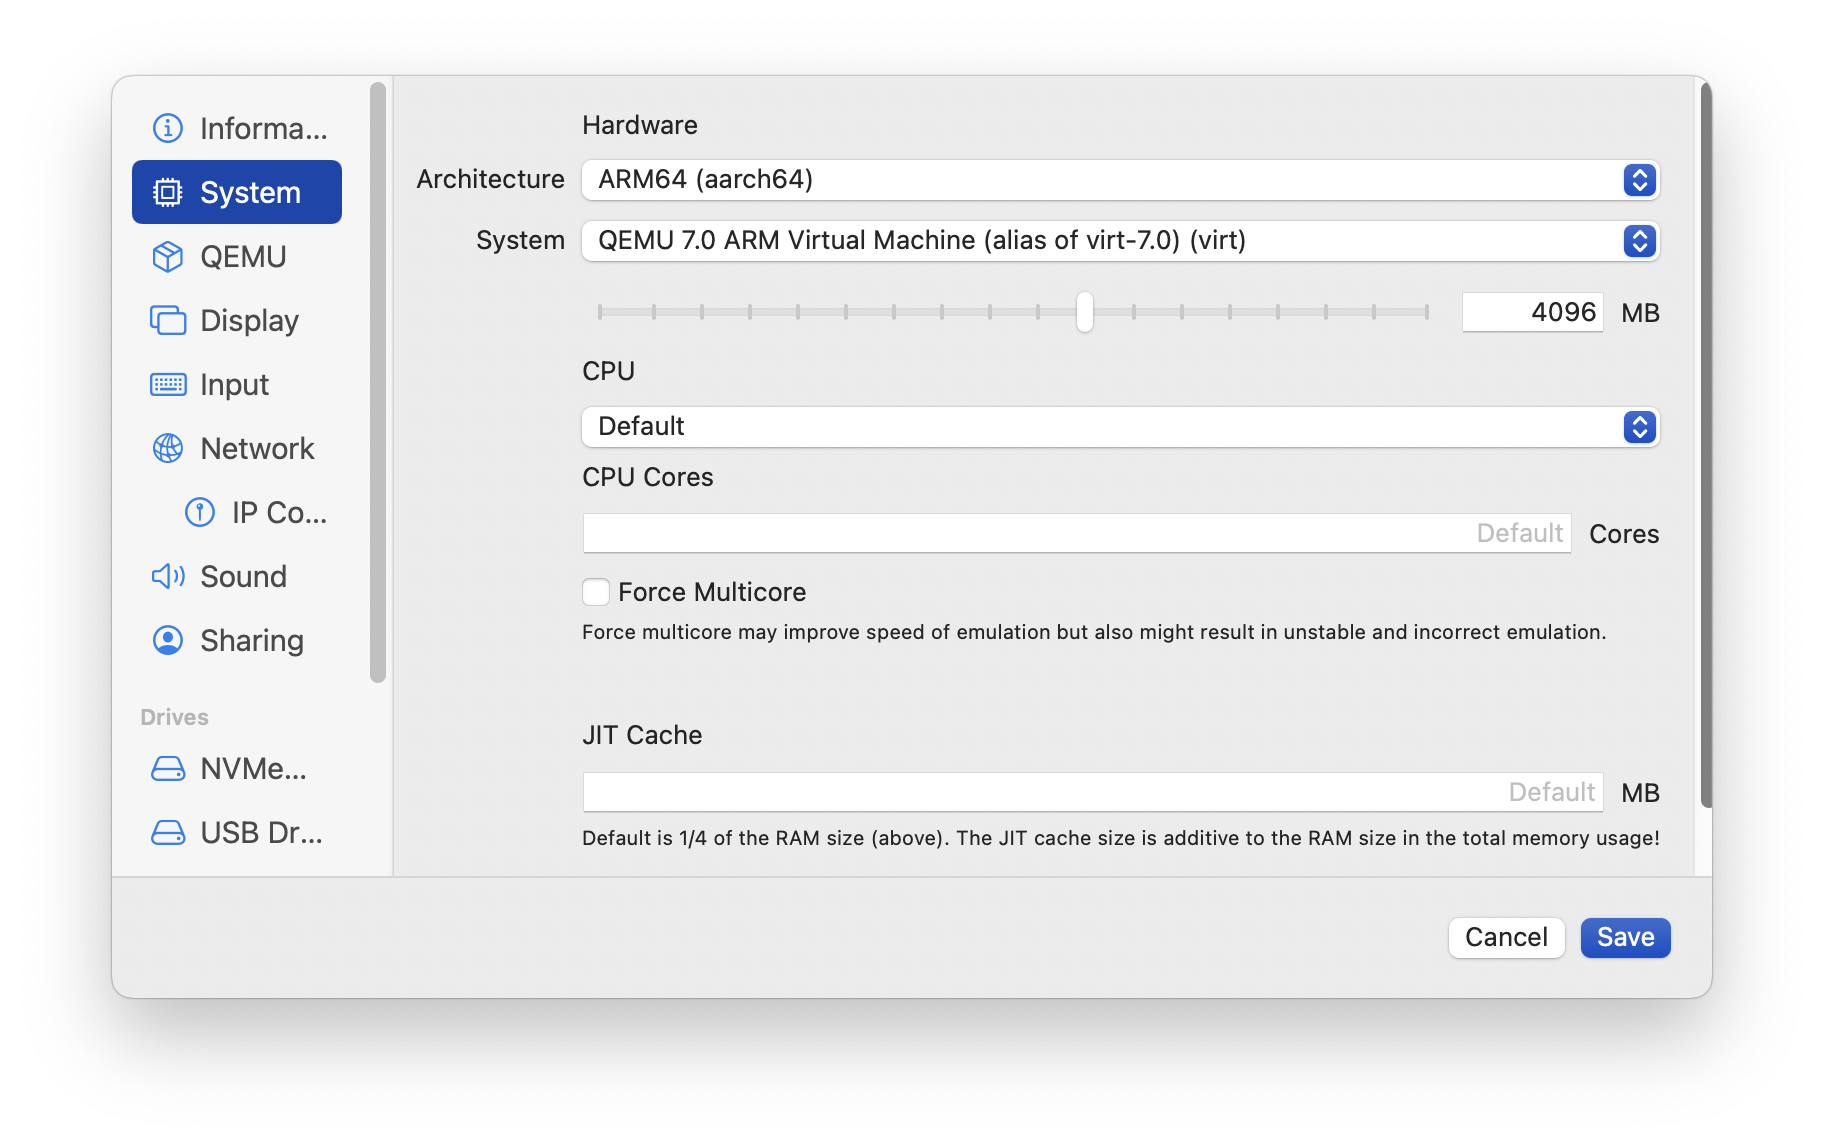
Have a look through the other settings. Again, you probably won’t need to change any of these, but you can do so later if needed.
You can now run Windows for free on your M1/M2/M3 Mac
As mentioned above, the $10 Mac App Store version of UTM allows you to get app updates automatically. If you chose to download it free from the developer’s site, the app does not have a built-in updater, so you’ll need to update UTM manually when new versions are released. You can check the UTM GitHub page to see what the latest version is; this is important, because updates include both new versions of the UTM app, but also the underlying QEMU software.
So, whether you need to use Windows occasionally or often, UTM is a great way to run it for free. For now, you can get Windows 11 for free, but it’s not clear how long this will be available. Microsoft will probably start selling the ARM version of Windows at some point in the future.
By the way, you can also use UTM to install a macOS Sequoia VM on your Mac for free.
Install macOS Sequoia Beta in a Virtual Machine on an M1, M2, or M3 Mac with UTM
How can I learn more?
 Each week on the Intego Mac Podcast, Intego’s Mac security experts discuss the latest Apple news, security and privacy stories, and offer practical advice on getting the most out of your Apple devices. Be sure to follow the podcast to make sure you don’t miss any episodes.
On episode 247 of the Intego Mac Podcast, we discussed running Windows 11 on an M1 Mac.
You can also subscribe to our e-mail newsletter and keep an eye here on The Mac Security Blog for the latest Apple security and privacy news. And don’t forget to follow Intego on your favorite social media channels: ![]()
![]()
![]()
![]()
![]()
![]()
![]()