How to Reclaim OS X Disk Space with Mac Washing Machine (Part 3)
Posted on
by
Lysa Myers
In our previous installment of this series, we talked about the Duplicates section of the new and improved Washing Machine, and how it can help you remove extra copies of files you may not want lying around, or just reclaim some extra space. In today’s article, we’re going to look at the Reclaim cycle, and see how it can give you even more options for how to reclaim disk space on your Mac.
As you’re doing your day-to-day computer activities, your computer is quietly keeping data and copies of things lying around, to speed up your activities or in case you need them. This is all a big part of usability that keeps things running seamlessly, so you don’t have to go digging around any more than necessary. But in time, all that adds up and bogs down your computer. Plus, who knows what is in all that data, which could be sensitive, but useful to someone who breaks into your computer? It keeps things both faster and safer if you can periodically go in and tidy things up.
Delete Space-Hogging Files
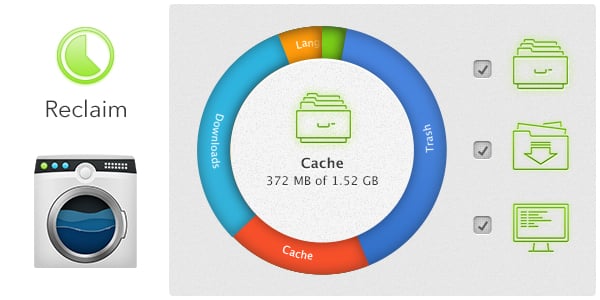
The Reclaim cycle seeks out files you no longer use or need, and quickly cleans them from your Mac, freeing up space and boosting your Macs performance.
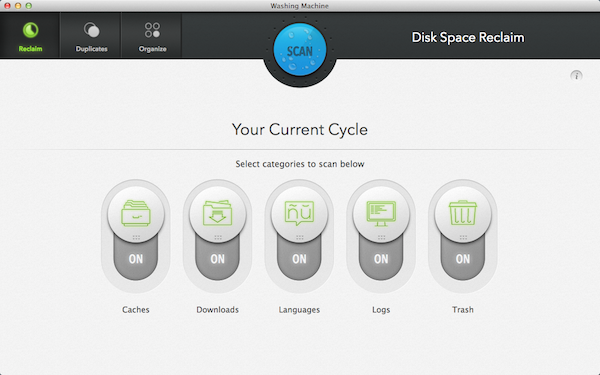
When you click the Reclaim button in the top left corner of the window, you’re presented with a list of categories to scan and clean. This includes common areas and files, such as caches, downloads, languages, logs, and trash.
- Caches: These are the areas programs use to pre-load things to make stuff happen faster, but when it’s something you did months ago you may not need that pre-loaded data anymore. This is also likely an area where digital burglars could find tasty bits of data.
- Downloads, Logs, and Caches: These are areas where files get stored that you may not realize are there.
- Languages: Well, do you really need your machine to display things in Occitan and Friulian? Odds are, probably not.
- Logs: These are lists of events that happened on your machine, which might be useful in situations like trying to trouble-shoot errors on your machine, but again it can get to be a lot of data that might also be useful for folks that are up to no good.
- Trash: This option empties the Trash Can. It is important to know that no file is actually deleted until you empty the Trash Can, therefore reclaiming disk space.
NOTE: Like with Duplicates, if you enable everything it could take a while, so keep that in mind when choosing how many areas you’d like to search at a time.
Once you have chosen your categories, click the Scan button and Washing Machine will begin analyzing your files for items to clean. Once Washing Machine completes its scan of your Mac, you will be presented with a new window that gives more detailed information about the types of files you can clean from your computer.
Make Space for What Matters

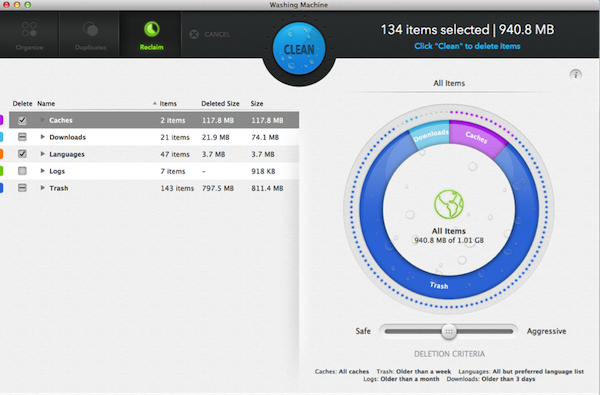
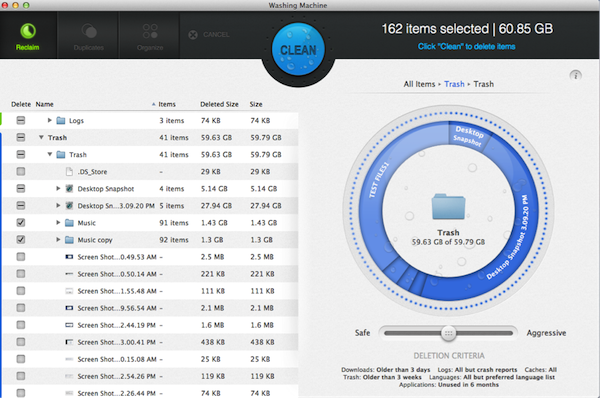
In the left-hand column, you will see a list of the different files that Washing Machine has found to clean. Each section is clickable, and you can manually choose which individual files you want to clean from your Mac.
You can also adjust each area by how aggressive you’d like the scan, depending on where exactly you’d like the results to fall in terms of saving a bunch of space versus saving data that might make things load faster, for instance.
NOTE: There are three deletion criteria options you can choose from by using the slider on the bottom right side of the window. The “Safe” option will delete less information, or the “Aggressive” option will delete more files and clear up more space on your Mac. More detailed information about exactly what will be deleted for each category is visible directly below the slider.
You can double-click any of the colored sections in the graph to get more detailed information about the files that have been found by the scan. This can help you visualize how much free space you can reclaim, and what categories, applications, and folders they are being deleted from. You can also use the list view on the left side of the window to see the size of each item. The list view can also be sorted by any column; for example, you can use this to easily sort by size to see which sections are using the most disk space on your Mac.
Clean Your Mac

Once you have made your selections about which items you would like to delete from your Mac, click the Clean button, and a new window will appear showing the items that will be permanently deleted from your Mac.
To finish the process, click the Delete button in the bottom right corner of the window. Washing Machine will quickly clean the files from your Mac, and show you how much space you’ve saved by doing so. You will also be given options for choosing another wash cycle to continue the cleaning process.
You can see where all this can add up to some pretty impressive disk-space saving, pretty quickly! In one fell swoop, Washing Machine can tidy up your Mac to keep it purring like a kitten, and keep your data right where you can see it so that you can properly protect it.

