How to Get the Most out of Apple’s Safari 9 with El Capitan
Posted on
by
Kirk McElhearn
With every major operating system release, Apple updates its Safari web browser. The release of OS X El Capitan was no exception. While the list of new features in the browser is limited, Safari 9, available with El Capitan, contains some very useful improvements. Here’s a look at all the new features in Safari 9, along with some tips to help you get the most out of Apple’s latest web browser.
Under the Hood
Every new version of Safari is faster than its predecessors, and Apple loves to highlight these improvements. Comparing Safari 9 to Firefox and Chrome, Apple boasts that their browser is faster than both the competitors—both in JavaScript performance and in web application responsiveness. Apple even claims that Safari is 6X faster than both Firefox and Chrome in “JavaScript performance on popular websites.” Of course, your mileage may vary, but it’s true that the latest iteration of Safari does seem snappier.
Apple has also worked on improving Safari’s power consumption, to help your MacBook’s battery last longer. The company claims that Safari 9 offers two extra hours of browsing time compared to Chrome and Firefox, and even four hours more when watching videos on Netflix. (That’s enough for four episodes of House of Cards!)
Pinned Tabs
The most visible new feature in Safari 9 is Pinned Tabs. You’ve probably got a number of websites you visit often: maybe you use Google Docs, or Facebook regularly, you may have a favorite news site you check during the day, or you might want to keep tabs on your company’s website. You can do this with bookmarks or favorites, but pinned tabs are even better.
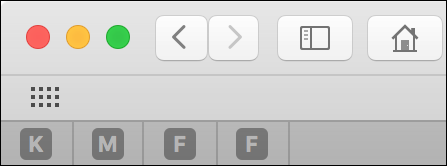
Open any site, right-click on its tab, and choose “Pin Tab.” Upon doing so, Safari will add a small tab with a square icon to the left of your tab bar.
To view a pinned tab, just click it.
This doesn’t sound like a big deal, but it is, for three reasons.
The first is that your pinned tabs take up very little space, so you’ll be able to read more of the names of your other tabs. Since you use these pinned tabs often, you’ll remember which sites they are without needing page titles.
The second reason is that you can get to them with keyboard shortcuts. Using the Command key, together with number keys, you can view your pinned tabs. To view the leftmost pinned tab, press Command-1. To view the next pinned tab, press Command-2. And so on.
Finally, these pinned tabs show up on every Safari window, and they remain in Safari even after you shut down your Mac. So the next time you restart, you’ll have the same tabs ready for you to use.
AirPlay Videos
You’ve been able to use AirPlay to stream your Mac’s entire display on an Apple TV for a while. If you go to the Display pane of System Preferences (Apple menu > System Preferences > Displays), and check “Show mirroring options in the menu bar when available,” your menu bar contains a small AirPlay icon. Click this, and you can choose an Apple TV to mirror your display on a TV set.
Now, in Safari 9, you can AirPlay just selected videos to an Apple TV, instead of everything on your screen. You won’t see this option with all videos, but many types of videos will now display an AirPlay icon in their toolbars. Just click it and choose a device to stream a video.
To stop streaming the video, click the icon and choose “Turn Off AirPlay.”
Silencing Tabs
You may be browsing a few websites, and suddenly hear some sounds coming from your Mac. This means one of the web pages you have open has an auto-play video—the scourge of peaceful web surfing. In the past, you’d frantically have to figure out which tab was playing the sounds, then manually find the video and stop it.
Now, in Safari 9, you see a small sound icon whenever Safari is playing any audio. You see this icon in two places: in the address bar, and on the tab that is playing the audio. You can turn off the audio by simply clicking on either of these icons.
Clicking the icon in the address bar silences all your tabs, whereas clicking an icon on a tab silences only that tab. So if you’re watching a video, for example, in one tab, and another tab starts making noises, you can simply click the latter tab’s icon to shush it, and then continue watching your video in peace.
New Status Bar
Safari has long had a status bar that you could display at the bottom of its window. You turn this on or off from the View menu: “Show Status Bar” or “Hide Status Bar.” Previously, the bar ran across the entire window, but now the status bar is a small pop-up that only displays when there’s something to show. In general, the status bar only shows a URL when you hover over a link. It now looks like this:
Cleaner Reader
Safari has had a Reader feature for a while. You can use this to read a web page without being distracted by ads and animations. To activate reader, load a page, and then click the Reader icon at the left of the Address Bar (if it is visible), or press Command-Shift-R. It only displays when you are viewing a page with a lot of text. If you’re viewing, for example, the home page on this blog, you won’t see the Reader icon.
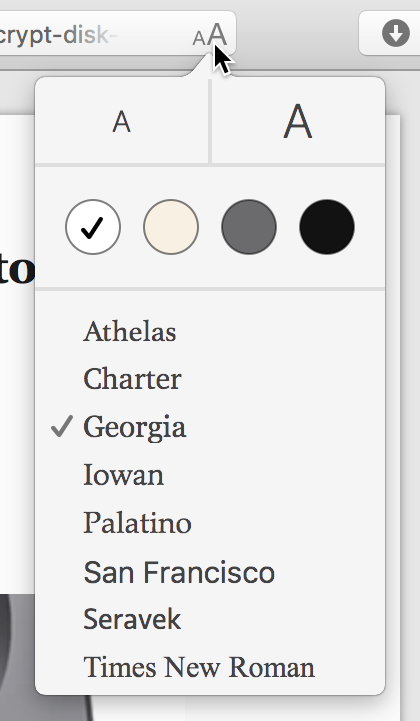
You can also tweak the way Reader displays content. Click the Reader button to see the cleaner display, and then click the ᴀA button to the right of the URL in the Address bar.
The colored circles let you choose a theme: black on white, sepia, and two night themes (one with a gray background, the other with black). You can also choose from a number of fonts, and you can click the ᴀ and A buttons at the top of the popover to change the font size.
If you don’t use Reader to read articles on complex web pages, you should try it out; it gets rid of a lot of cruft, and makes reading much easier.
Sharing Web Pages
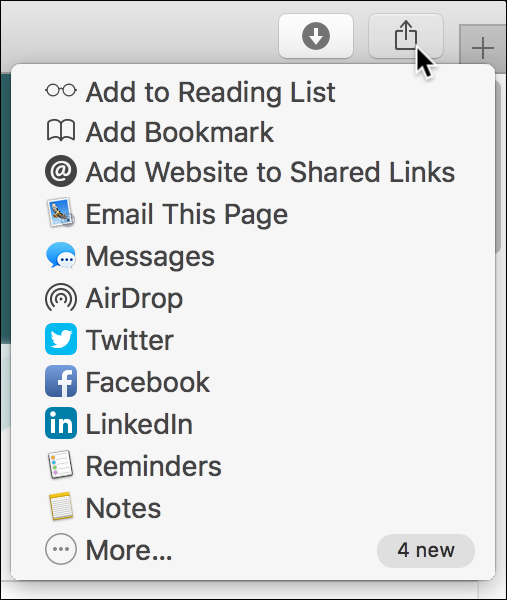
You’ve long been able to share web pages and URLs from Safari by clicking on the Share button in the toolbar; that’s the button that contains a square with an up-pointing arrow. Safari 9 adds some new sharing options that you may find useful. Click the Share button to see the available options.
(Your Share sheet may be different from mine; mine shows two apps, Day One and Fantastical, which you may not have.)
New in Safari 9 is the option to save a web page to Reminders or Notes. When you save a page to Reminders, it gets added to a Reminders list with the page’s name and URL. No date or time is set for the reminder. You can use this as a sort of read later list, if you wish (though you can also use the Add to Reading List option for that).
If you save a page to Notes, you’ll see the page’s name, description, and icon (in some cases), but nothing more.
What’s useful about these features is that you can save items to a shared Reminders list, so others can access the web pages you’ve saved, and that Reminders and Notes sync, via iCloud, to your other Apple devices. Unfortunately, you can only save a URL; if you select text, for example, then use the Share sheet, that selected text is ignored. This sort of defeats the purpose of using this with Notes, which could serve as a repository of web clips together with their URLs.
Developer Tools
Safari has long had a suite of developer tools, which are useful to web designers. To display them, go to Safari > Preferences > Advanced, and check the “Show Develop menu in menu bar” checkbox. The Develop menu has lots of tools that you’ll understand if you’re a web designer, but it’s worth pointing out one new tool.
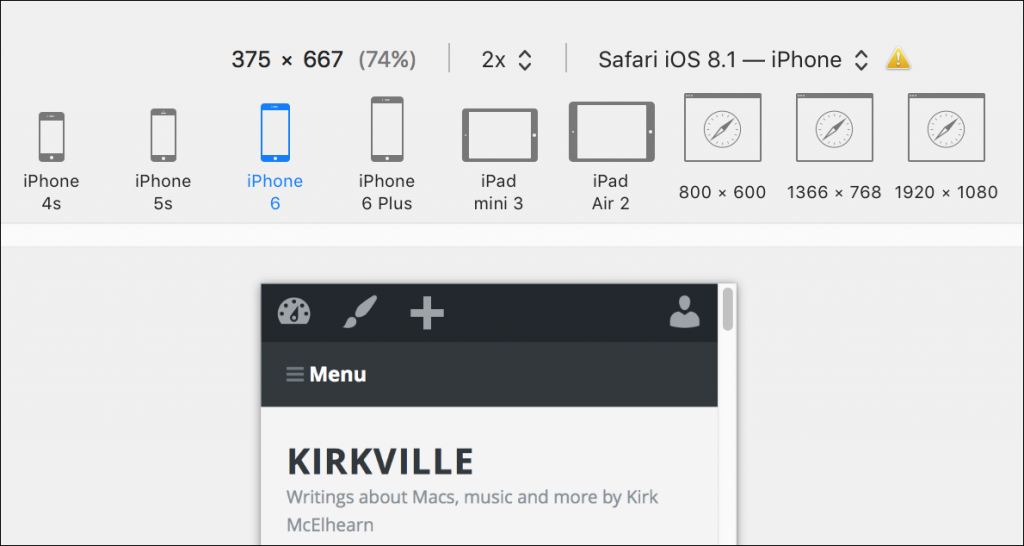
If you view a web page and choose Develop > Enter Responsive Design Mode, Safari displays the page as it would display on a number of different iOS devices, as well as some other standard screen resolutions. Here’s the top of my personal website, as seen on an iPhone 6 (the screenshot is cropped to show just the top and Safari’s buttons).
You’ll note that you can navigate pages in Responsive Design Mode, and menus and buttons work as they would on a mobile device.
Another thing to know about the Develop menu is the “Disable Extensions” menu item. This used to be a checkbox on the Extensions pane of Safari’s preferences. If you use any extensions, you may find that, at times, you need to disable them when pages don’t load correctly. So even if you’re not a developer or web designer, you might want to enable the Develop menu in case you need to use this feature.
The Develop menu is also where you empty Safari’s caches. Choose Develop > Empty Caches, or press Command-Option-E to empty the web cache. This is another troubleshooting tool. Sometimes when pages don’t load correctly, emptying the browser cache fixes things.
New to Mac? Let’s get you started on the right track!
